
A Quick Sewing Project—Texting Gloves
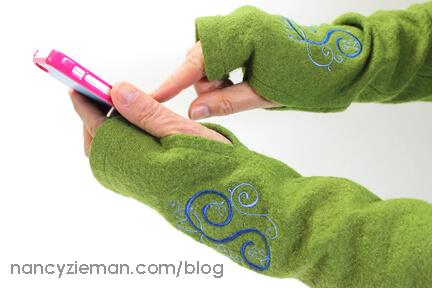 Here’s a quick sewing project—texting gloves. Use fleece scraps to create a comfy pair in an evening of sewing. Or, spend a little more time to embellish the gloves with a monogram for an added personal touch.
Notions, Fabrics, and Supplies
- 1/2 yard high-loft fleece
- Matching all-purpose thread
- Pattern Tracing Paper
- Non-Permanent Marking Pen or Tailor’s Chalk
- 1/2″ wide Fusible Web
Cutting Directions
Prepare the Pattern
- Using Pattern Tracing Paper, trace a 12″ x 14″ rectangle with the grain running the 14″ length.
- Measure in 1″ from each edge along one 12″ side.
- Draw a line from the point to the other 12″ side, tapering the pattern.
- Mark a 1″ seam allowance along the 14″ edges.
- Mark a thumb opening 2″ and 4-1/2″ from the narrower end of the glove.
There are two schools of thought on monogramming gloves or in this case, texting gloves: The monogram can either face outward or inward. I chose the outward option.
You are viewing: How To Make Fleece Texting Gloves
How to Monogram on Fleece
- Attach embroidery unit.
- Determine the embroidery design and transfer the design to your sewing machine.
Note from Nancy I used a font found in Personalize ‘N Stitch 2:0 and scrolls from the Delightful Daisies Collection.
- Place a marking or embroidery-positioning sticker 4-5/8” from the top and 3-1/2” from the right side. On the opposite glove, use the same measurements, marking from the left side.
- Position a Sticky-Back Tear-Away Stabilizer in the hoop.
- Perforate the stabilizer inside the hoop with a tip of a pin. Tear away the paper covering.
- Place fabric on the stabilizer, centering the marking or placing the stickered area in the middle of the hoop.
- Move the needle to begin stitching over the mark or sticker. Remove the sticker.
- Place a Wash Away Avalon Film Stabilizer over the fabric.
- Embroider the design.
- Tear away the excess wash-away stabilizer and gently tear the fabric away from the sticky-back stabilizer. If any residue of the wash-away stabilizer remains, spritz the fabric with water and the stabilizer will vanish.
Construct the Gloves
Read more : How To Install Glove Box Light Lbz
This series of steps features photography for the left-hand glove.
- Clip to seam allowance at marked thumb openings.
- Fuse a 2-1/2″ strip of Fusible Web at the ends of the clips as pictured.
- Remove the paper covering from the strip. Turn under the seam allowances and press.
- Stitch the seam allowances in place.
- Press a 5/8″ hem at the top and bottom edge of the glove.
- Meet the long edges, right sides together.
- Stitch 1″ seam with a basting stitch, using caution to not stitch the thumb area.
- Try on the gloves and adjust the seam width, if necessary, to fit your hand/wrist.
- Restitch the long seam, reinforcing the thumb area before and after the opening.
- Fold the 5/8″ hem along the marked crease, topstitch.
- Turn gloves right side out.

More Knit Project Ideas
For more information on the Texting Gloves pattern and other knit sewing project ideas, check out my book, Sew Knits with Confidence.
Watch Sewing With Nancy online
Read more : How Do Golf Rain Gloves Work
Enjoy watching my two-part series, Sew Knits with Confidence, featuring basic to creative knit sewing techniques. Click to watch Part One and Part Two.
Bye for now,
Nancy Zieman—author, pattern designer, businesswoman, producer, and national sewing authority—is the host of the popular show Sewing With Nancy®, which appears exclusively on public television stations across the United States and Canada. Follow Nancy’s blog at NancyZieman.com/blog and sign up to receive Nancy’s E-News for the latest news in Sewing, Quilting, Creating, and Block of the Month updates.
Content in this feed is © copyright 2015 by Nancy Zieman and may not be republished without written permission. You’re welcome to forward the email to a friend or colleague but it’s not okay to add the RSS feed automatically as content on a blog or other website.
Source: https://t-tees.com
Category: HOW