
Sighting in a rifle is the first step in making sure your point of impact matches your point of aim. Properly sighted rifle optics achieve consistent and accurate shots. This is of even greater importance when distances vary and increase. In this article, we will discuss the process of how to sight in a rifle scope at 25 yards, focusing on each necessary step and the importance of understanding the basic components of the scope. We will also discuss why someone may wish to have a 25 yard zero on their rifle.
Understanding the Basics of Rifle Scopes
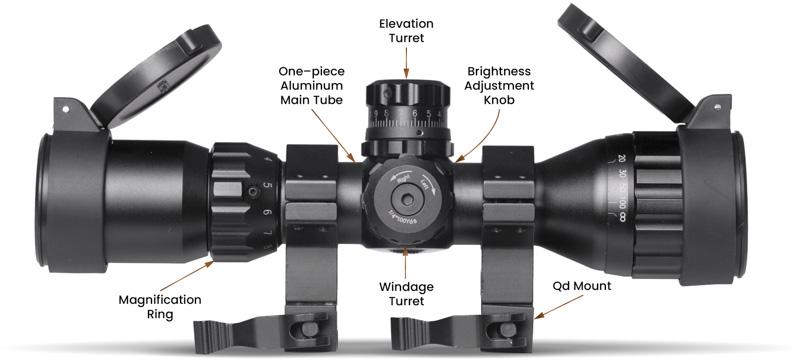
Before proceeding to sight in the rifle let’s get familiar with the core components of a rifle scope and their functions. This knowledge aids in more precise adjustments and a greater understanding of the scope as a whole.
You are viewing: What Does 25 Yards Look Like
- Objective Lens: Positioned at the opposite end of the shooter’s eye, the objective lens gathers light and transmits it to the ocular lens. Its diameter (usually mentioned in millimeters) limits the amount of light entering the scope. A larger diameter means a clearer and brighter image.
- Eyepiece: This is the section of the scope closest to the shooter’s eye. It contains the ocular lens, which magnifies the image formed by the objective lens.
- Magnification Adjustment: Most modern scopes offer variable magnification, allowing shooters to zoom in or out on their target. This adjustment usually takes the form of a rotating ring on the scope, marked with various magnification levels.
- Windage/Elevation Turrets: These are typically situated on the top (elevation) and side (windage) of the scope. They allow the shooter to make adjustments for bullet drop and wind drift, moving the point of impact up/down and left/right, respectively. Each “click” on these turrets represents a specific shift, commonly 1/4 inch or 1 inch at 100 yards for many scopes.
- Reticles: Often referred to as “crosshairs,” reticles are the aiming point you see when looking through the scope. They can vary in design, from simple intersecting lines to more complex Mil-dot systems. The reticle aids in aiming and can also provide additional points of reference for shooting over different distances.
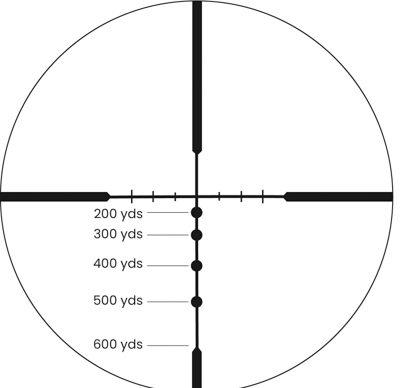
A Deeper Dive into Reticles
Reticles are commonly referred to as crosshairs and come in a myriad of styles and configurations to cater to different shooting needs and preferences. While their primary function remains to provide an aiming point, the design intricacies serve varied purposes:
- Simple Red Dots: These are minimalistic reticles often found in red dot sights. As the name suggests, it’s typically just a red dot that acts as an aiming point. Such reticles offer quick target acquisition, making them ideal for close-quarters shooting.
- Dot and Circle Red Dots: This type of reticle combines a central aiming dot with a larger circle around it. The design aids rapid target acquisition in close combat scenarios and also allows for more precise aiming at slightly extended distances using the central dot.
- Bullet Drop Compensator (BDC) Reticles: BDC reticles have markings or dots below the central aiming point to compensate for bullet drop over longer distances. Each marking corresponds to a specific range, letting the shooter adjust their aim based on the target’s distance without having to adjust the scope’s settings.
- ACSS Reticles (Advanced Combined Sighting System): ACSS reticles are a comprehensive solution, offering features for bullet drop compensation, wind holds, moving target leads, and range estimation. They combine several elements to help shooters quickly and accurately make shots in.
Step 1: Choosing the Right Ammunition
A rifle’s accuracy doesn’t solely depend on the scope. The type of ammunition used plays a huge role in ensuring precise shots, especially when sighting in a scope.
Ammo Selection Considerations & Tips
- Bullet Weight: Bullets of different weights, even within the same caliber, have varying trajectories. A heavier bullet might (But not always) drop more quickly than a lighter one, affecting the point of impact but decreasing the effects of wind.
- Caliber: The caliber of a bullet refers to its diameter, and different calibers have distinct ballistic characteristics. A .308 round behaves differently than a .223.
- Bullet Type: Hollow-point, full metal jacket, soft point, and ballistic tip are just a few examples of bullet types. Each has a unique flight path and behavior upon impact.
- Velocity: Ammunition with a higher muzzle velocity typically has a flatter trajectory over short to medium distances compared to slower rounds.
- Brand & Batch Consistency: Even within the same bullet type and weight, different brands might have slight variations in performance. Additionally, it’s a good practice to use ammunition from the same manufacturing batch when sighting in, as there can be minor inconsistencies between batches.
- The ballistic coefficient (BC): of a bullet is a measure of its aerodynamic efficiency in flight. The higher the BC, the better the bullet can overcome air resistance during flight and maintain its velocity. Several factors contribute to a bullet having a high ballistic coefficient. The ballistic coefficient is a common measurement in external ballistics, which describes the bullet’s behavior during flight.
- Shape: The most critical factor is the bullet’s shape. Bullets with a more streamlined profile—those that are elongated and have a pointed (or “boat-tailed”) rear—have a higher BC. Boat-tailed bullets create a smaller turbulent wake as they fly, reducing drag.
When sighting in a rifle scope, using the ammunition type and brand you intend to use most frequently ensures that the rifle is accurately dialed in for that specific ammo’s characteristics. There will generally be the greatest deviation in point of impact from changing grain weight.
Step 2: Selecting a Suitable 25-Yard Range
Many shooters consider sighting a rifle scope at 25 yards an ideal distance for several reasons. First, it’s a short enough distance that even if your scope is way off, you’re still likely to hit the target paper. Secondly, sighting in at 25 yards can provide a solid baseline before making more nuanced adjustments at longer distances. Furthermore, for some firearm and ammunition combinations, a 25-yard zero can be closely aligned with a longer-distance zero due to the trajectory of the bullet. For example, a 14.5 inch barrel firing a 62gr 5.56 projectile will hit in the same spot at 300 yards that it will at 25. Keep in mind the grain weight and barrel length are factors here.
Step 3: Safety First
Read more : What Time Is 15 46
Make sure to choose a safe shooting area with a reliable backstop. Know what is behind your backstop and what will happen to the bullet after it goes past your target. Make sure to minimize the possibility of ricochets. Always wear ear and eye protection, and make sure you have adequate eye relief to avoid the scope causing injury during recoil.
Range Considerations & Tips
A stable shooting position will make this much easier. Utilize tools like sandbags or shooting rests to stabilize your rifle and reduce human error. These aids help you and your rifle remain still during the shot, leading to more consistent results.
Step 4: Initial Bore Sighting
Bore sighting is a step you may consider to make sure your rifle and scope are aligned for accurate shooting. This process aligns the rifle’s barrel with the scope’s reticle, setting the stage for precise adjustments. Before your shots can consistently hit the bullseye, your rifle and scope need to be in sync. This critical step is the bedrock upon which accurate shooting is built.
Bore Sighting Considerations & Tips
- Visual Alignment: Begin by securing your rifle in a stable rest, ensuring it won’t move during the process. Without looking through the scope, visually align the rifle’s bore with a specific target or object at a known distance. This initial alignment should be rough but close, making it easier to make precise adjustments later.
- Using a Bore Sighting Tool: Alternatively, consider employing a bore sighting tool. These devices are inserted into the chamber or the end of the barrel and project a dot or laser onto a target. Adjust your scope’s windage and elevation settings until the reticle aligns with the projected dot. While bore sighting tools such as a universal laser bore sight may require an initial investment, they offer a more accurate and efficient method.
- Fine-tune for Rough Alignment: The goal of bore sighting is not perfect alignment but to get as close as possible to the target. The rifle and scope should be roughly aligned, reducing the amount of adjustment needed during live fire. This preliminary step significantly simplifies the zeroing process.
Regardless of the method, bore sighting gets you on the paper and saves ammunition, but you’ll need to refine your zero through live-fire adjustments at the range.
Step 5: Windage and Elevation Adjustments
The key to achieving accuracy with your rifle lies in mastering the art of increment rifle scope adjustments using the windage and elevation adjustments. Windage and elevation adjustments are critical for achieving accurate shots. These adjustments allow you to fine-tune your scope’s point of impact to match your point of aim. Understanding how windage and elevation work can significantly improve your shooting precision.
- Windage Adjustment: Windage refers to the left or right movement of your bullet’s impact point. To make windage adjustments, locate the windage turret, often located on the right side of the scope. To move your point of impact to the right, turn the turret clockwise (clockwise adjustments push the point of impact right). To move left, turn the turret counterclockwise.
- Elevation Adjustment: Elevation pertains to the vertical movement of your bullet’s impact point. The elevation turret is typically located on the top of the scope. Similar to windage, it also has a click value. To raise the point of impact, turn the turret counterclockwise. To lower it, turn the turret clockwise.
Adjustment Considerations & Tips
When making windage and elevation adjustments, it’s essential to be precise. Most scopes have turrets specifically designed for these adjustments. Here’s how to use them effectively:
- Understand Click Values: Each ‘click’ on the turret corresponds to a specific movement in the bullet’s point of impact, often measured in minutes of angle (MOA) or milliradians (MRAD). For example, a common value is 1/4 MOA per click, meaning each click moves the point of impact 1/4 inch at 100 yards. Therefore, at 25 yards, four clicks would adjust the impact by approximately 1/16th of an inch.
- Making Adjustments: Begin by firing a group of shots to see where they land in relation to your aiming point. Adjust the turrets as necessary:
- Turn the windage turret left to move the impact left and right for rightward movement.
- Adjust the elevation turret upwards to raise the impact and downwards to lower it.
- Keep Track of Adjustments: It’s a good idea to remember how many clicks you’ve adjusted so you can return to a baseline or make further modifications.
Step 6: Fine-Tuning and Confirming Accuracy
Once the basic adjustments are done, it’s time to confirm accuracy. This step involves firing a series of shots, often in groups of three or five, to ensure consistency in where bullets land. This step ensures that your rifle is dialed in for precise and consistent performance.
Fine Tuning Considerations & Tips
Read more : What Are Plies
Consistency is required when confirming accuracy. Confirming the accuracy of your adjustments ensures that your rifle is zeroed in and ready for precise shooting under various conditions.
- Consistent Shooting Technique: To achieve reliable results, maintain a consistent shooting technique for each shot in your series. Ensure that your cheek weld, eye relief, and trigger pull remain uniform. Inconsistent shooting can lead to erratic results, making it challenging to assess your scope’s adjustments accurately.
- Steady Shooting Position: A stable shooting position is essential for precise shots. Whether you’re shooting prone, from a bench, or another position, minimize body movement and muscle tension. This steadiness helps eliminate shooter-induced errors.
- Barrel Cooling: As you fire multiple shots in quick succession, your barrel can heat up, affecting accuracy. Allow the barrel to cool between shots, especially if you’re conducting a prolonged shooting session. A hot barrel can cause shots to stray from the point of impact.
- Examine Grouping: After firing a series of shots, examine the shot group’s center, which should align with your point of aim. If the group is consistently off-center in any direction, further adjustments are needed.
- Record Data: Keep a log of your shots, noting the adjustments made, shot grouping results, and any environmental conditions like wind or temperature. This data will help you make future adjustments and track your rifle’s performance.
Step 7: Adjusting for Grouping and Finalizing
Analyzing your shot groups is crucial to determine the effectiveness of your adjustments. Ideally, your bullets should land in tight groupings close to your aiming point.
Grouping Considerations & Tips
- Evaluate Groupings: A tight group shows consistency, but if it’s away from the aim point, further scope adjustments are necessary. A scattered group could indicate shooter errors or inconsistency.
- Identify Shooting Errors: Factors like flinching, inconsistent breathing, or unstable shooting positions can affect groupings. Recognize these errors and work to correct them.
- Final Adjustments: If your grouping is consistent but off the mark, make final turret adjustments to bring shots onto your aiming point. After adjustments, fire another group to verify the accuracy of the ammunition you plan to use with the weapon.
Final Thoughts
Properly sighting in a rifle scope at 25 yards gives the shooter a chance to make sure they are on paper and with certain configurations, will tell the shooter where they will hit at further distances.
Every step, from understanding the basics of rifle scopes to making the finest windage and elevation adjustments, plays a role in shooting accuracy and your understanding as a shooter. The process requires patience, practice, and a keen eye for detail.
As with all things, practice makes perfect, and the more time spent on the range adjusting and refining, the more intuitive it becomes. Above all, it’s a good idea to understand your shooting objectives, whether it be hunting, tactical, or long-range target shooting, and select a scope that aligns with those needs.
Learning this process isn’t just for yourself, a big part of the reason we are so detailed in our explanation is because someone taught me. I want to pass along what I learned so that someday you can pass this along to someone else.
The opinions expressed in this post are those of the author and do not necessarily reflect the views and opinions of Tacticon Armament.
Source: https://t-tees.com
Category: WHAT