
Bread flattening or collapsing is quite a common problem. Even for experienced bakers, it happens from time to time.
There are 3 main reasons for your bread to collapse.
You are viewing: Why Did My Bread Fall
- Underdeveloped gluten mesh
- Over proofing
- Mishandling the dough
To know the reason as to why this happens you need first to know when this happens. This flattening can happen in various stages of your bread-making process.
- While proofing
- while transferring the bread from prooving and into the oven, transferring the bread from your prooving basket onto your baking surface, peel or Dutch Oven.
- While slashing
- After the bake.
Let’s take a closer look at these 3 main reasons in more detail and see if we can resolve your flattening bread issues.
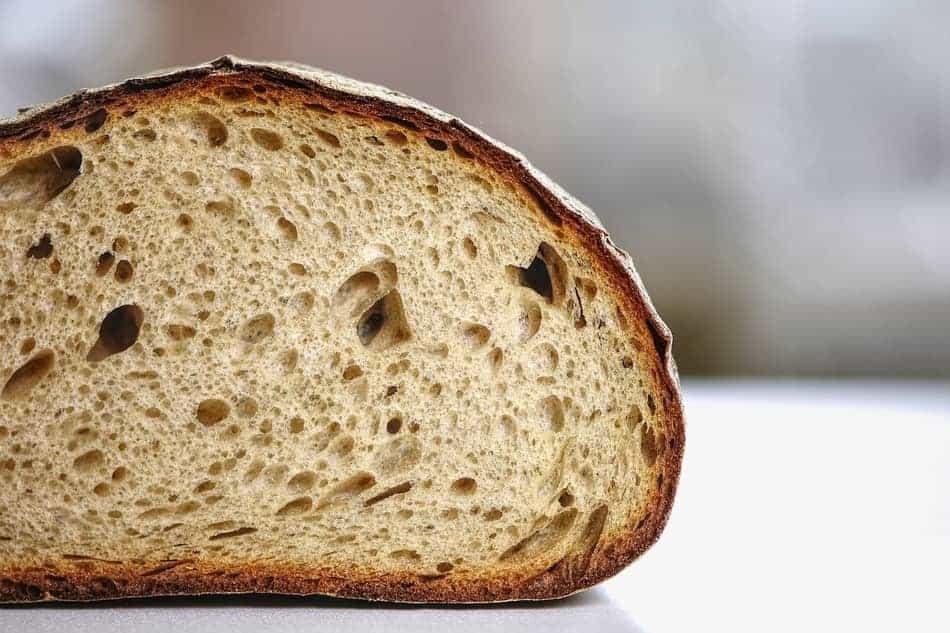
Underdeveloped gluten mesh
When yeast is active in your dough it eats away at starches and sugars and releases gasses. These gasses are then trapped inside your dough by the gluten mesh that has been created. If your gluten mesh is not fully developed it will not be able to supposer those gasses and thus resulting in a flat or collapsed bread.
A strong gluten mesh is crucial. Underdeveloped gluten mesh can be a result of a few things.
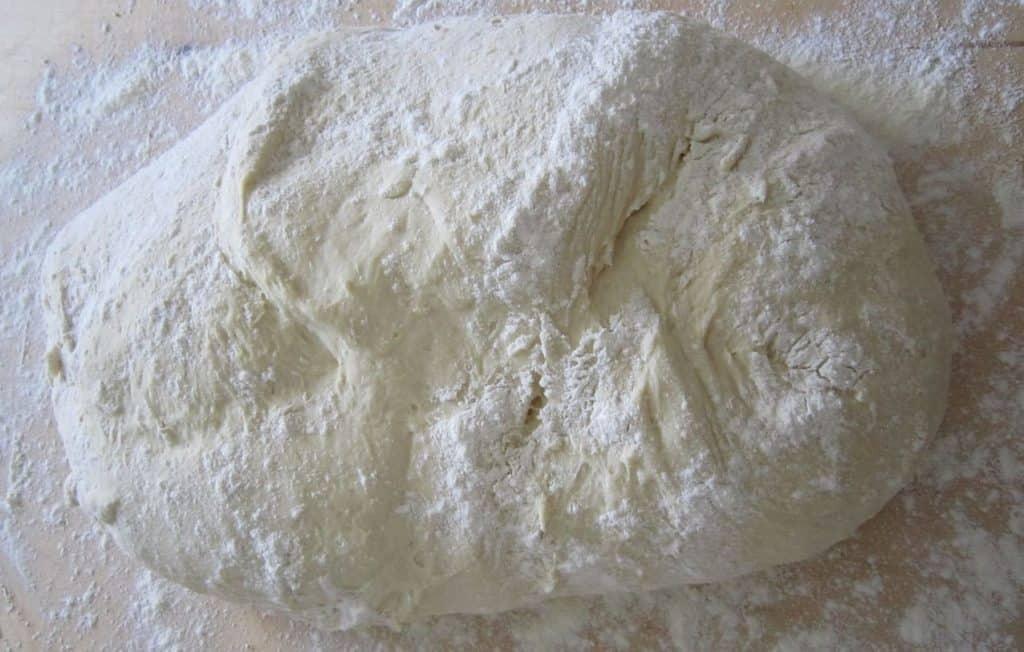
Reason 1: Not kneading your dough long enough
When kneading dough you are actually creating that gluten mesh. If that mesh was not developed enough your dough will rise but will quickly collapse as soon as you handle the dough after proofing. The mesh will just not be strong enough to hold the gasses in it. This is very common in “no-knead recipes” that have become quite popular in recent years.
You will also notice your dough collapsing or flattening during the baking stage or when you go to slash your bread. Because the gluten mesh is not spread evenly you will have big pockets of air and when you slash your bread all those gases will escape. Same goes for the baking stage. If your mesh is not even or not fully developed your dough will not be able to hold on to those gasses and your bread will flatten out as well.
Solution:
There is a very easy test you can proform that will tell you if your gluten mesh is developed enough or not. It is commonly known as the windowpane test.
Take a piece of dough and stretch it out between your fingers. If you can successfully get a nice thin piece of dough that you can see light shine through it and it does not break you then know you have a good strong gluten mesh. If your dough breaks apart during this test keep on kneading until you get the desired results.
Reason 2: Your flour selection
Flour selection is very important. Gluten is part of the protein in your flour grain. So if the flour you are using is low in protein chances are you will have a weak gluten mesh in your final product. Check your flours nutrition values. For the common bread flour, the protein level should be 11%. Strong flour has about 14% protein content.
Read more : Why Are Range Rovers So Expensive
When making a bread that uses a blend of flours you should always take into consideration the protein content. Rye flours are quite low in protein, about 8%.
If you are making a whole wheat bread you will notice that it has about the same protein content as regular bread flour. The fact that whole wheat bread has the added bran and fibers to it will require higher hydration thus lowering the amount of gluten in the final product as well.
Solution:
If using whole wheat or rye flours or any other flours that have a lower protein content in them, try to blend the flours with a strong flour. This will help to balance out the protein content and will help with the development of a good strong gluten mesh.
So if making a whole wheat bread try using 30% whole wheat and 70% bread flour. If you want a higher whole wheat flour content then replace the percentage of the white flour with Strong flour.
For example, 50% whole wheat flour, 20% stong flour and 30% bread flour.
Over-proofed
You might notice that the collapse happens during the slashing stage or when transferring the dough from your proofing basket onto your peel or dutch oven. This is quite common for doughs that are over-proofed.
The proof or proof of your dought is the final stage before baking. This is when your dough is most susceptible to flatting. Overproofing your dough will result in a flatting or collapsing of the dough. The reason for this is that the yeast in your bread has exhausted itself and does not have any more energy after you put it in the oven. Also, your bread dough has expanded too much and when you put it in the oven your dough cannot rise anymore because the yeast cannot produce any more gasses and it then collapses.
it is common to have an over-proofed bread when making sourdough bread. Because the process is long and most sourdough bread recipes call to proof your bread in the fridge overnight it usually leads to over proving.
Solution:
I wish I can give you an exact time for how long to proof your bread but there are simply just too many variables and everyone’s environment is different. Your fridge temperature might be different as well and your flour composition will vary. Luckily there is a very simple test you can use to see if your dough is ready for baking or not.
Make sure to test out your dough throughout the proving stage. There is a simple poke test that can be done. Gently poke your dough with your finger. Just a slight poke not too deep. If the indentation slowly comes back up your bread is just right. If the indentation you make pops right back up, your bread is not proofed enough. lastly, you guessed it, if the indentation you created does not pop back at all your dough is over-proofed.
Mishandling your dough
Many times you will notice that your bread dough will flatten when you transfer it from one place to another. This is especially true with high hydration doughs like focaccia or ciabatta doughs. This dough has a very high hydration content and their gluten mesh is very fragile. If you are too rough with this dough or bang it on a counter it will lose all the gasses trapped inside and will result in a collapse.
Solution:
you must baby these doughs and handle them with extra care. If you are lifting these doughs from their proofing stage and into your peel or pan you must do so very carefully. Instead of lifting try to get a wide scraper underneath them. If you are proofing these on a cloth gently lift the cloth up from it side turning the dough onto a wide scraper or a piece of cardboard with some cloth on it as well. Do not attempt to pick up these doughs with your hands as you will not be able to support the full size of the loaf.
Bread collapsing or flattening after the bake?
Read more : Why Is Density An Intensive Property
While this is not common in bread but mostly in cakes, there are some occasions where this can happen.
Most commonly I see that people ask about the bread flatting and when I look at what kind of bread they make it mostly always points to bread that resembles cake batters. This can also happen in high hydration doughs as well.
I categorize bread by the leavening agents. If your bread uses baking powder or/and baking soda than I would consider that more of a batter almost cake-like ( without eggs or sugar).
If you are using yeast or sourdough starter then I would consider this a bread.
For “Batter Dough” the most common mistake is overmixing. This overmixing will usually cause a collapse in the middle of your loaf.
The leavening agents used ( baking soda, baking powder or a mixture of both ) need a liquid in order to release their gasses.
If you create a strong gluten mesh, in this case, it will only hinder the development of these gasses. Mix your ingredients until they combine rather than trying to make your batter smooth.
If we are talking about Yeast dough bread then your most likely issue is that you underbaked your bread. Do not be afraid to give your bread a longer bake with a dark crust. Bread can handle very high heat and will not burn easily as they have a lot of water in them. The final internal temperature of a loaf of bread should be at least 190-210 degrees Celsius or 375-410 Fahrenheit. For doughs that have a fat and egg content to them the internal temperature will be a bit higher about 200 – 220 Celcius or 390-430 Fahrenheit.
Bread collapsing while transferring to the oven
As mentioned earlier many times your bread can collapse during this stage due to over proofing your bread ( especially sourdough bread ) or mishandling it ( being too rough with a high hydration dough )
In sourdough bread, this can also happen if your sourdough starter was not ready for use or past its peak. It might be that your sourdough starter was too “young” ( meaning it did not reach its full potential and will end up being a weak starter) or your sourdough starter was too “old” ( you will notice that you sourdough starter has collapsed, this happens when you leave your sourdough starter out too long and have not fed it).
Solution:
In order to know that your sourdough starter is ready for use, you should use the float test. Take a spoonful of sourdough starter and drop it into a glass of water. If it floats it is ready. Make sure to test out your sourdough started at least a couple of hours after you have fed it. ( usually takes between 2-4 hours for a sourdough started to reach its peak ).
If you want to learn more about sourdough starter and how to make it yourself, click here for our a step by step guide. We worked super hard on it so you can have great results!
Source: https://t-tees.com
Category: WHY