One of my workmates asked me to make her son a boxing glove cake for his 18th birthday. I’ve not done anything like it before so thought it would be a fun new endeavour. I hoped I would have time to put a fancy tutorial together with some pretty dSLR photos, but in reality I was making the cake in the dead of night between uni assignments and work, so a quick iPhone tutorial will have to suffice.
Some general points before we start:
You are viewing: How To Carve A Boxing Glove Cake
- I used Sugarflair gel colours for the cake and the icing and I swear by them.
- For the cake, I used this recipe, which I also swear by.
- I cheated and used ready-made buttercream because I was super pushed for time.
Step 1: Bake
[zephyr_columns][zephyr_column col=”2″][/zephyr_column][zephyr_column col=”2″]For two gloves, you’ll need to bake two cakes in bowls and one large square/rectangle cake. I made them red so the inside will match the outside. [/zephyr_column][/zephyr_columns]
Step 2: Assemble/carve
Read more : How Many Gold Gloves Does Paul Goldschmidt Have
[zephyr_columns][zephyr_column col=”2″] [/zephyr_column][zephyr_column col=”2″]When your cakes are cool, trim the bowl cakes so the top of the bowl is completely flat. At this stage you should draw a template of a boxing glove on an A4 piece of paper, cut it out and use it as a guide. You then need to stick each bowl cake on top of a rectangle using a little buttercream. Carve a line on the inside of each glove cake where the thumb will be. My next photo shows the shape you want. [/zephyr_column][/zephyr_columns]
Step 3: Crumb coat
[zephyr_columns][zephyr_column col=”2″]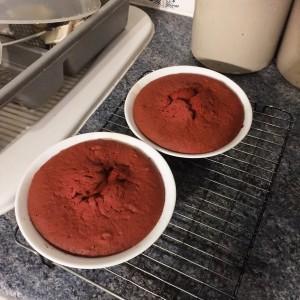 [/zephyr_column][zephyr_column col=”2″]When you’re happy with the shape, cover your cake in a crumb coat. This is just a fancy way of saying add a layer of buttercream and don’t worry if it gets messy. Once your first crumb coat is dry (a couple of hours at room temperature), add a second layer. You can alter the shape by adding some extra buttercream. For example, I padded out the area where the bowl cake joined the rectangle cake. Try to get the second coat as smooth as you can, and leave it to try for a few hours. [/zephyr_column][/zephyr_columns]
Step 4: Fondant
[zephyr_columns][zephyr_column col=”2″][/zephyr_column][zephyr_column col=”2″]When your crumb coat is dry you can cover the cake with fondant. Colour your fondant nice and red, roll it out on a flat surface, and cover! The cake on the stand in this photo has had the fondant applied. Once it’s applied, carve out some creases around the thumb area using a small knife. Also add a little rectangle of fondant at the bottom of the glove to form the strap. I ran over my fondant with wheel embosser where the gloves have stitching lines. This just makes it a bit more realistic! [/zephyr_column][/zephyr_columns]
Step 5: Shine
Read more : How To Make Post Apocalypse Gloves
[zephyr_columns][zephyr_column col=”2″][/zephyr_column][zephyr_column col=”2″]Did you know you can make your fondant shiny with a layer of vodka? I mixed vodka, a little red food colouring, confectioners glaze and a drop of water. Though brushing with vodka will do the trick. Don’t worry, you can’t taste it. [/zephyr_column][/zephyr_columns]
Step 6: Details
[zephyr_columns][zephyr_column col=”2″] [/zephyr_column][zephyr_column col=”2″]After I made the cake shiny I started painting on some shadows. I used a tiny drop of food colouring and a tiny drop of water. First I used a mix of red and black to paint around the curves of the glove, then I filled in the creases with black to make them stand out. I also added a little Lonsdale logo on the strap. For this I rolled out some white fondant, drew the outline using edible pen, and then coloured the logo with black gel colour and a tiny paintbrush. I expect eating this bit will make your teeth black for a short while! [/zephyr_column][/zephyr_columns]
Step 7: Assemble your boxing glove cake!
Now for the fun part! Stick the cakes to a board using a mixture of fondant and water, or just leftover buttercream to make sure they don’t move around. Add any finishing touches now. I decided to add a little marzipan medal that I painted with edible gold dust. I also piped on a message to make the cake more personal. Unfortunately I’d lost my small nozzle so had to fashion one from a pen nib. As you can see the result was a little untidy, but I feel like the personal touch is important!
There you have it – a completed boxing glove cake!
Source: https://t-tees.com
Category: HOW