

If you are looking for the perfect baby gift, then these practical easy-on, no scratch baby mittens should be on your list!
These tiny baby infant mittens are based on my unique easy-on crochet mittens patterns. This means you can easily open the cuff to slide hands and fingers inside.
You are viewing: How To Crochet Gloves For Baby
To make these mittens even more appropriate for our little babies, there are no button closures to worry about and there is no elastic to cut off the circulation and leave red marks on our baby’s wrists.
These little mitts are adjustable and secured using the extra length of the cuff and a simple chain row closure at the wrists.
You simply slide the extra length of the cuff under the closure chains (both) and pull slightly to tighten.
If you have a lot of extra cuff once you have done this simply fold it and tuck it under the first closure chain to secure it and keep it from flopping about.
No more worrying about their sharp little nails!
I hope you love these little easy-on, no scratch baby mittens and baby loves them too.
I recently crocheted these 3 pairs of little baby mittens for Nadia’s Baby Shower. If you would like to see all the other great crochet projects our crochet group sent her and get some great free patterns to make for your next baby shower invite, visit this post which includes links to them all. I’m sure you will find the perfect baby shower gift in this collection.
Rhondda
xo
If you are looking for a good pair of baby mittens for chilly winter days, you may want to try this easy crochet pattern. My warm baby mitts free baby mittens crochet pattern includes sizes 0-3 months, 3-6 months and 6-months to 18-months mittens crocheted in Medium Worsted Weight Yarn (Aran). They are the perfect accessory and include instructions for the crocheted mitten string so that the mitts can be threaded through the arms of a coat. This way they can be there when you need them and you won’t need to go searching for a missing mitten.
The Easy-On, No Scratch Baby Mitten Crochet Pattern
Add your project to Ravelry here
Supplies
- Yarn: Red Heart Baby Hugs Light 4.5 oz (127 g) and 318 yds (290 m). 100% Acrylic. Light Weight Yarn [3]. Machine washable warm, gentle cycle, tumble dry low.
- Colors: 1 skein in your choice of color. I used: Small (Bluie E403_3825 ), Medium (Shell E403_3303) and Large (Blueberry – E403_3801).
- Crochet Hook: 3.5 mm (E) for Small, 3.75 mm (F) for Medium and 4 mm (G) for large. I used these hooks and my 4 mm (G).
- Finished Project Yardage: approximately 20 g / 51 yds, 27 g /68 m and 35 g / 88 yds
- Scissors, Yarn Needle, Stitch Marker
Difficulty Level
Easy
Crochet Baby Mittens Finished Sizes
- Small (Preemie approximately 3 to 7 pounds) Mitten height (including cuff) approximately 4.25 inches X 2.25 inches width
- Medium (Newborn approximately 7 pounds) Mitten height (including cuff) approximately 5 inches X 2.75 inches width
- Large (Newborn more than 7 pounds) Mitten height (including cuff) approximately 5.25 inches X 2.875 inches width
Free Hand Size Chart for Mittens and Gloves
Gauge
Small Mitten approximately 3.6 rounds per inch and 4.8 sts per inch
Medium Mitten approximately 3 rounds per inch and 4 sts per inch
Large Mitten approximately 2.8 rounds per inch and 3.8 sts per inch
You can substitute any yarn and hook for this stitch pattern – just remember when you substitute if your gauge is different, the finished size, and amount of yarn used for your project will also be different.
Abbreviations
US Terminology used
beg – beginning
bl – back loop
Read more : How To Make Fire Gloves
ch – chain
hdc – half double crochet
hdc2tog – half double crochet 2 together
R – round
rem – remaining
rep – repeat
sc – single crochet
sl st – slip stitch
st/sts – stitch/stitches
* to **- Repeat the instructions between the asterisks the number of times indicated. This repeat will contain of multiple instructions.
[] – at the end of the row – the total number of stitches
() – important notes AND sets of stitches to be worked within one stitch, or space
Helpful Tutorials
Stitch Anatomy
Invisible Join
Helpful Video Tutorials
Quick Stitch Guide
Slip Knot and Starting Chain
Notes:
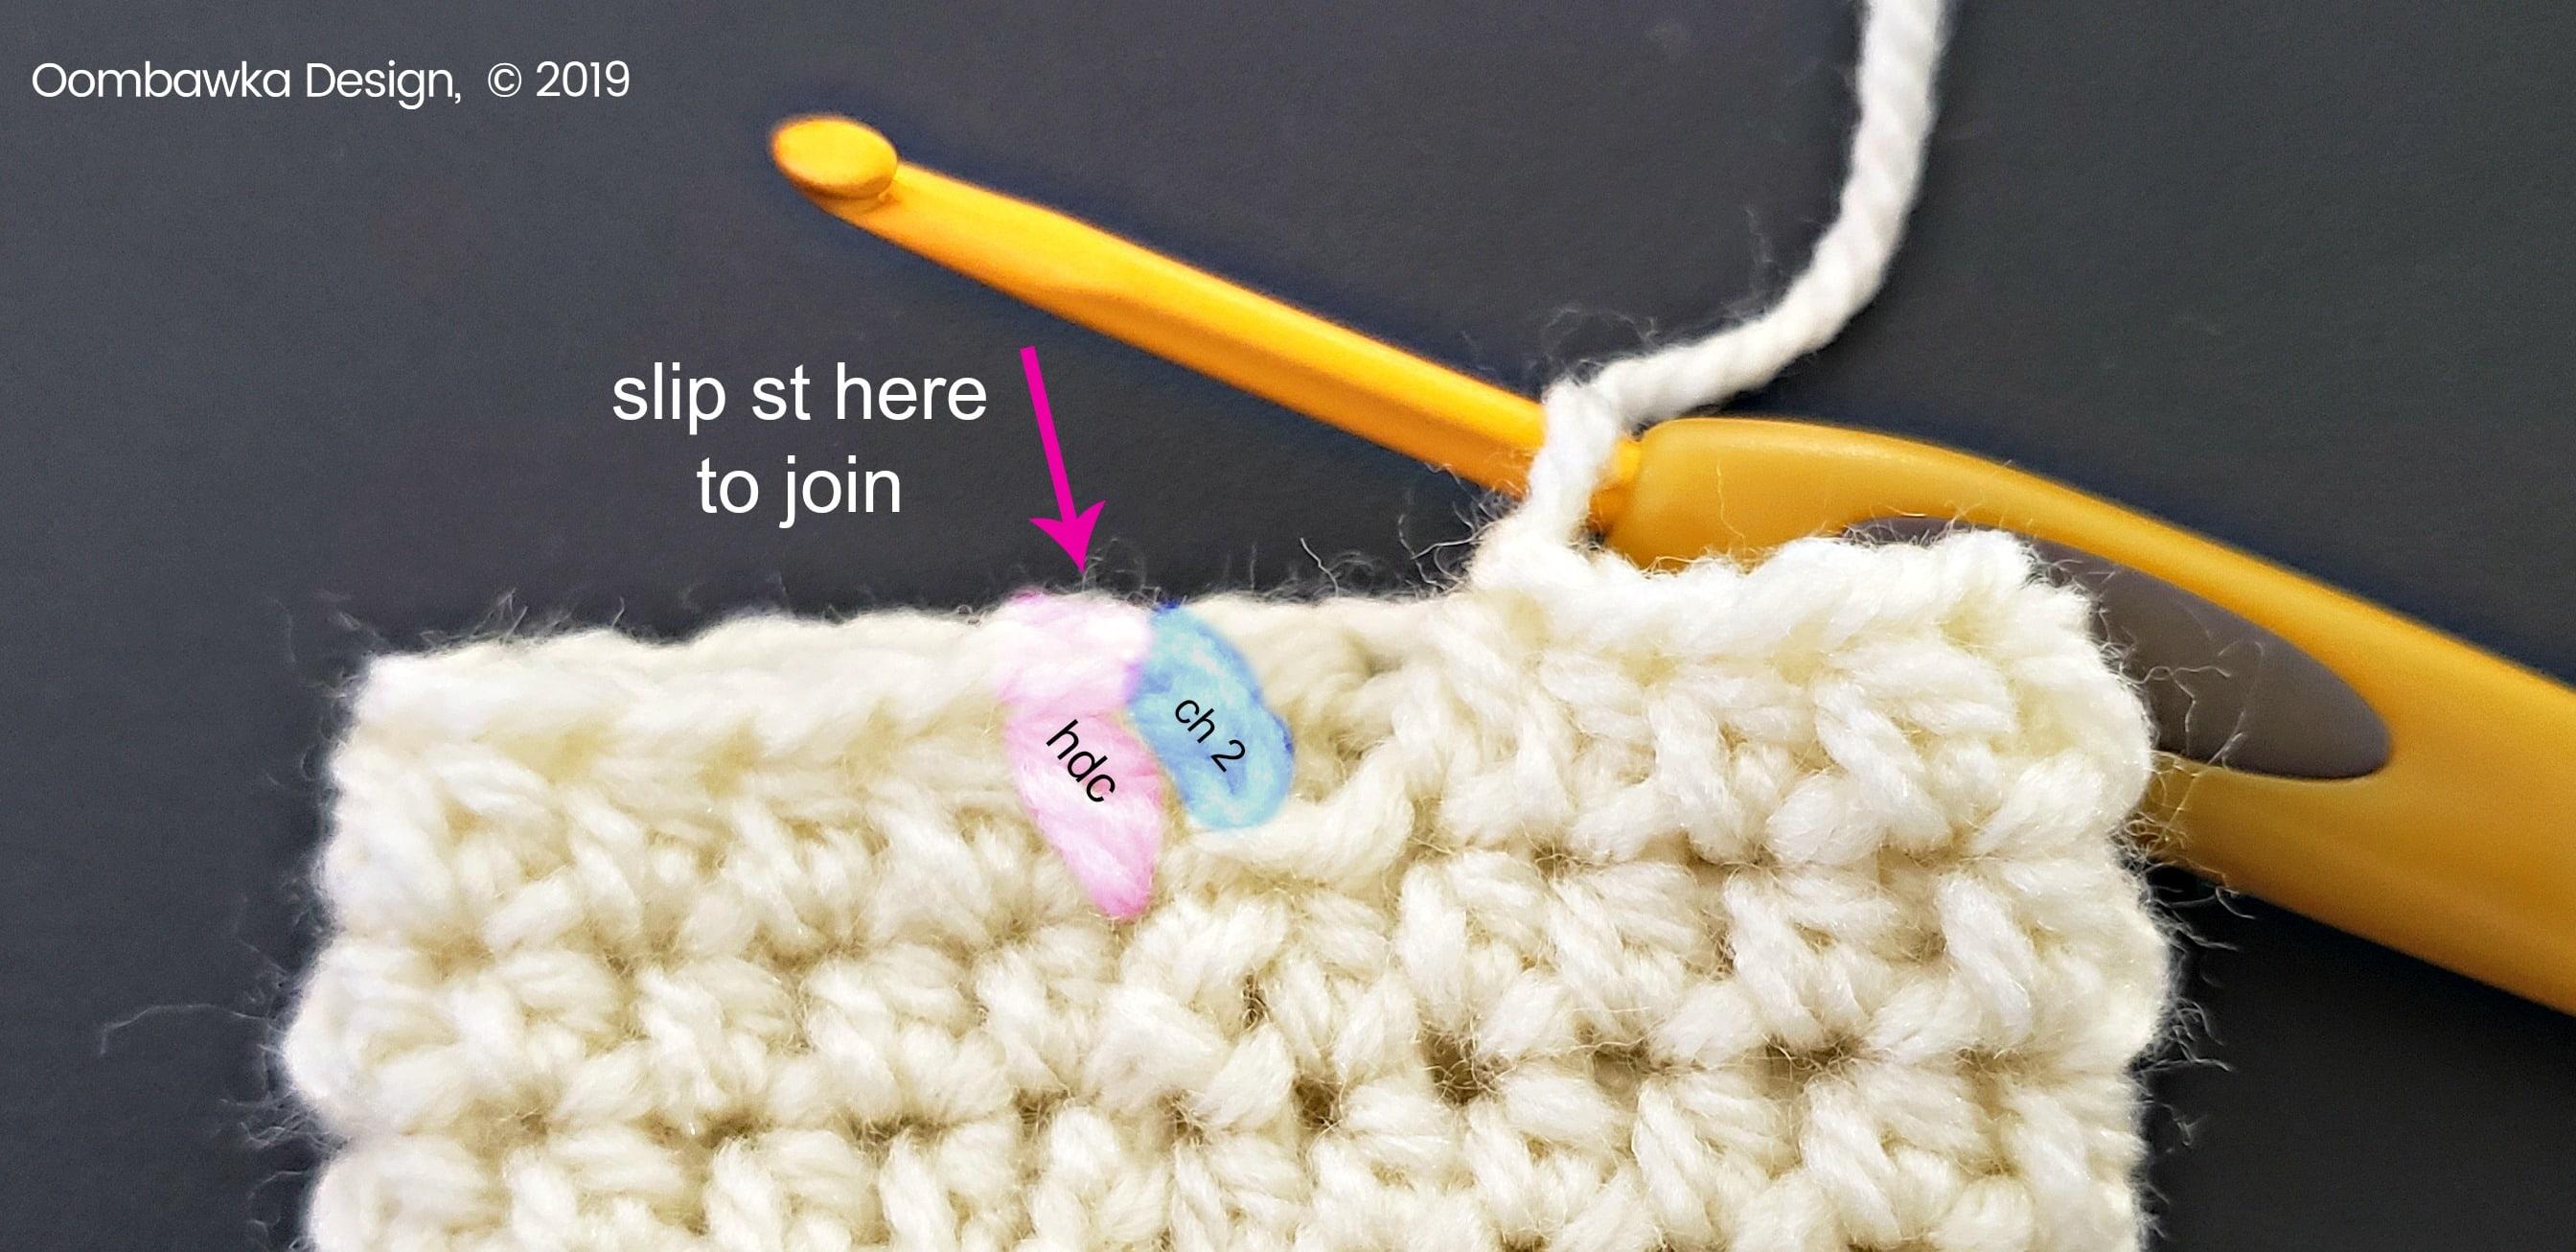
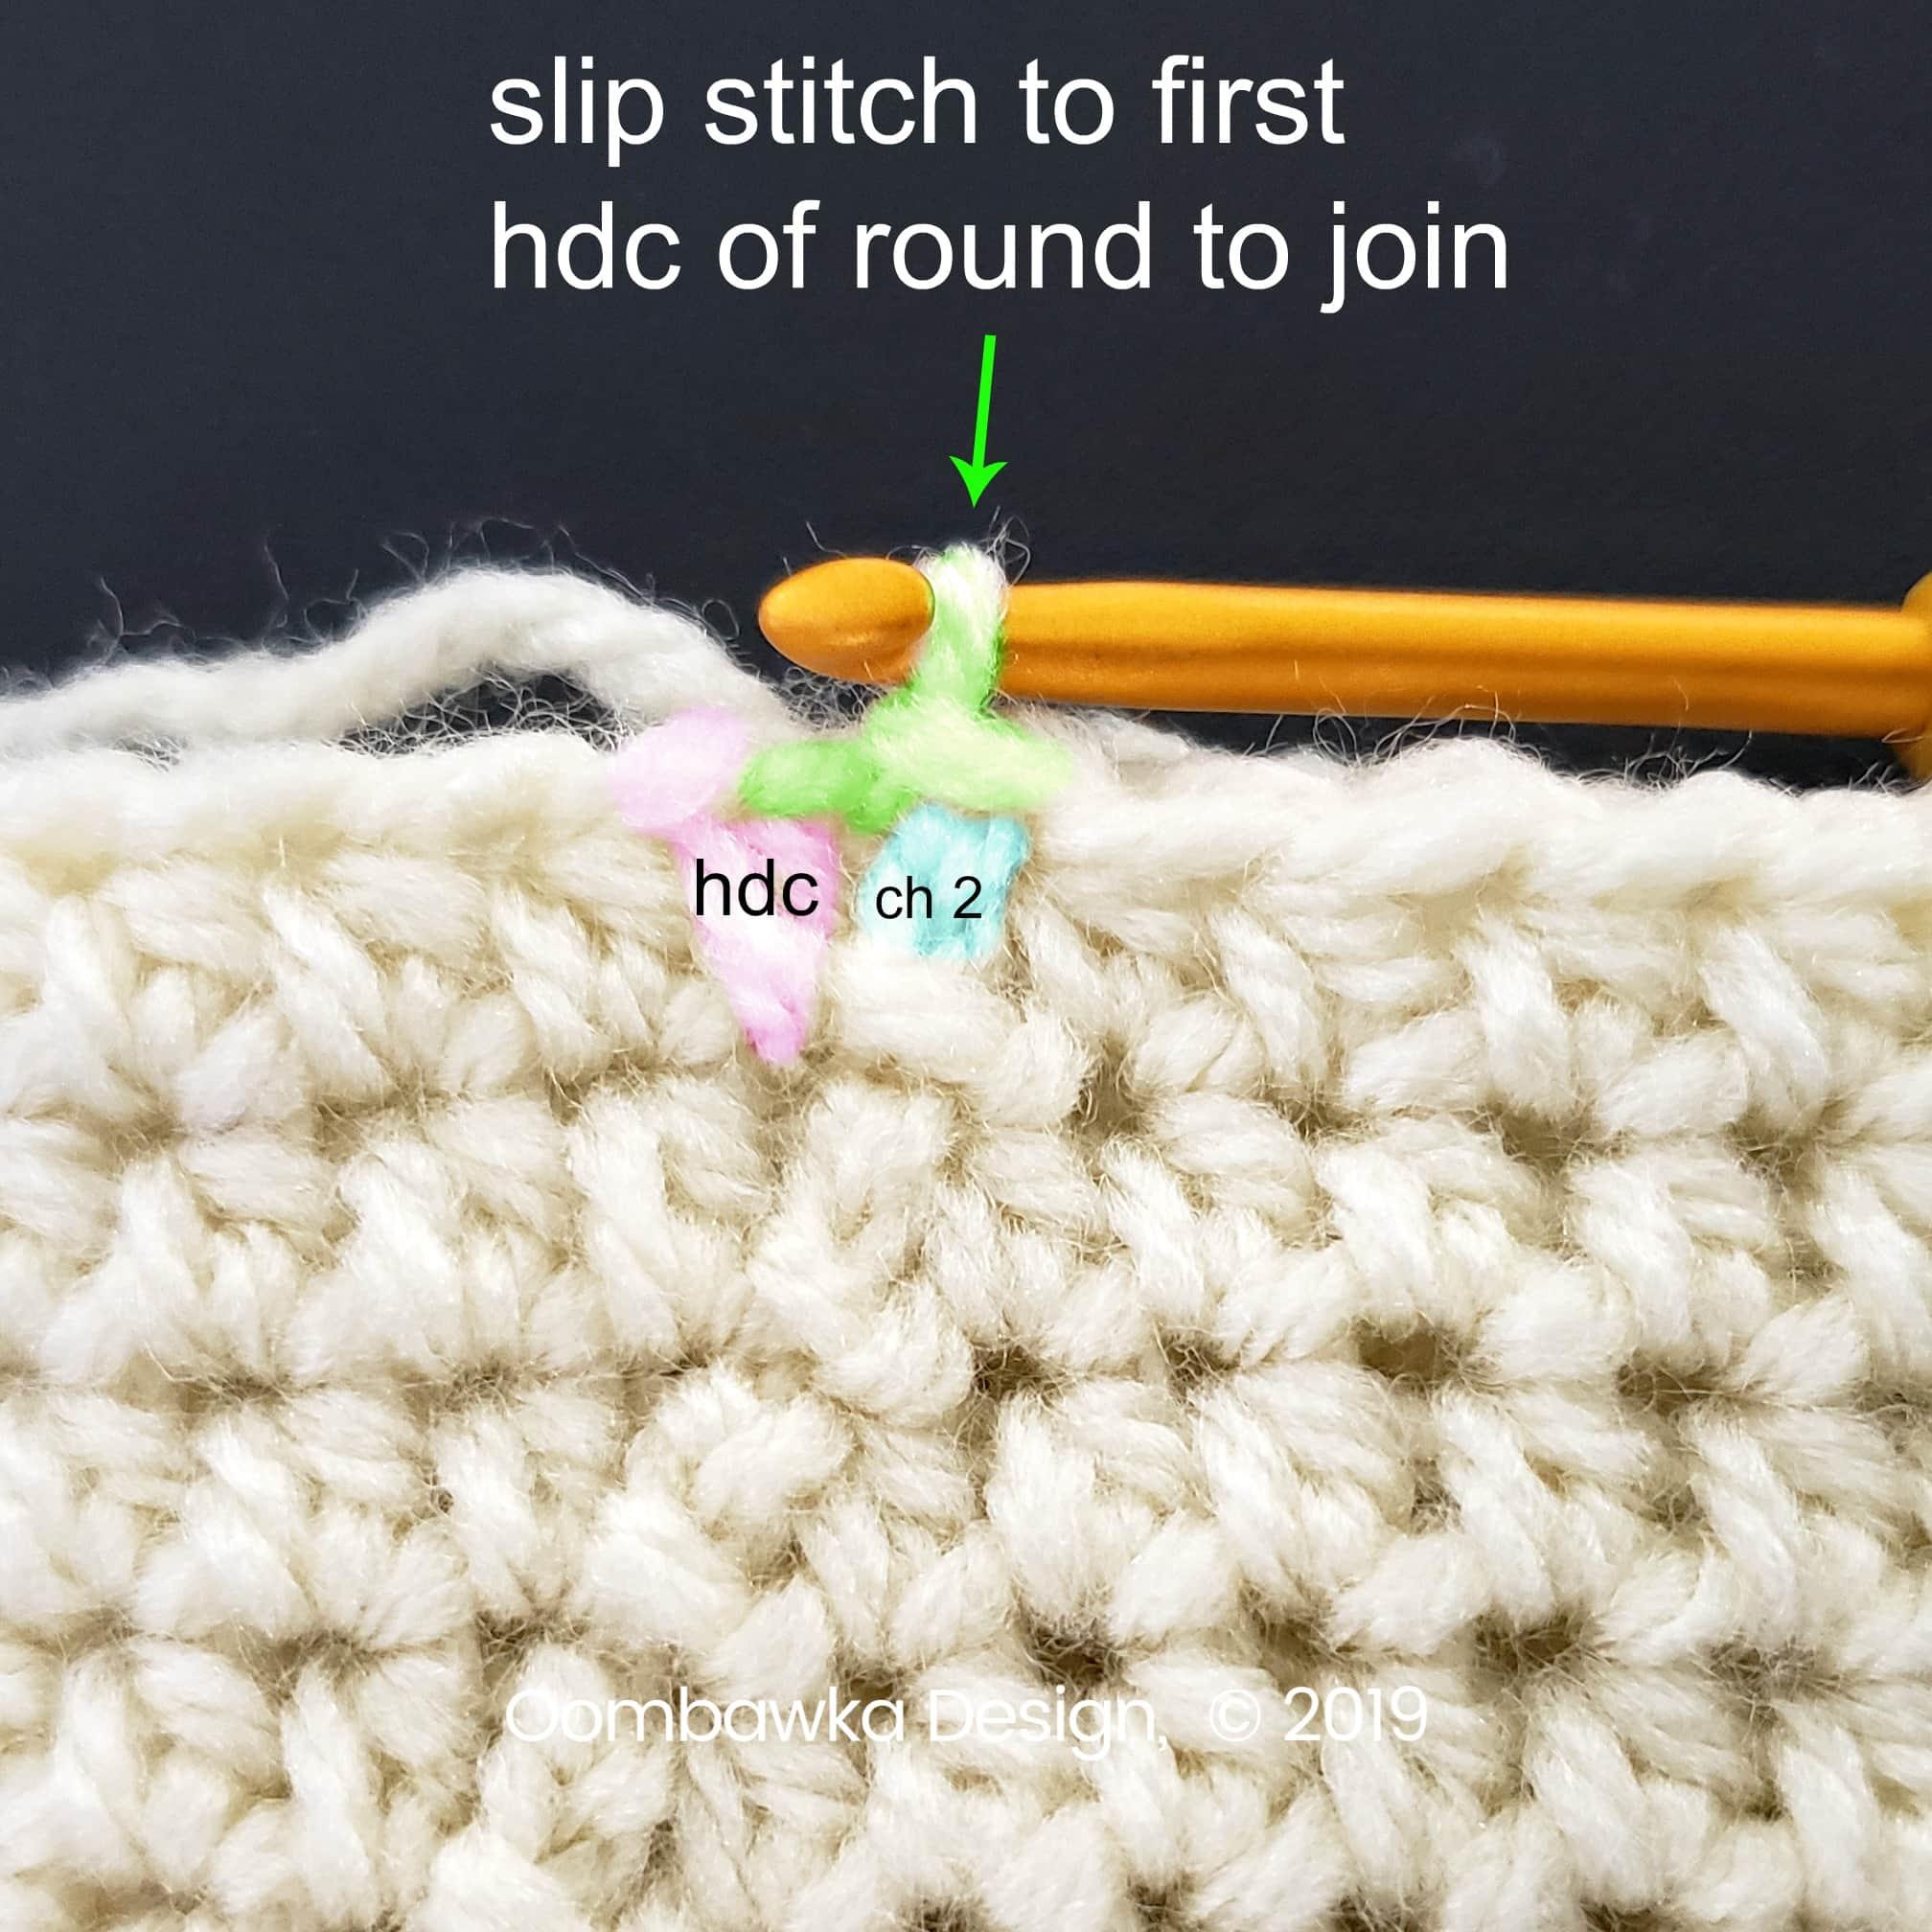
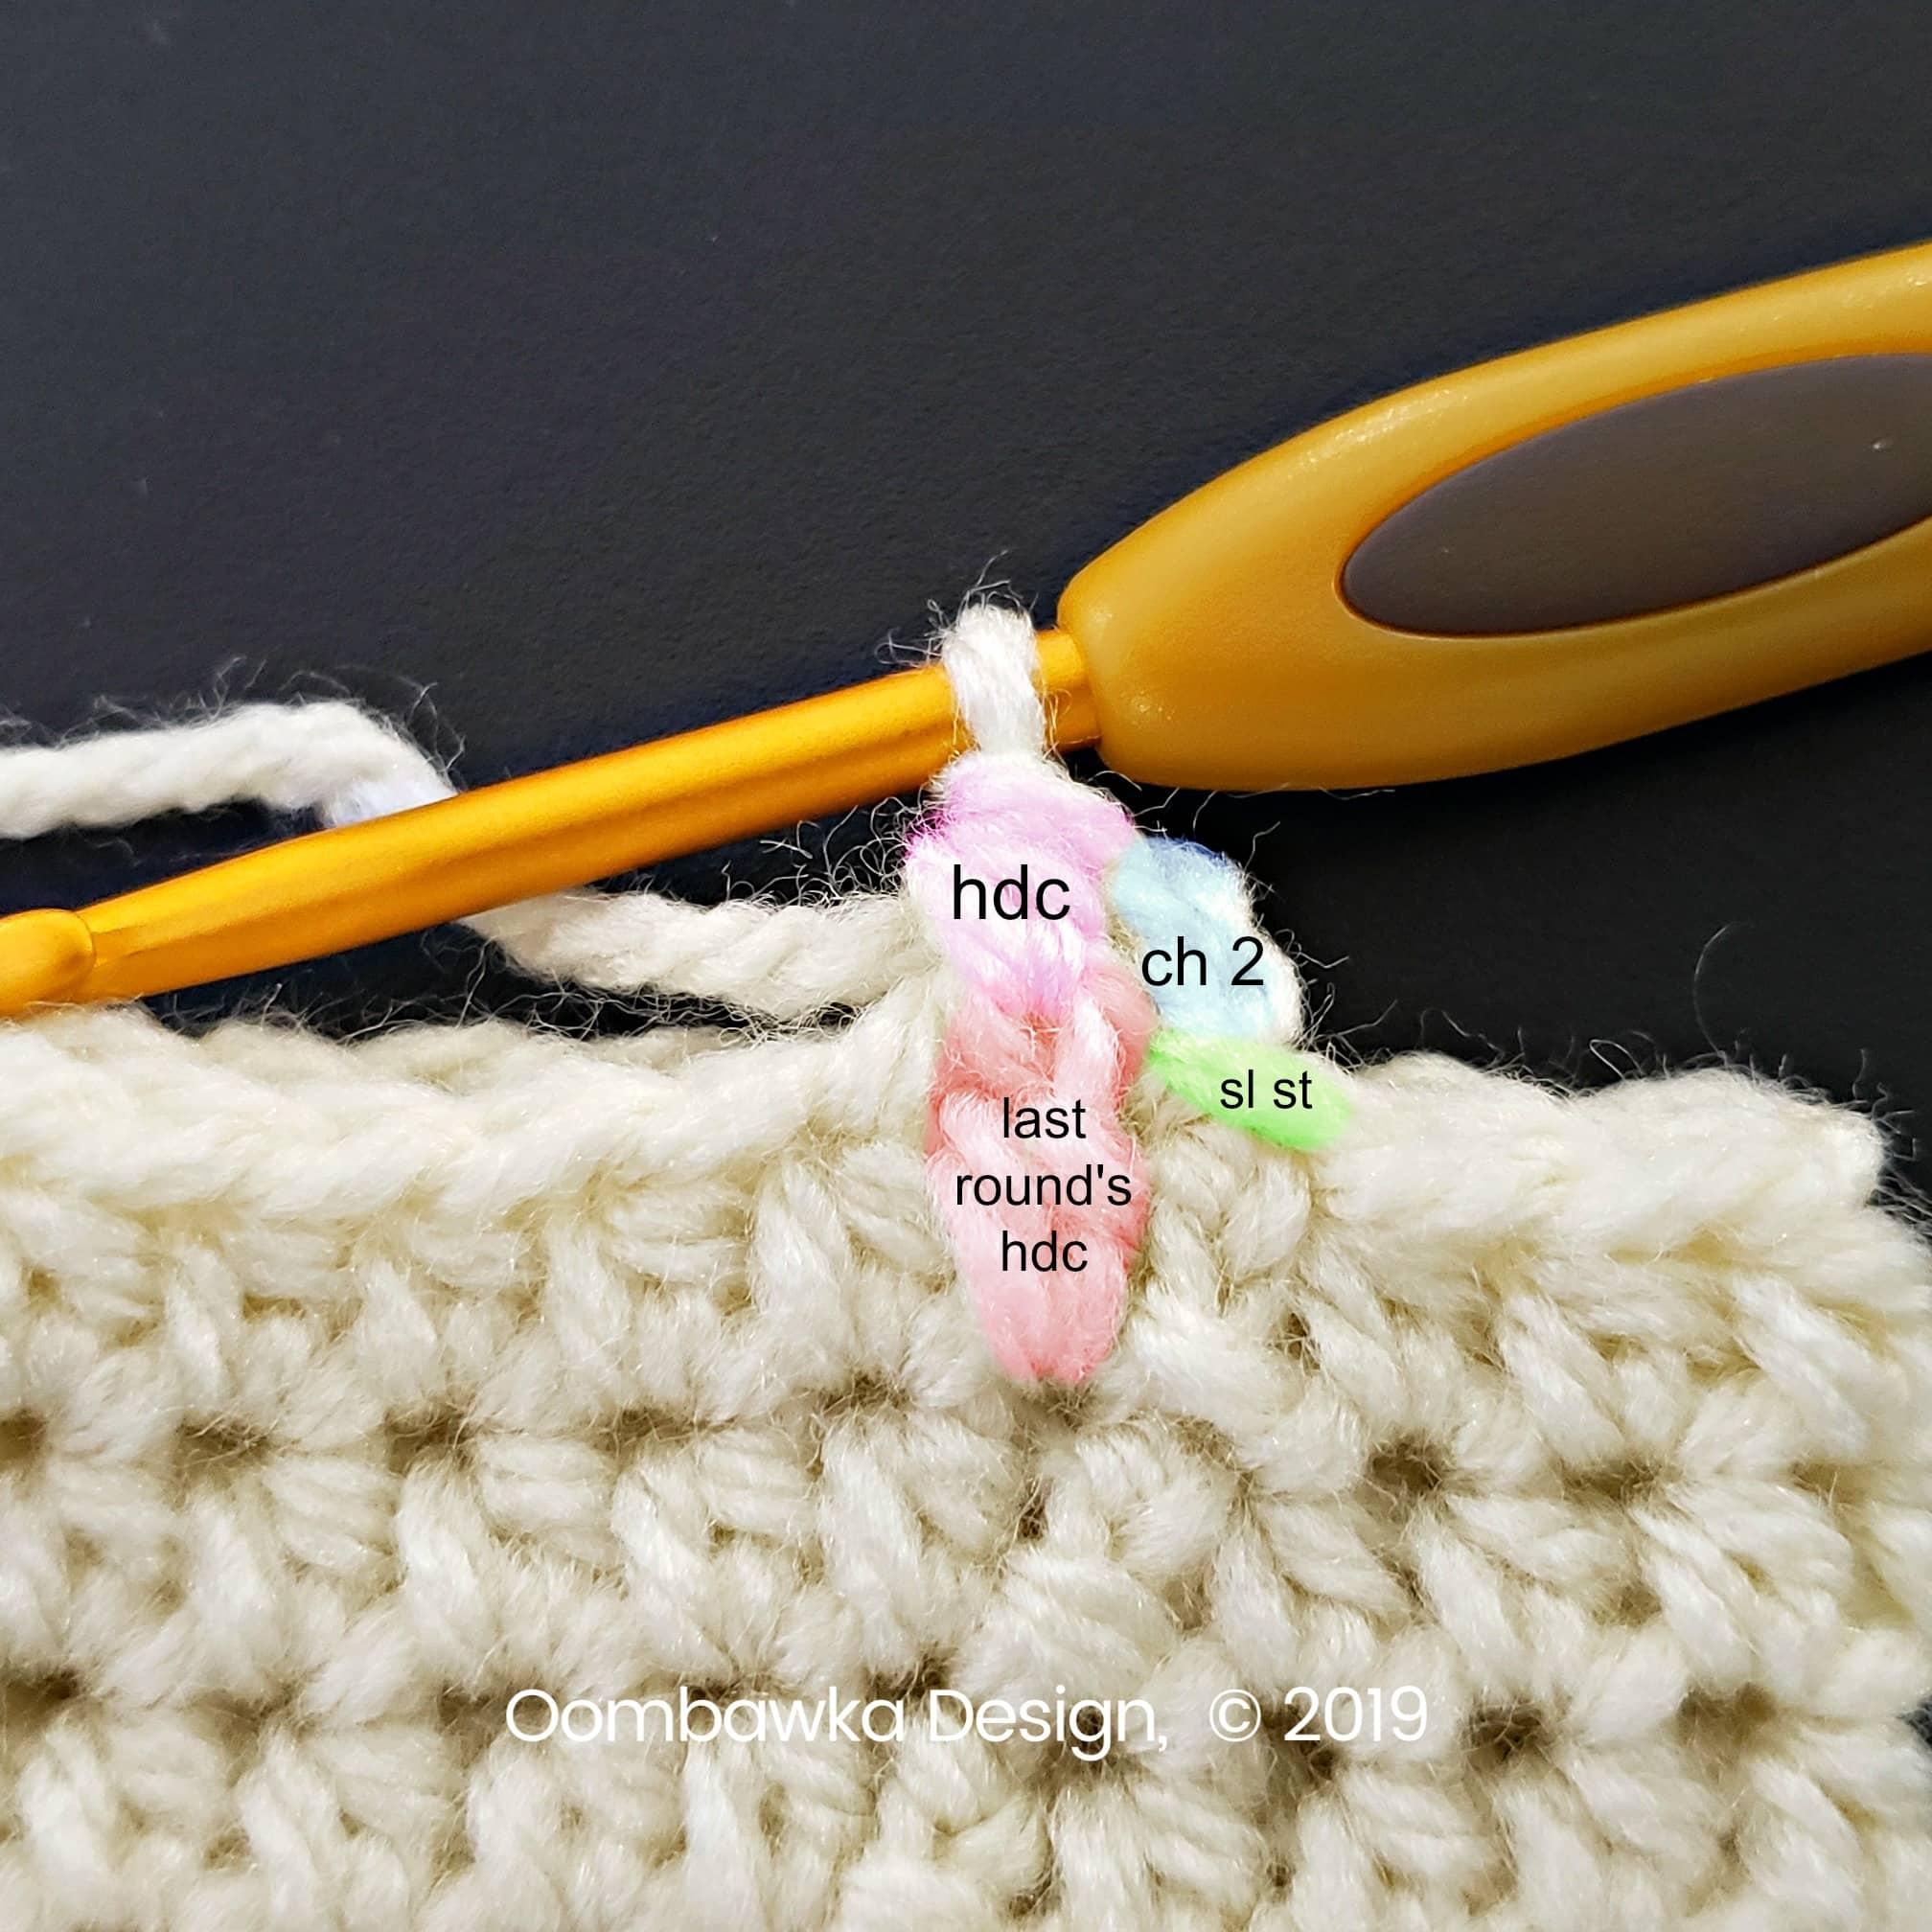
- Initial ch 2 counts as 1 hdc but we never work into the top of the ch 2. Instead, sl st to the first real hdc of the round (which is the stitch following the ch 2). Then work both the ch 2 and the first hdc in that first real hdc.
- You may also enjoy the baby crochet patterns included in Bold Baby Crochet. I designed a cute pair of snuggly monster mittens, a colorful rainbow cardigan, a bright striped sunhat and a pastel chevron hat and mitt set for this book.
You can click on the images in this post to open them in their own page. Then click again on the new image to make them larger.
Crochet Baby Mitts Pattern
The mittens are crocheted from the cuff (wrist-band) up to the tip of the fingers in one single piece. The cuff is crocheted back-and-forth in rows, the main mitten is crocheted in joined rounds. The closure strap is added after the mitts are complete.
Hook: 3.5 mm (E) for Small, 3.75 mm (F) for Medium and 4 mm (G) for large.
Using the size hook required for your mitten size (or size required for gauge):
Make 1 Right Mitten and 1 Left Mitten
Right Mitten Cuff
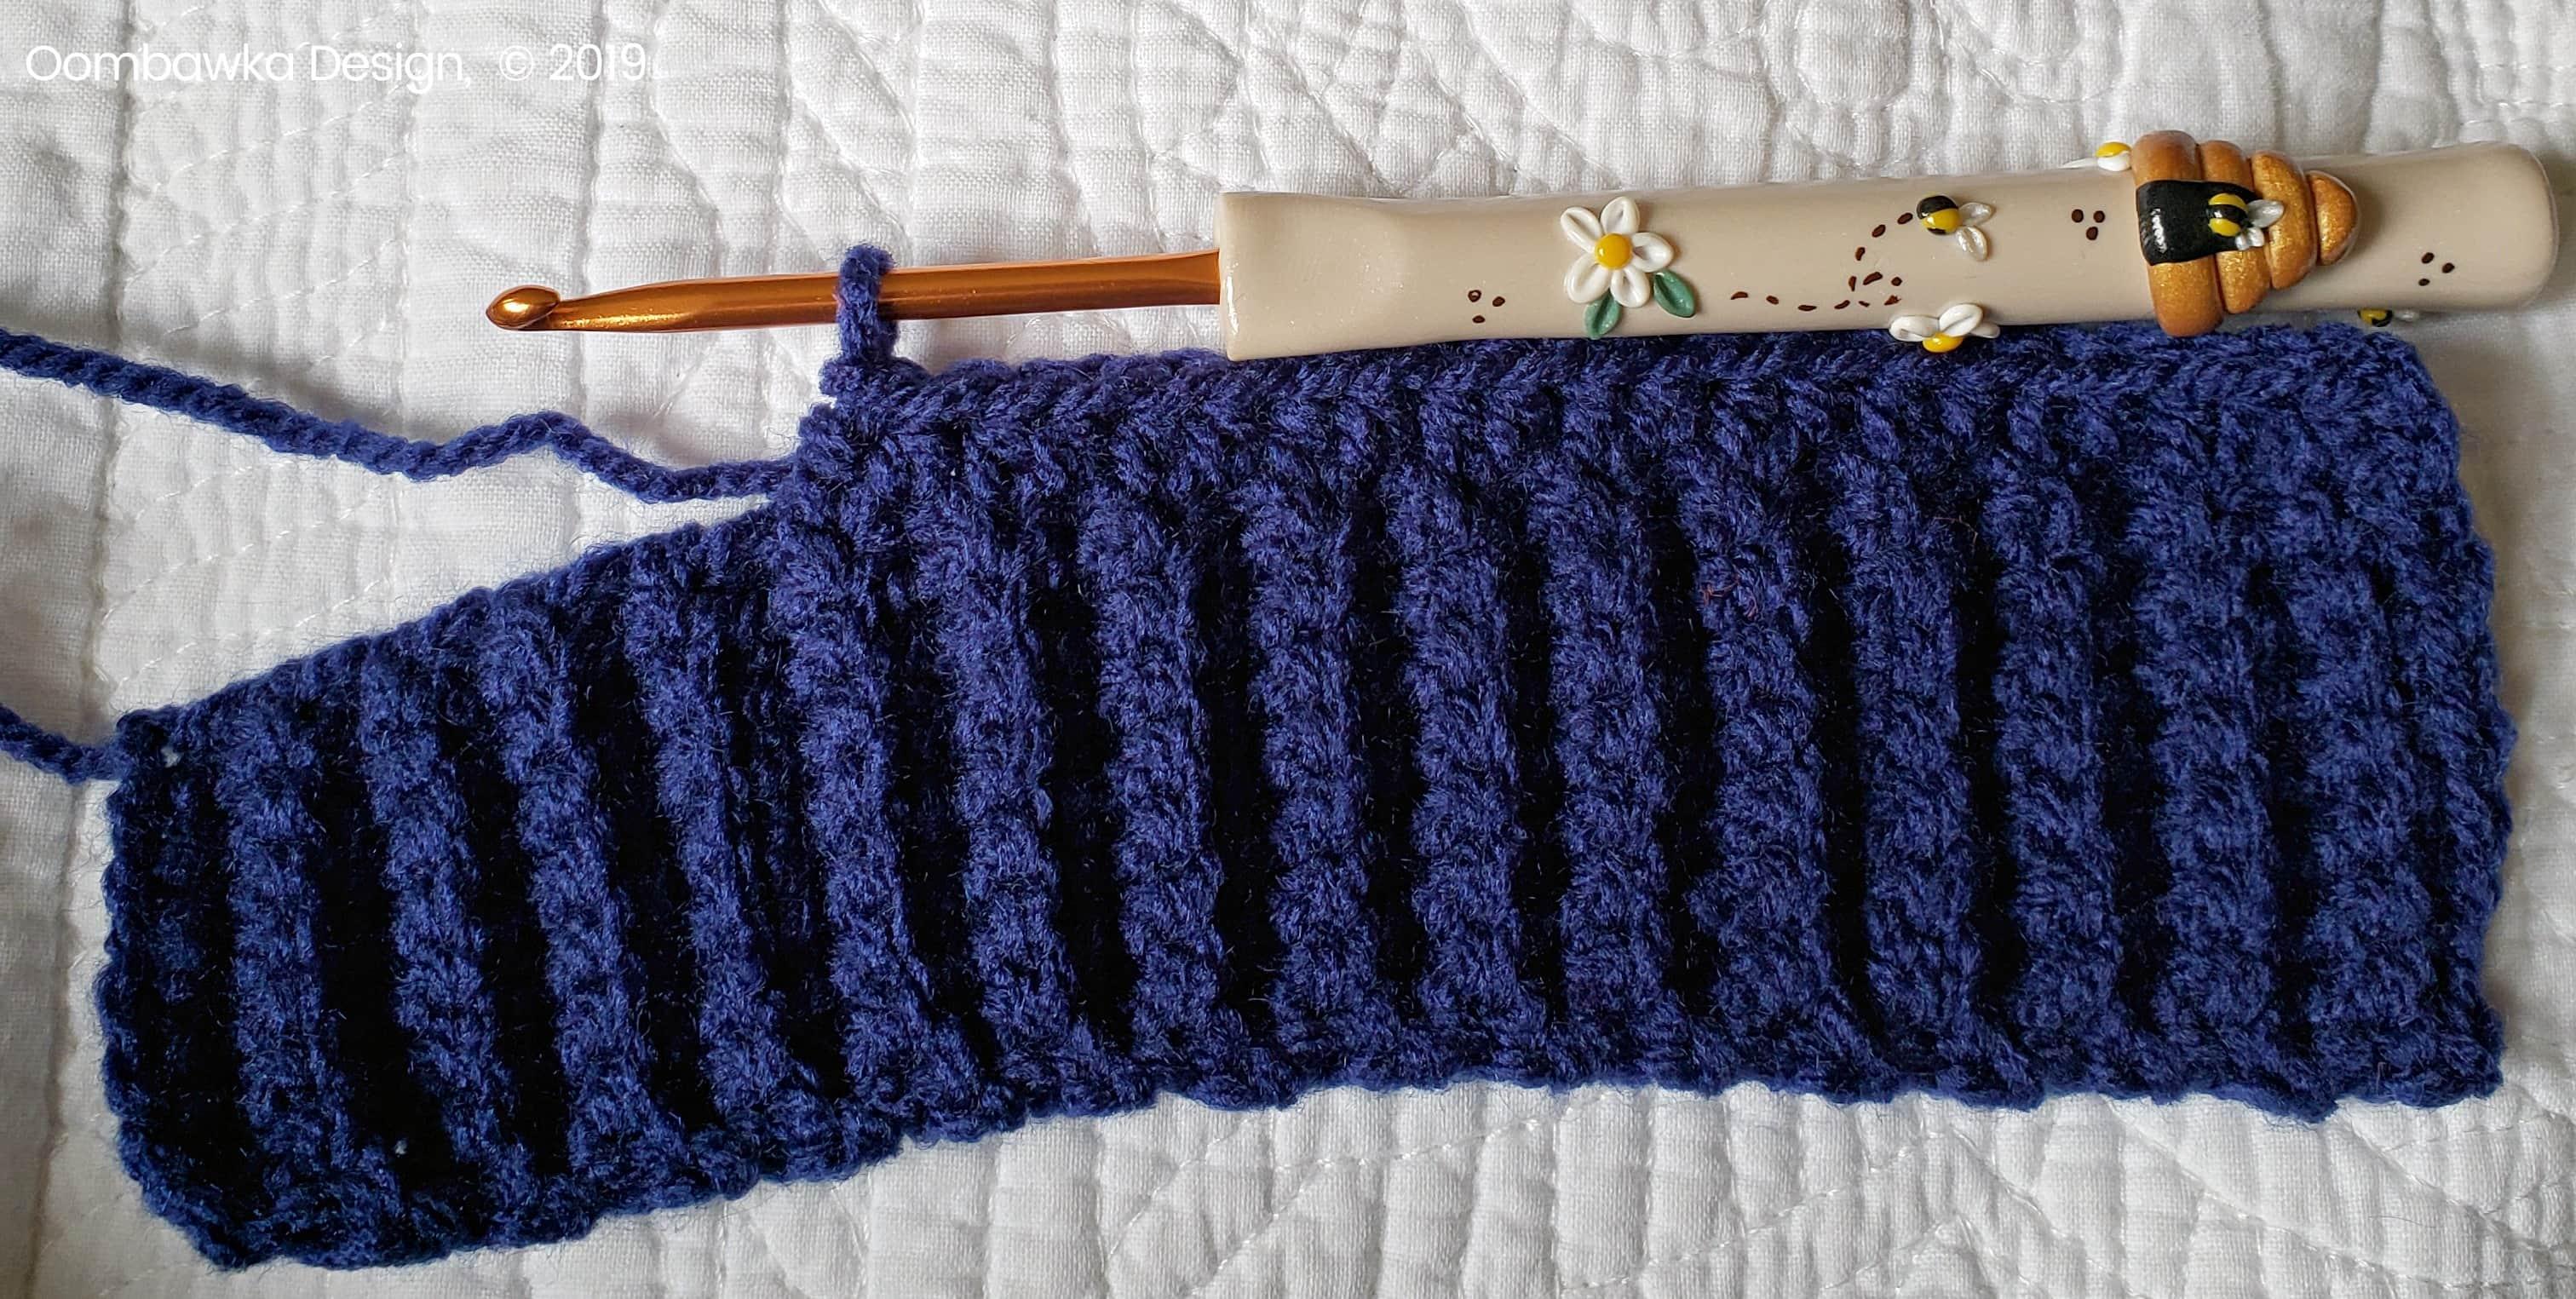
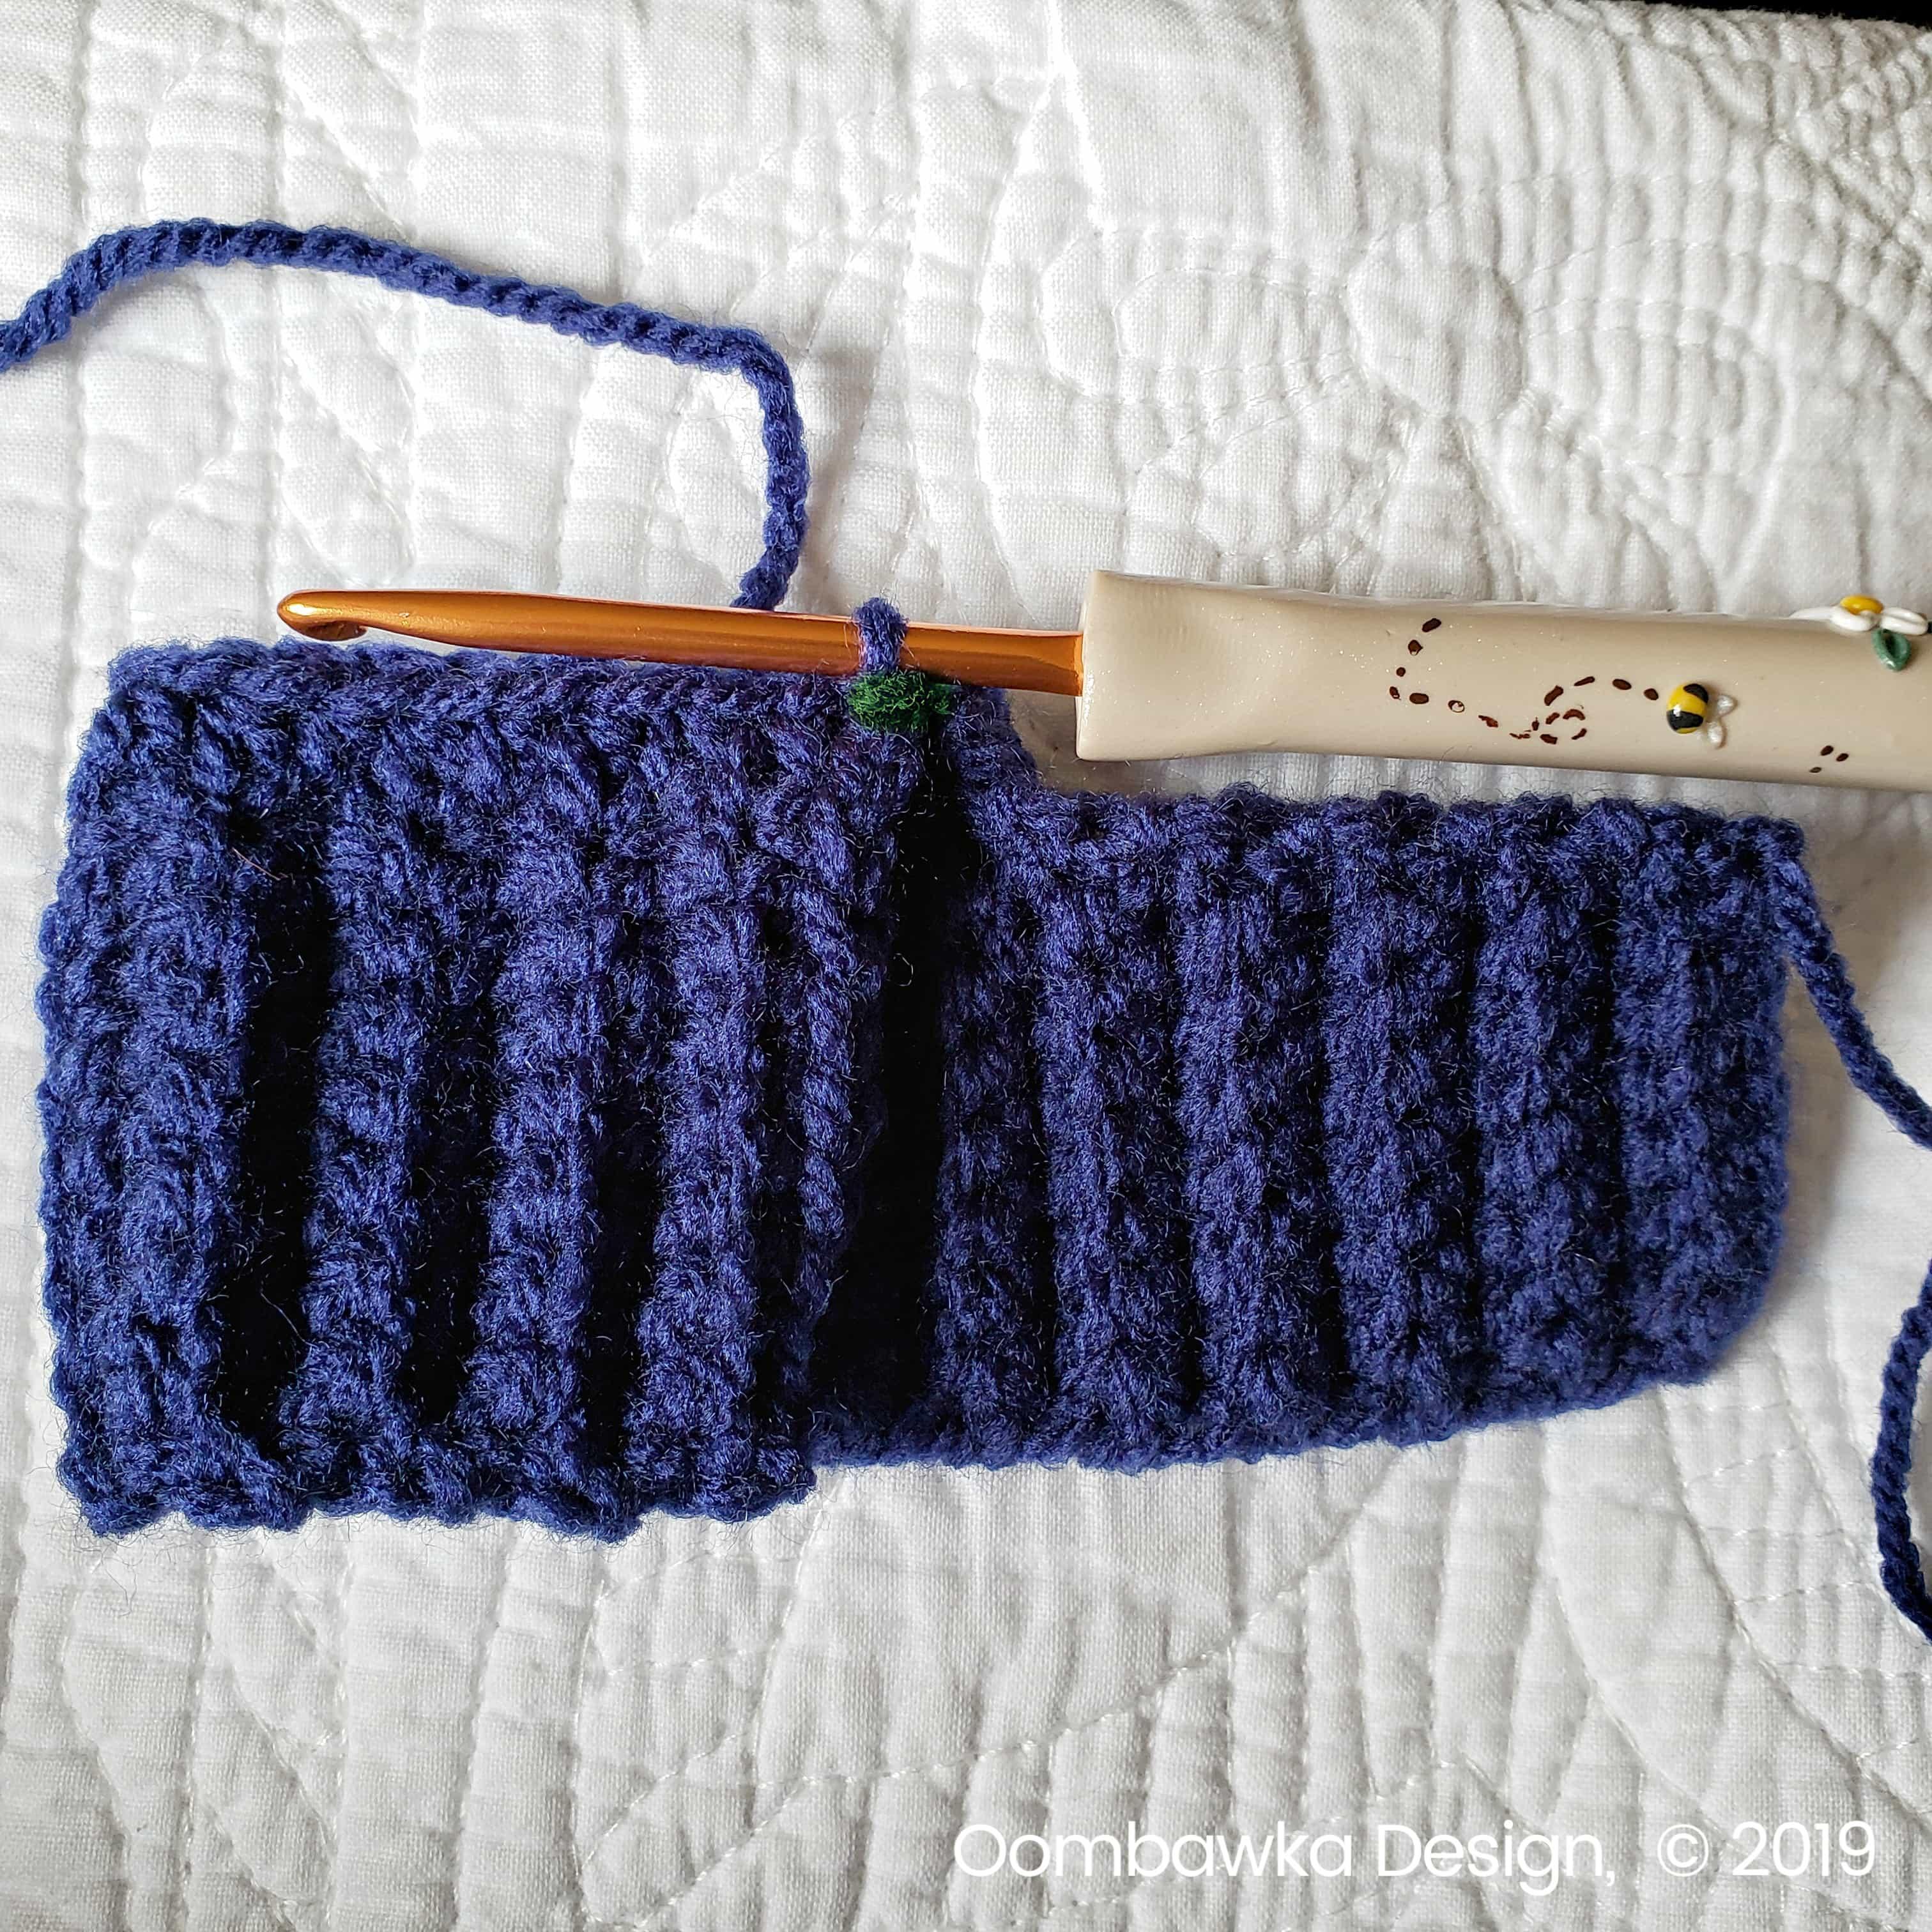
Row 1: Ch 9, sk the first ch, 1 sc in each rem ch across, ch 1, turn. [8 sc]
Row 2-31: 1 sc in bl of each of the next 7 sts, 1 sc in the last st, ch 1, turn. [8 sc]
Read more : How To Get Thrift Store Marker Off Baseball Glove
Do not finish off.
Rotate your work to begin crocheting across the row-ends of the cuff.
Right Main Mitten
R1: Ch 2 (counts as 1 hdc), 1 hdc in each of the next 21 row ends. Leave the rem row ends unworked. Fold the cuff (bring the right edge under the left edge to allow you to continue working around the outside of the mitten) to bring the first and last hdc together; sl st to the first hdc to join. [22 hdc]
You will now continue working in joined rounds.
R2-R9: Ch 2 (counts as 1 hdc), 1 hdc in each rem st around. Sl st to the first hdc to join. [22 hdc]
R10: Ch 1 (does not count as a st). Hdc2tog around. Sl st to the first hdc to join. Finish off leaving a 5 inch tail of yarn. Proceed to Finishing Section. [11 hdc]
Proceed to Adding the Simple Tie to the Mitten Cuffs and the Finishing Section below the Left Mitten Instructions.
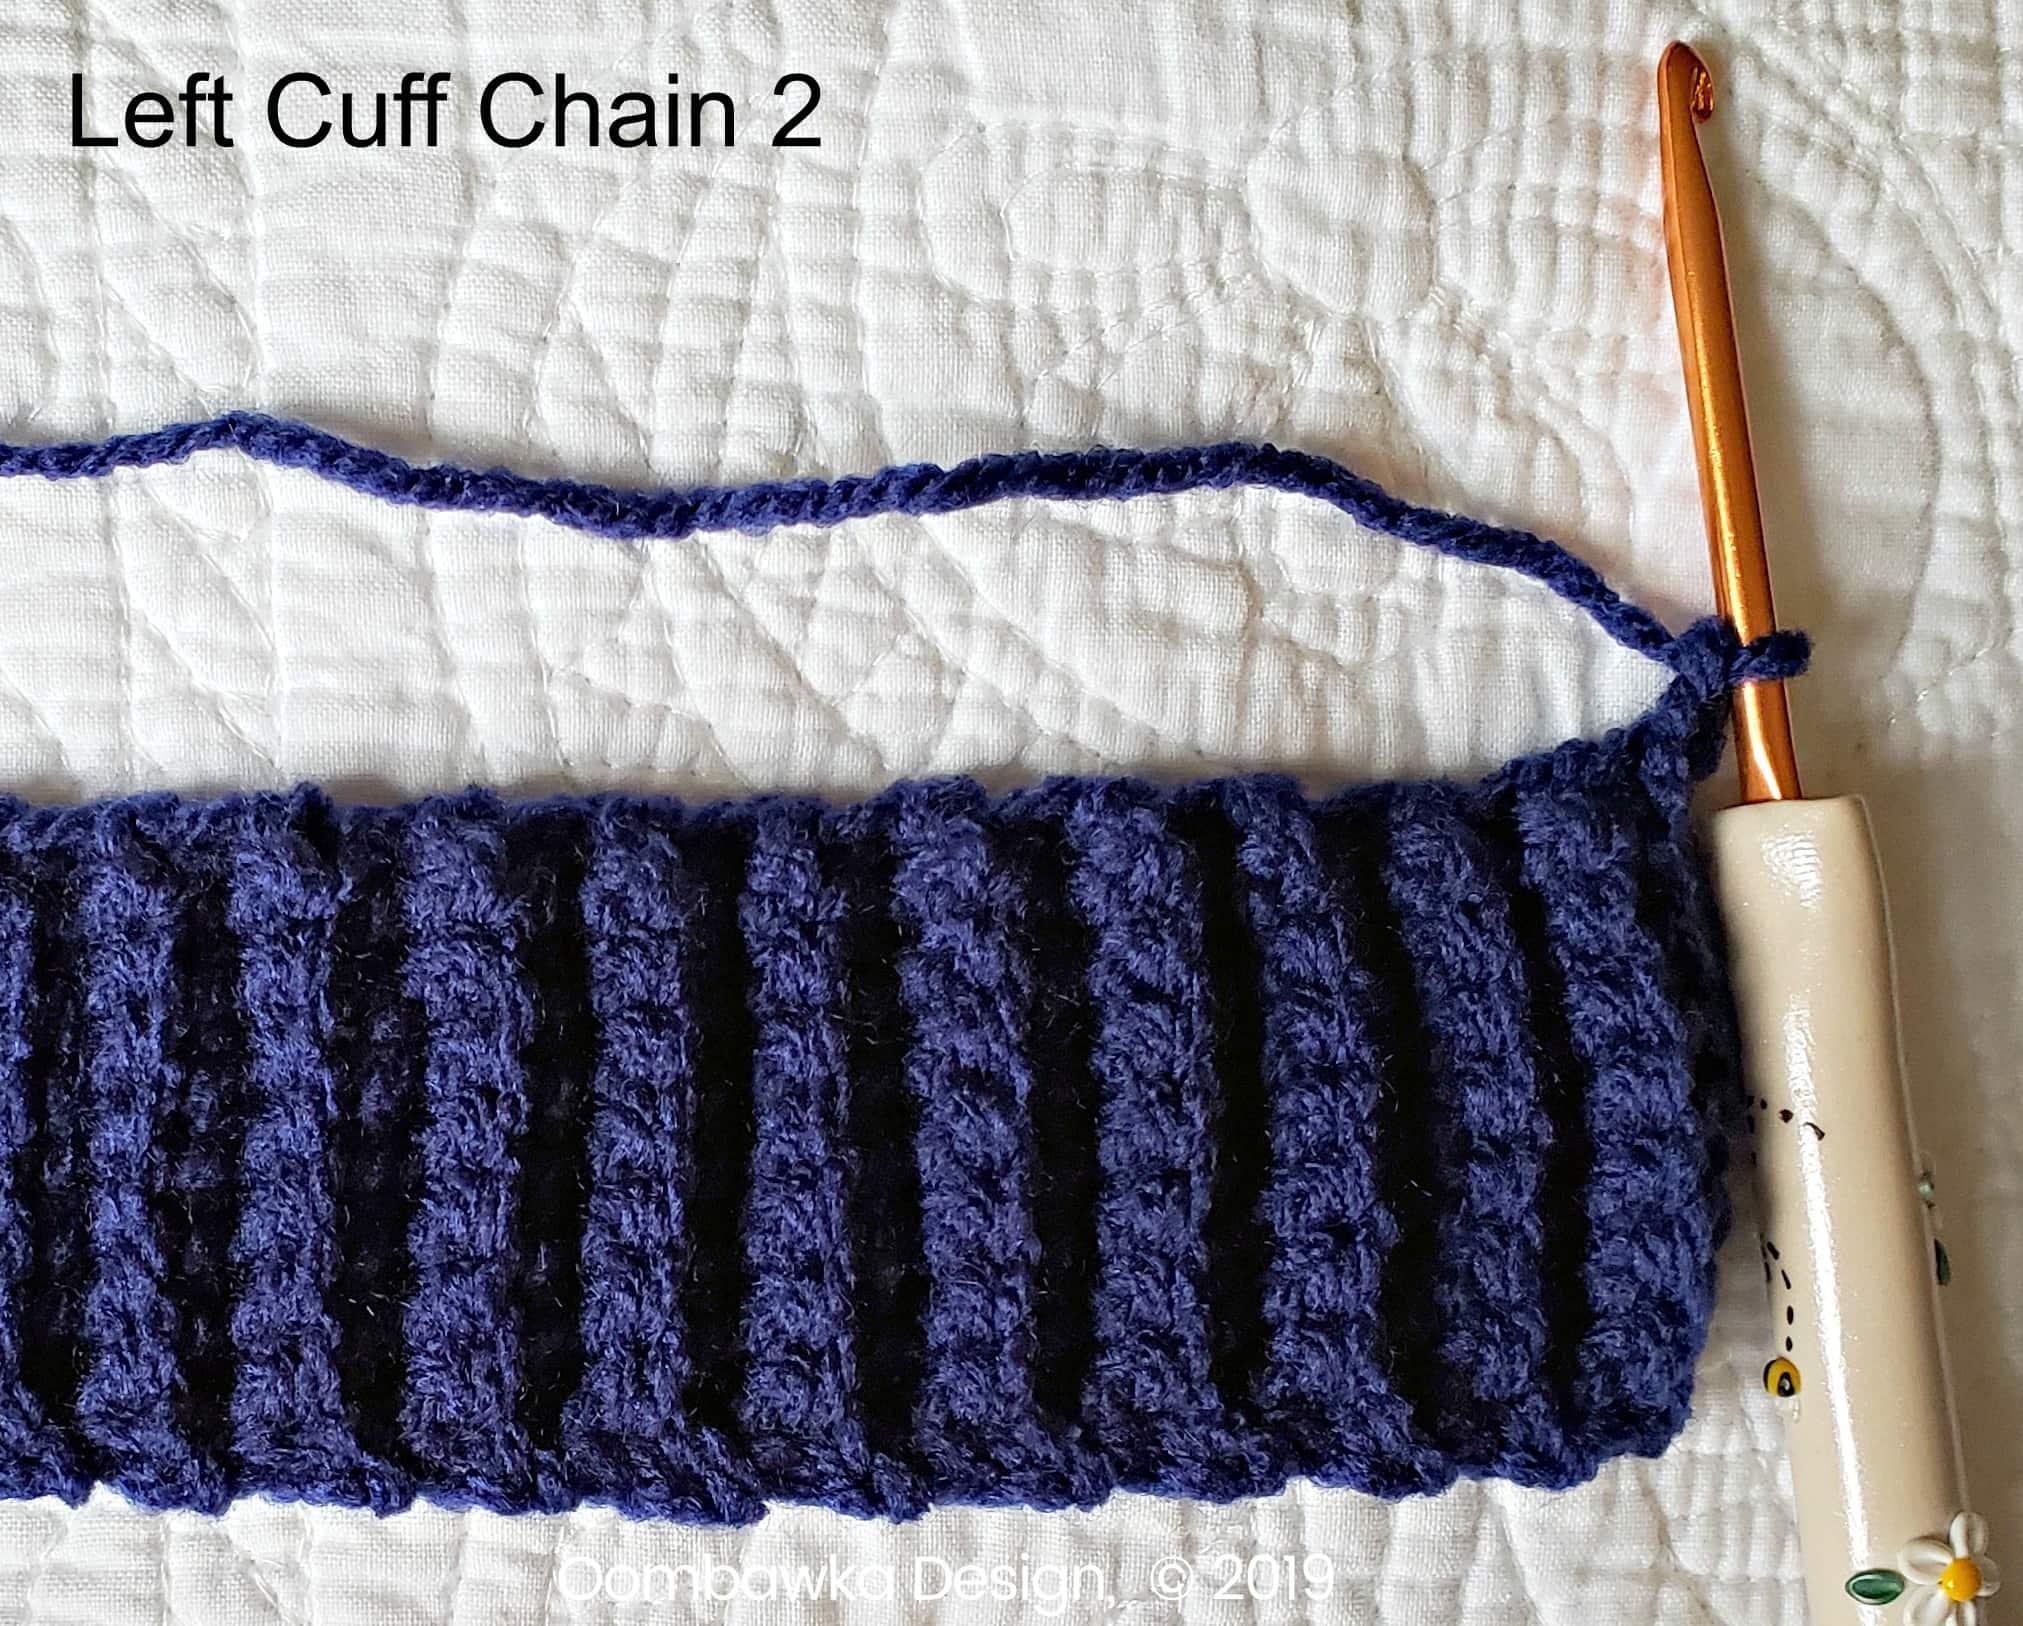
Left Mitten Cuff
Row 1: Ch 9, sk the first ch, 1 sc in each rem ch across, ch 1, turn. [8 sc]
Row 2-31: 1 sc in bl of each of the next 7 sts, 1 sc in the last st, ch 1, turn. [8 sc]
Read more : How To Get Thrift Store Marker Off Baseball Glove
Do not finish off.
Rotate your work to begin crocheting across the row-ends of the cuff.
Left Main Mitten
R1: Ch 2 (counts as 1 hdc), fold the cuff bring the left side of the cuff on top of the right side. Count over 8 row ends and work 1 hdc in the next (9th) row end. 1 hdc in each of the next 21 row ends. Leave the rem row ends unworked. Sl st to the first hdc to join. [22 hdc]
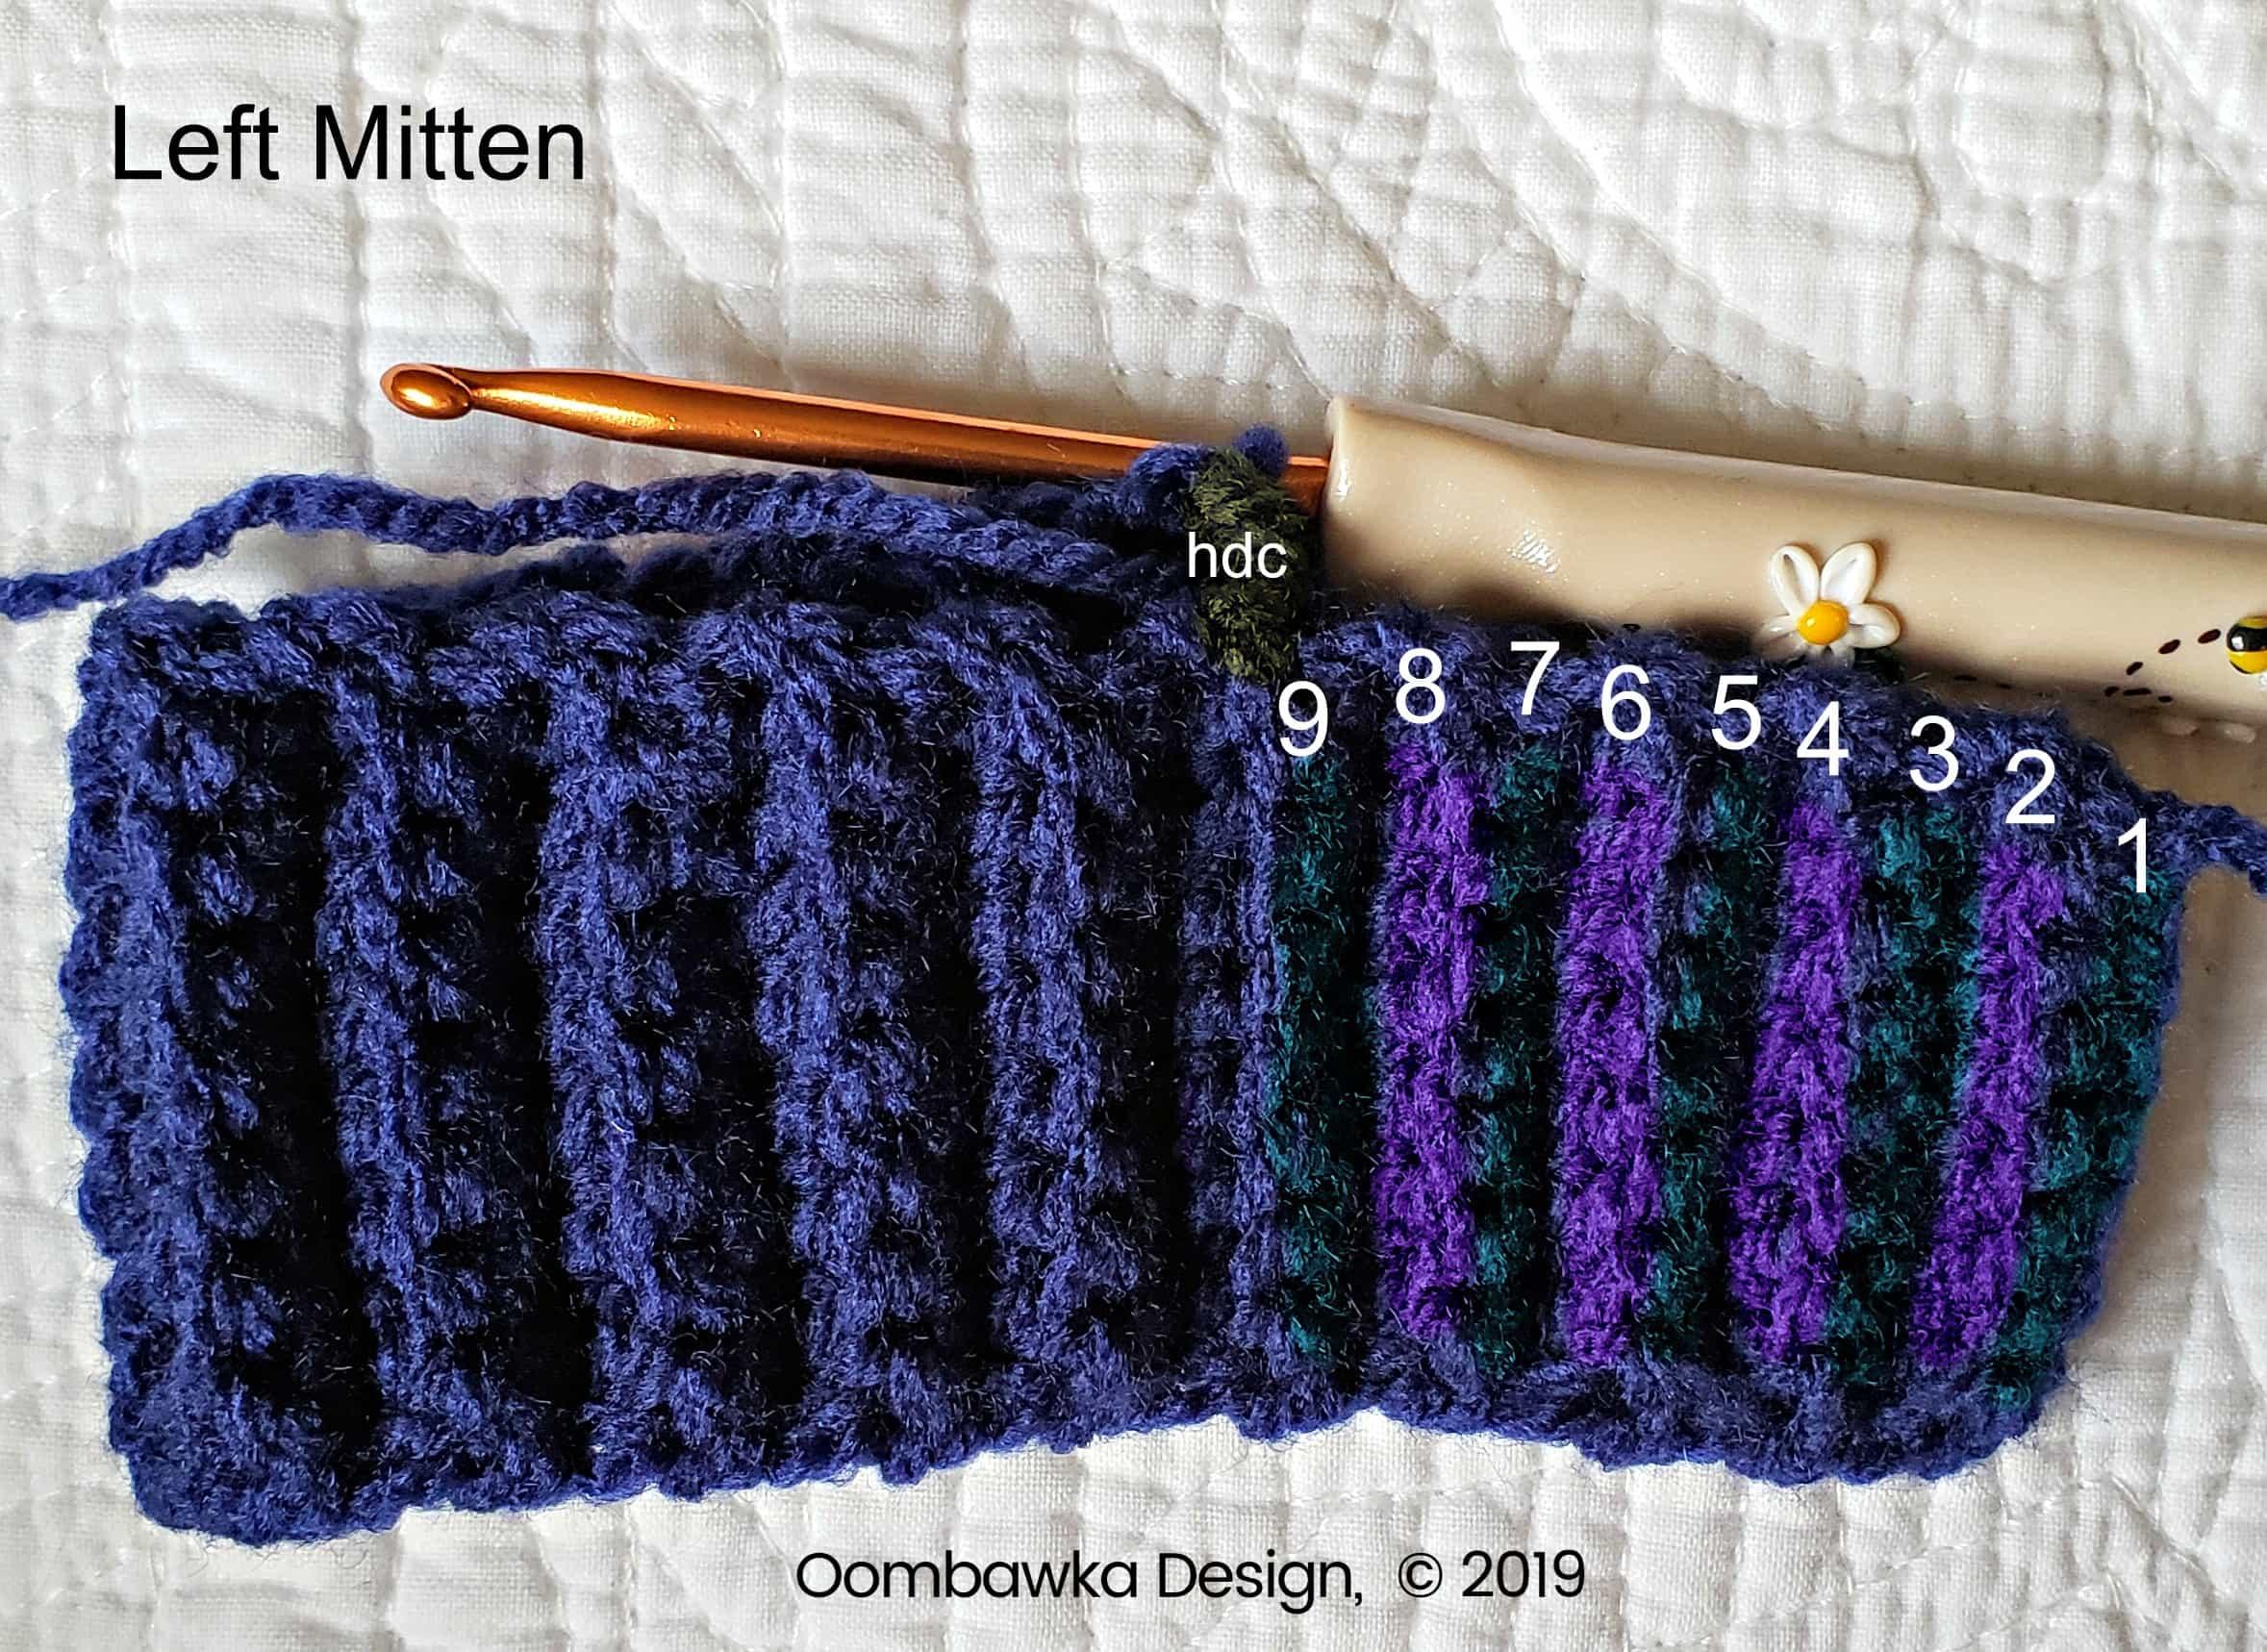
You will now continue working in joined rounds.
R2-R9: Ch 2 (counts as 1 hdc), 1 hdc in each st around. Sl st to the first hdc to join. [22 hdc]
R10: Ch 1 (does not count as a st). Hdc2tog around. Sl st to the first hdc to join. Finish off leaving a 5 inch tail of yarn. Proceed to Finishing Section. [11 hdc]
For Both Mittens
Add the Simple Tie to the Mitten Cuffs
Using the below image as a guide, join your yarn to the cuff of the mitten with a sl st. Ch 20, finish off leaving a 4-inch tail of yarn.
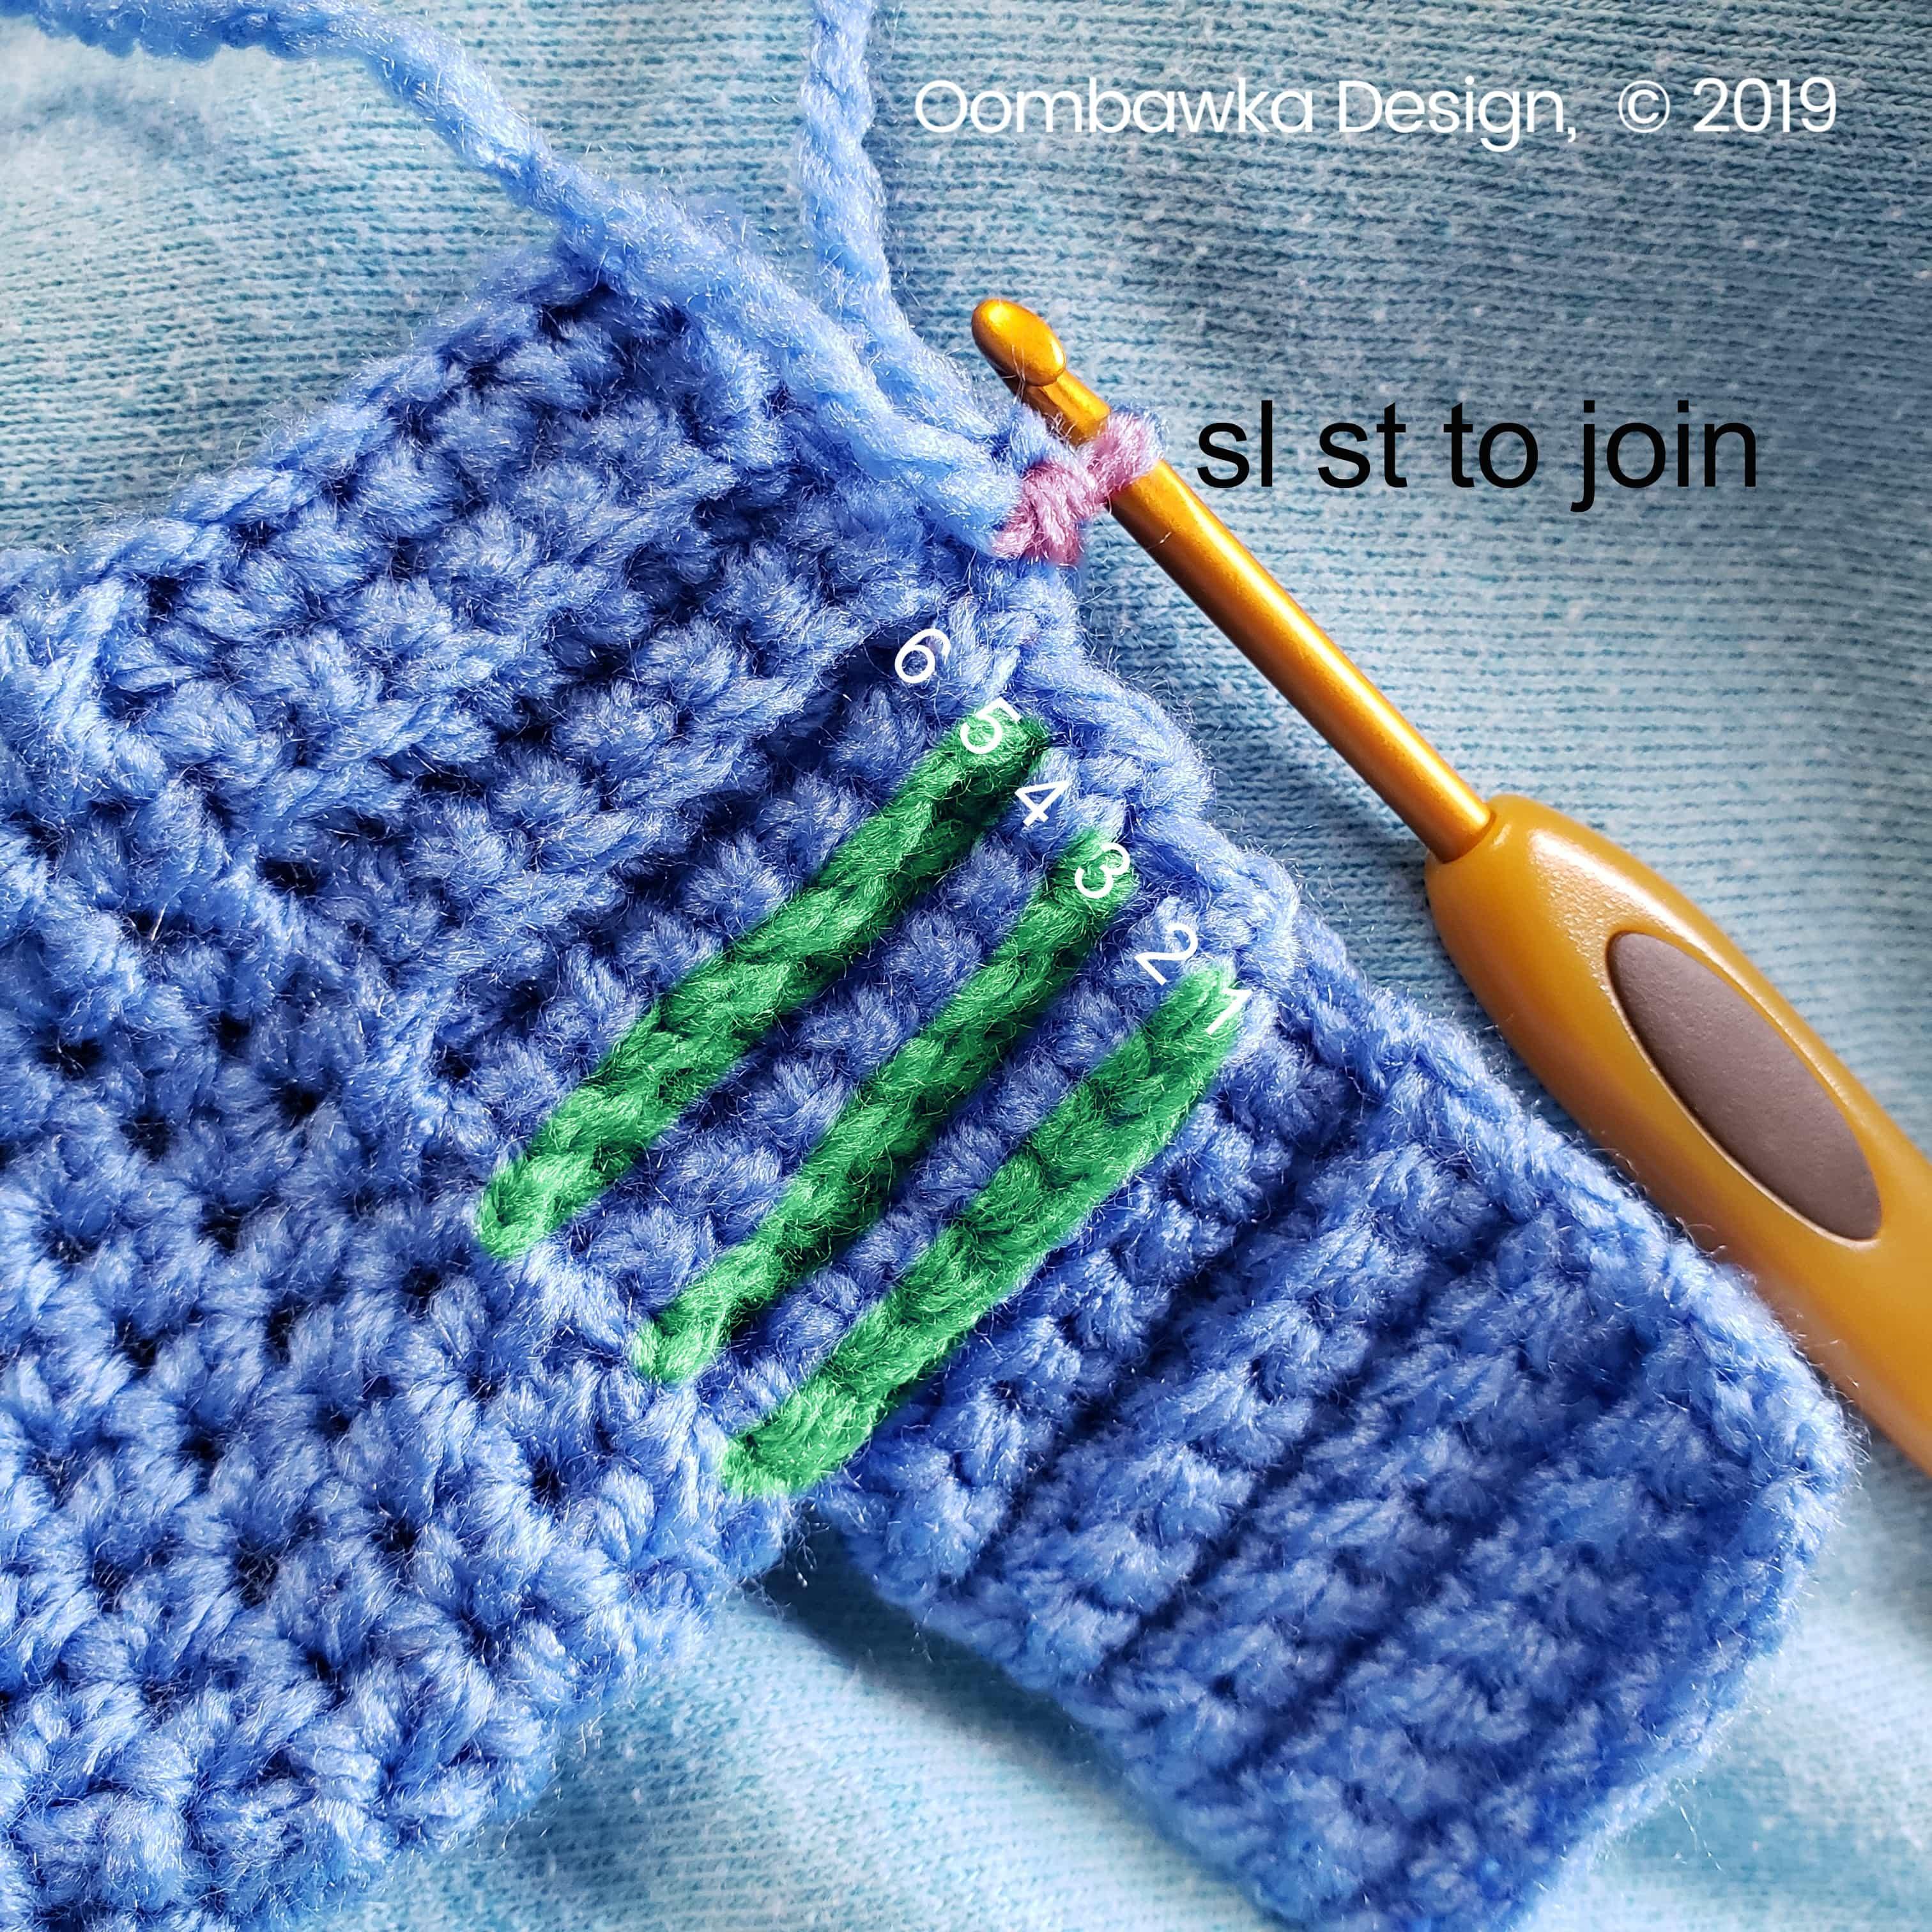
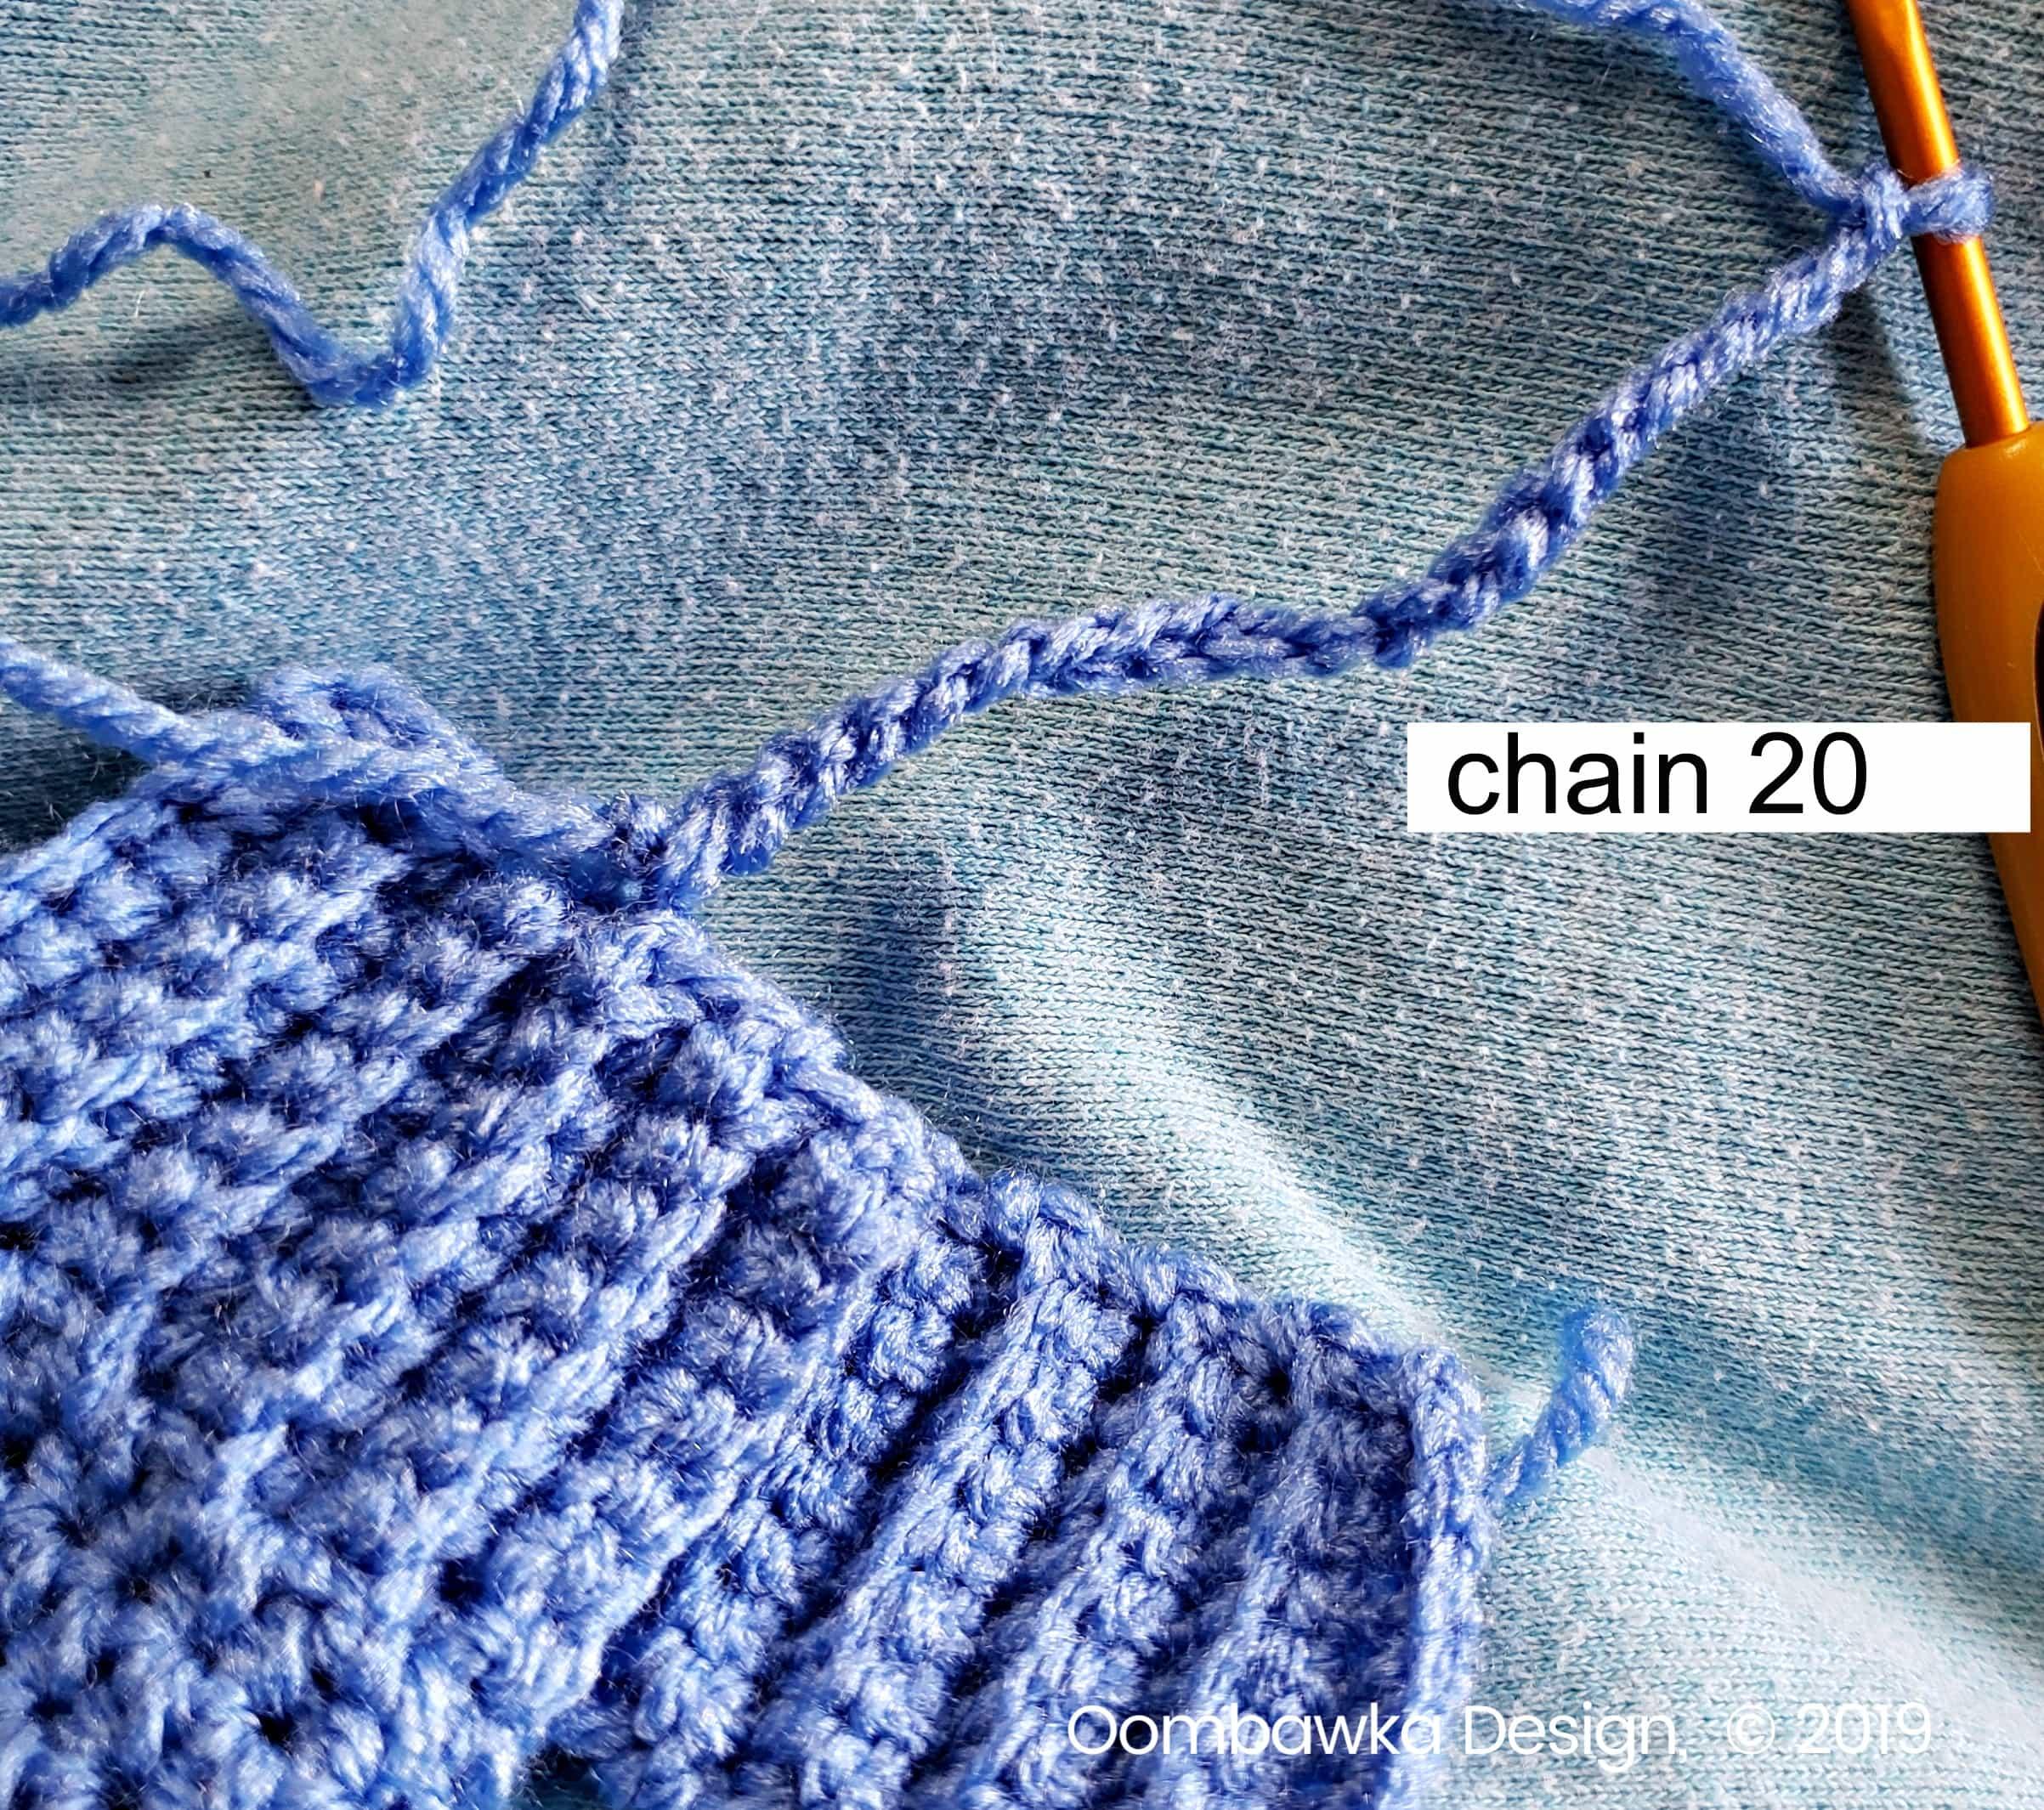
Thread the yarn end onto your yarn needle and weave it between the cuff stitches, from the front (in line with your initial join location) to the back.
Carry the yarn over 5 rows and weave the yarn end back through to the front of the mitten and then to the base of the cuff.
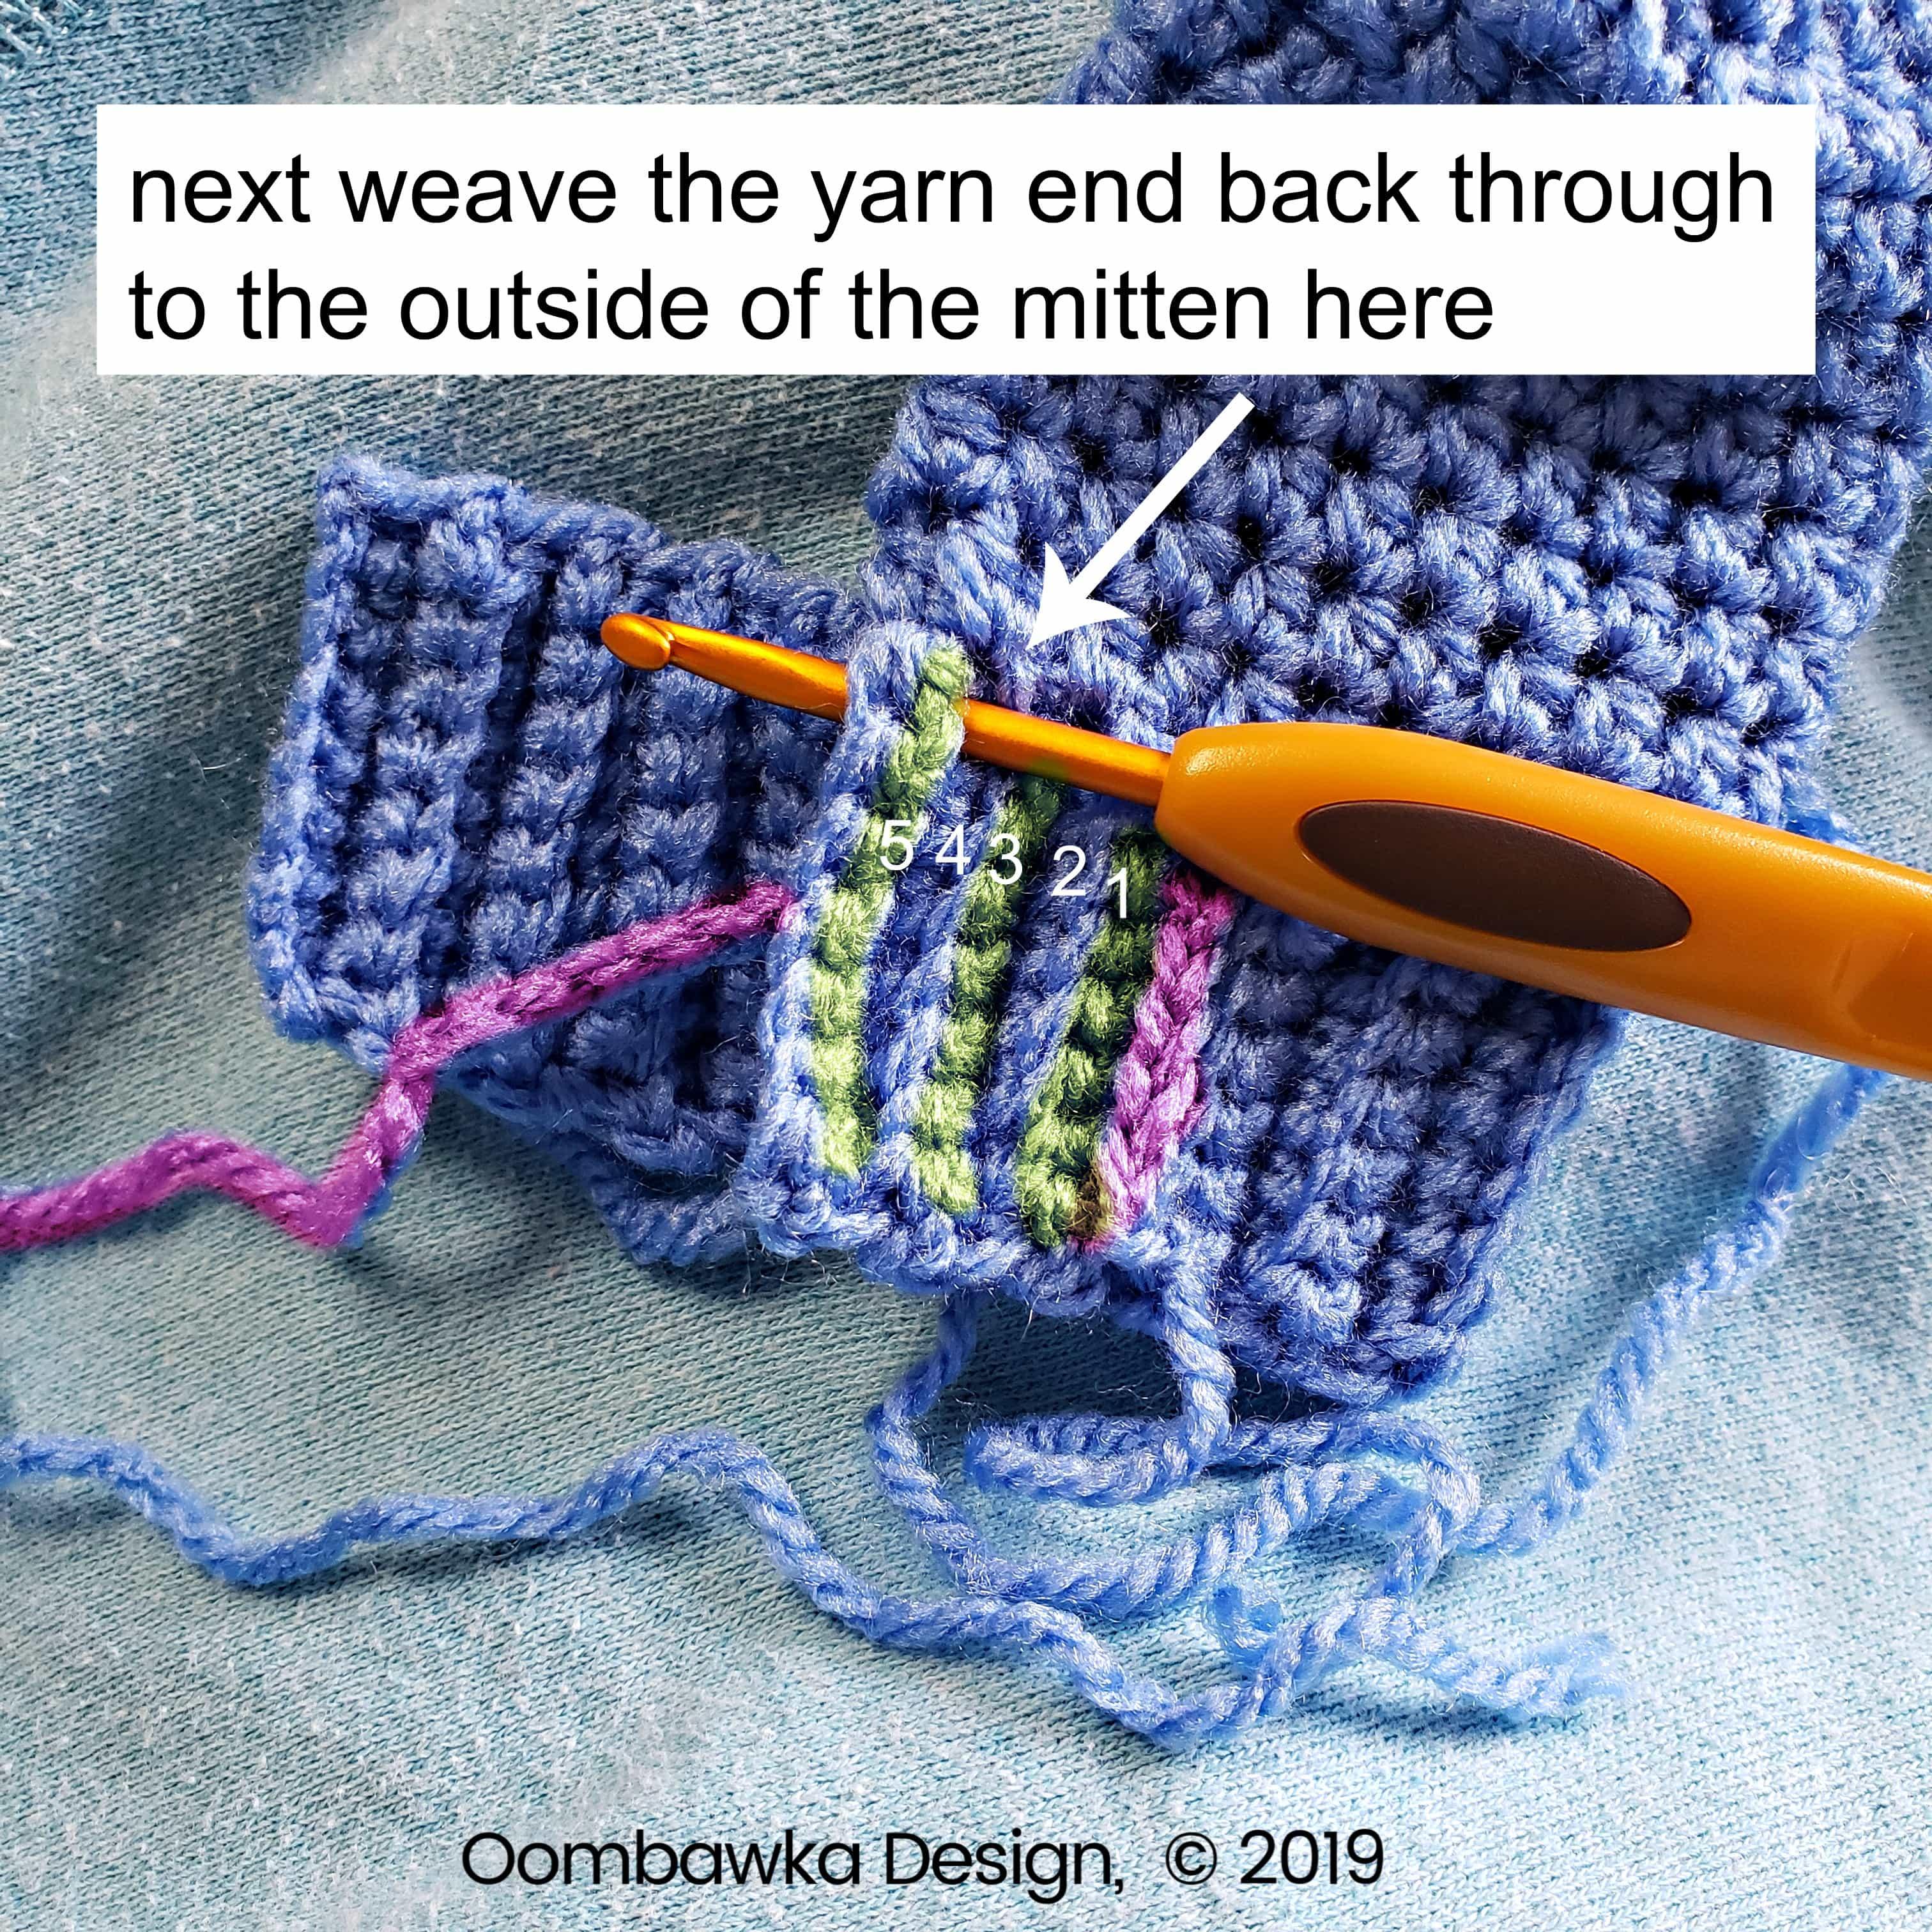
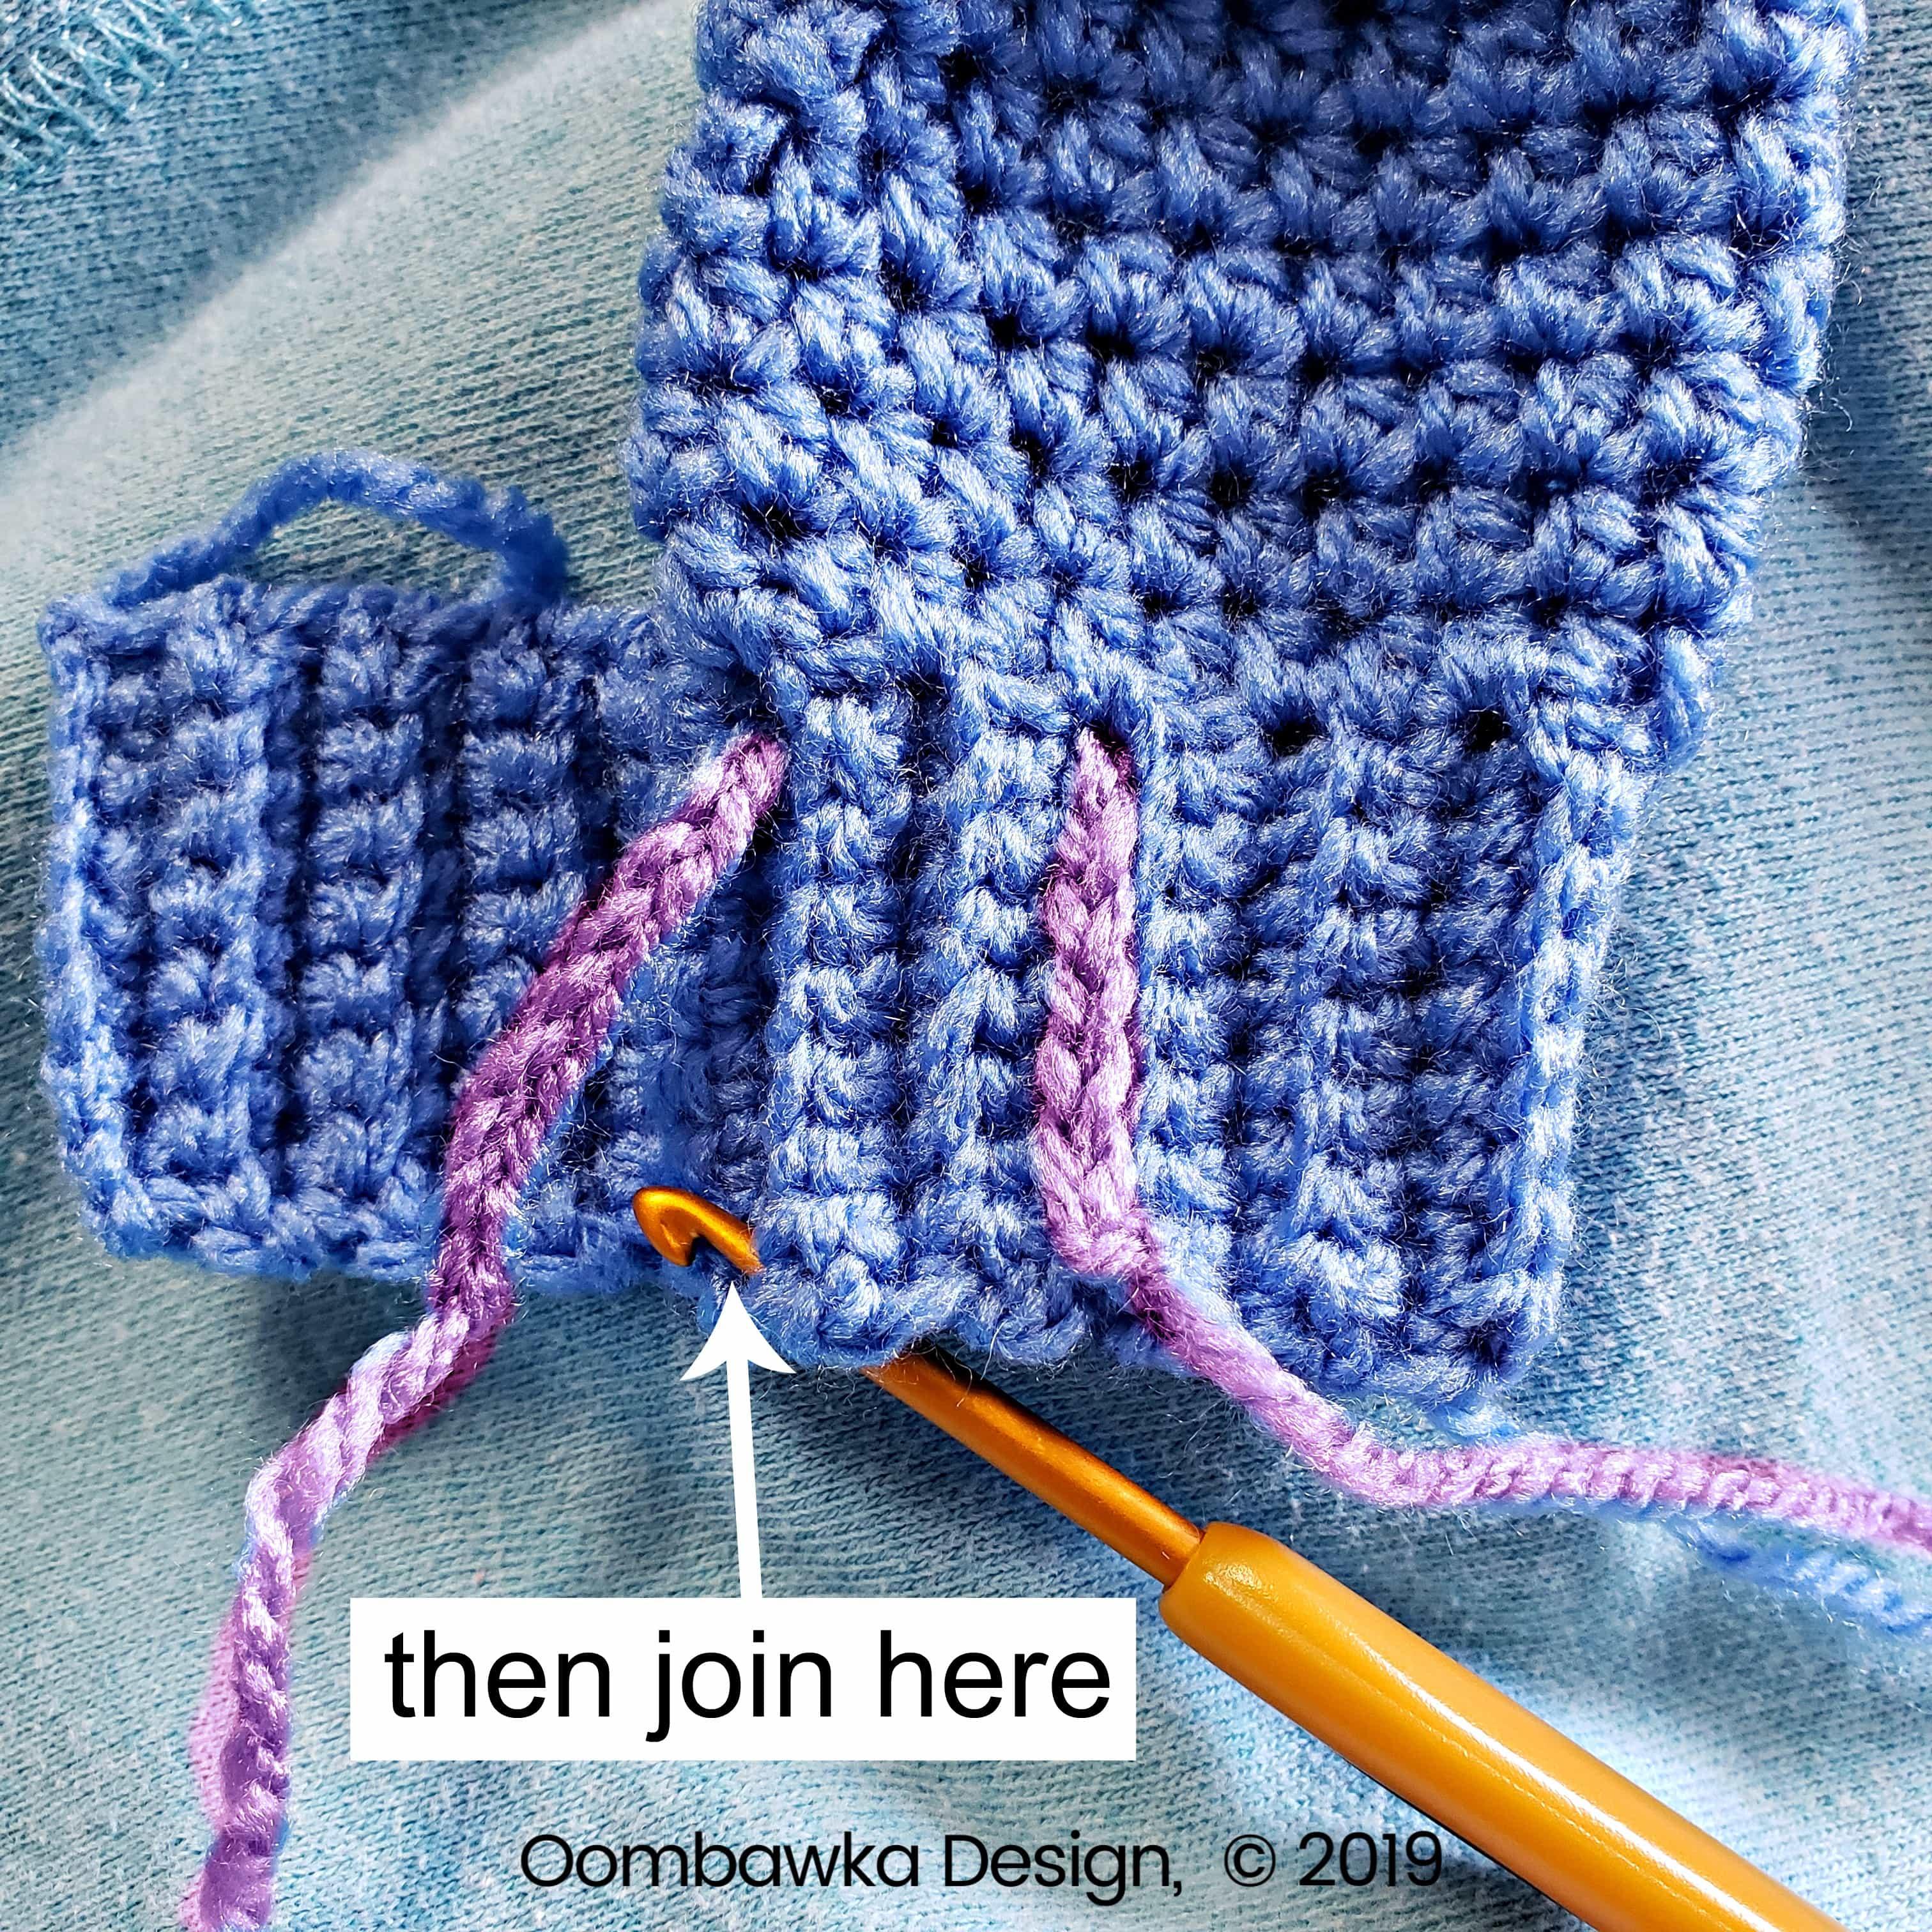
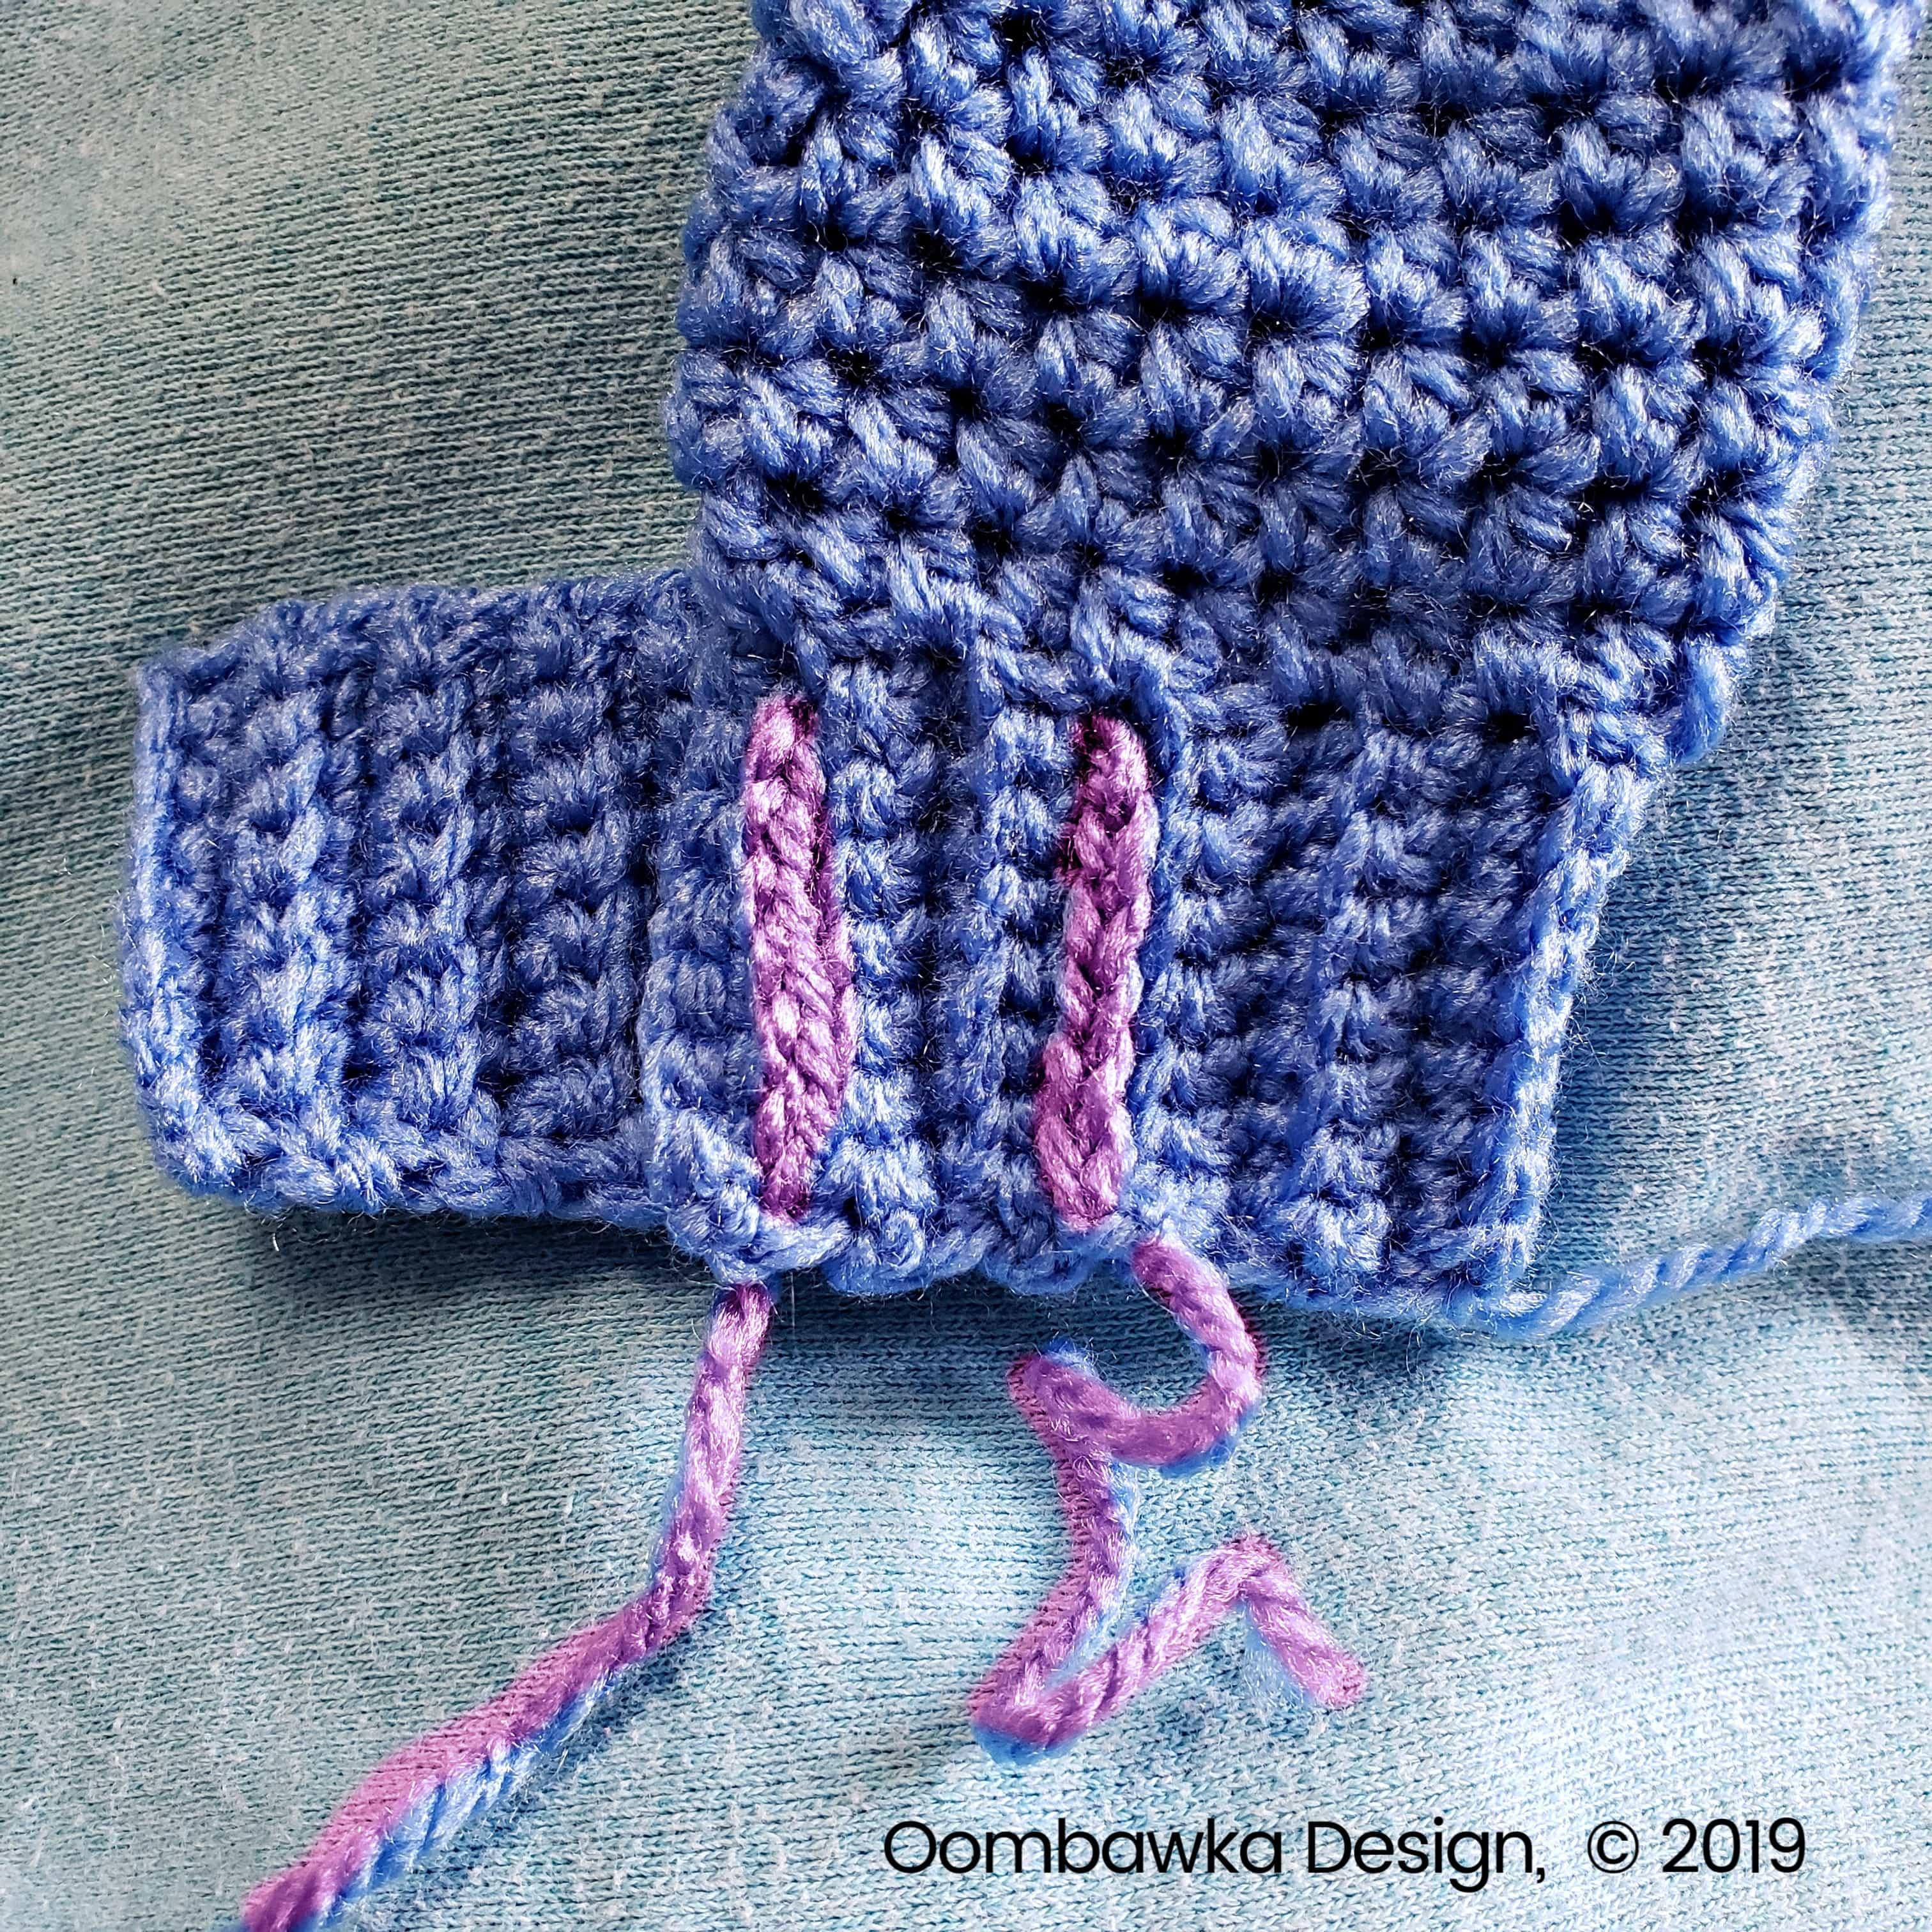
Attach the yarn end to the base of the cuff and weave in your ends securely.
Finishing
Use my simple closing method to close the tops of the mittens. Tutorial: Simple Closing Method
Weave in any remaining ends.
#redheartyarns #joycreators #babycrochet
Practical baby gifts are always appreciated by new parents. Easy-on, no scratch mittens are an excellent choice for keeping those little hands safe and protected. With their unique crochet pattern and adjustable design, they are both functional and adorable. So if you’re looking for a thoughtful and useful gift, consider these mittens. Your loved ones will thank you for it!
Source: https://t-tees.com
Category: HOW