
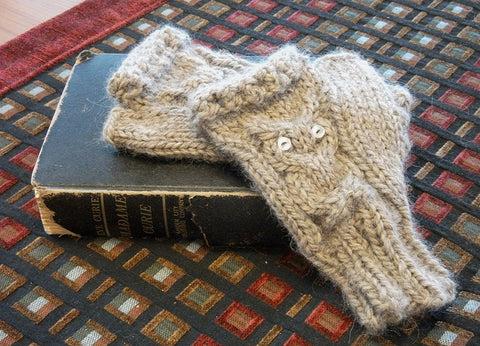
These cute and studious little cabled owls will keep your hands toasty and the textbook pages turning! Designer Meghan Bosanko kindly provided a step-by-step tutorial for the her free pattern, Owl Study Gloves. Meghan explains each part of the pattern, and you’ll learn about cables, thumb gussets, what brackets mean, using double-pointed needles, and do much more! So download your copy, get your yarn, and knit along! Materials
- 1 hank Cascade Chunky Baby Alpaca, Berroco Ultra Alpaca Chunky, or 100 yds of similar yarn
- Five US 10 double-pointed needles
- Stitch marker
- Cable needle
- Four 1/4″ buttons, plus sewing needle & thread
Stitches & Abbreviations
You are viewing: How To Crochet Owl Fingerless Gloves
- dpns— double-pointed needles
- m1— make 1 new stitch by picking up the running thread from the back & knitting it
- c4b— slip 2 stitches to cable needle & bring to back of your work, knit 2 regular stitches, then knit 2 stitches from cable needle
- c4f— slip 2 stitches to cable needle & bring to front of your work, knit 2 regular stitches, then knit 2 stitches from cable needle
- k2tog— knit 2 stitches together
- [instructions]—brackets don’t need any special treatment; they are just to help keep instructions organized
Directions
Left glove: Cast on 20 stitches and divide evenly between 4 dpns, being careful not to twist the cast-on. Place marker and join.
- Rounds 1-12: *k2, p2* repeat around (2 x 2 ribbing)
- Round 13: knit around
- Round 14: *k4, m1* repeat around— 25 stitches in round
- Round 15: knit around
Now, you’ll rearrange the stitches on your dpns to make the counting easier. From the marker, leave 2 stitches on the first dpn. Place the next 12 stitches on the second dpn. Place the next 9 stitches on the third dpn and leave the last 2 stitches on the fourth dpn. The brackets will help you see what happens on each dpn.
- Round 16: [k1, m1, k1], [k2, p8, k2], [k9], [k1, m1, k1] — 27 stitches in round
- Round 17: [k3], [p2, k8, p2], [k9], [k3]
- Round 18: [k1, m1, k2], [p2, k8, p2], [k9], [k2, m1, k1] — 29 stitches in round
- Round 19: [k4], [p2, c4b, c4f, p2], [k9], [k4]
- Round 20: [k1, m1, k3], [p2, k8, p2], [k9], [k3, m1, k1] — 31 stitches in round
- Rounds 21-24: [k5], [p2, k8, p2], [k9], [k5]
- Round 25: [k5], [p2, c4b, c4f, p2], [k9], [k5]
- Round 26: [k5], [p2, k8, p2], [k9], [k5]
- Rounds 27 & 28: [k5,], [p2, k1, p2, k2, p2, k1, p2], [k9], [k5]
- Round 29: [k5], [p2, k8, p2], [k9], [k5]
- Round 30: [k5], [p2, c4b, c4f, p2], [k9], [k5]
- Round 31: [k5], [p2, k8, p2], [k9], [k5]
- Round 32: knit around
- Round 33: [k5], [k12], [k9], but don’t work the last 5 stitches on the fourth dpn
Slip the first 5 stitches of the round and the last 5 stitches of the round onto a piece of scrap yarn and set aside—these will become your glove’s thumb later (10 stitches total). Cast on 1 extra stitch across the gap to connect the remaining stitches in a round, and rearrange evenly on your dpns (22 stitches total).
- Rounds 34 and 35: knit around
- Round 36: purl around
- Round 37: *k2tog, yo* repeat around
- Round 38: purl around
- Round 39: knit around
Loosely bind off the 22 stitches from your dpns.
Slip the thumb stitches back onto your dpns and distribute evenly (you may only want to use 3 dpns here). Pick up and knit 1 stitch in the gap where the thumb meets the body of the glove (11 stitches total).
Rounds 1-3: knit around.
Loosely bind off all thumb stitches.
Read more : How To Keep Mystic Tuning Gloves
Right glove: Cast on 20 stitches and divide evenly between 4 dpns, being careful not to twist the cast-on. Place marker and join.
- Rounds 1-12: *k2, p2* repeat around (2 x 2 ribbing)
- Round 13: knit around
- Round 14: *k4, m1* repeat around— 25 stitches in round
- Round 15: knit around
Now, you’ll rearrange the stitches on your dpns to make the counting easier. From the marker, leave 2 stitches on the first dpn. Place the next 9 stitches on the second dpn. Place the next 12 stitches on the third dpn and leave the last 2 stitches on the fourth dpn. The brackets will help you see what happens on each dpn.
- Round 16: [k1, m1, k1], [k9], [k2, p8, k2], [k1, m1, k1]— 27 stitches in round
- Round 17: [k3], [k9], [p2, k8, p2], [k3]
- Round 18: [k1, m1, k2], [k9], [p2, k8, p2], [k2, m1, k1] — 29 stitches in round
- Round 19: [k4], [k9], [p2, c4b, c4f, p2], [k4]
- Round 20: [k1, m1, k3], [k9], [p2, k8, p2], [k3, m1, k1] — 31 stitches in round
- Rounds 21-24: [k5], [k9], [p2, k8, p2], [k5]
- Round 25: [k5], [k9], [p2, c4b, c4f, p2], [k5]
- Round 26: [k5], [k9], [p2, k8, p2], [k5]
- Rounds 27 & 28: [k5,], [k9], [p2, k1, p2, k2, p2, k1, p2], [k5]
- Round 29: [k5], [k9], [p2, k8, p2], [k5]
- Round 30: [k5], [k9], [p2, c4b, c4f, p2], [k4]
- Round 31: [k5], [k9], [p2, k8, p2], [k5]
- Round 32: knit around
- Round 33: [k5], [k9], [k12], but don’t work the last 5 stitches on the fourth dpn
Slip the first 5 stitches of the round and the last 5 stitches of the round onto a piece of scrap yarn and set aside—these will become your glove’s thumb later (10 stitches total). Cast on 1 extra stitch across the gap to connect the remaining stitches in a round, and rearrange evenly on your dpns (22 stitches total).
- Rounds 34 & 35: knit around
- Round 36: purl around
- Round 37: *k2tog, yo* repeat around
- Round 38: purl around
- Round 39: knit around
Loosely bind off the 22 stitches from your dpns. Slip the thumb stitches back onto your dpns and distribute evenly (you may only want to use 3 dpns here). Pick up and knit 1 stitch in the gap where the thumb meets the body of the glove (11 stitches total).
Rounds 1-3: knit around. Loosely bind off all thumb stitches.
Diving in Deeper
What is with all the brackets?
Yeah, I know … knitting patterns aren’t supposed to look like math textbooks, right? But bear with me here for a minute. If you haven’t started a pair of these gloves, this probably looks super threatening and you can’t imagine how such ugliness could ever be helpful.
Here’s the dealio, though: when you reach that part of the pattern, you have your 25 stitches split very strategically across 4 double-pointed needles. The brackets help you see what is happening on each of the 4 needles— they’re just a way to visually break up the round into bite-size chunks!
“Split very strategically?” Want to elaborate a little there?
Read more : How Has The Baseball Glove Changed Over The Years
In my Holly Holiday voice: I thought you’d never ask! While the gunk inside the brackets looks like word soup at first glance, there really is a pattern from round to round. Take a look at the left glove, for example.
- The first and last brackets correspond to the stitches on your first and last dpns. They start off with only 2 stitches each, but increase every other round until they hold 5 stitches each. Then, they sit tight and get knit until it’s time to turn those stitches into the thumb of your glove.
- The second bracket is where your owl will take shape. The written-out directions are hard to visualize, but the chart below might help you see what’s really going on under all that purling and cabling.
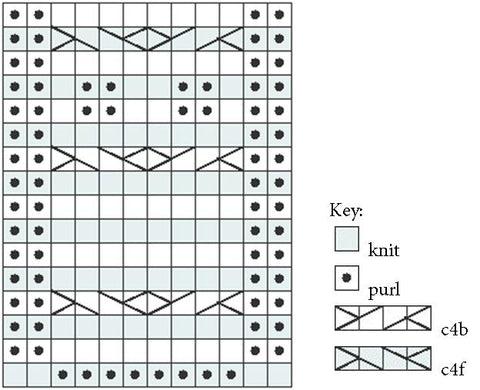
- The third bracket is plain-Jane knit stitches, every single round! This chunk of stitches will become the palm of your glove.
- Then, to make your right glove, it’s the same process, just with the 2nd & 3rd brackets switched!
Why the floopy yarn-overs at the end of the glove?
This is a purely stylistic choice that you are, of course, welcome to modify or leave out altogether. From round 37 onward, you’re creating some raised eyelets for the top edge of your gloves. They are there for two reasons: first, to combat the rolling tendency of plain old stockinette stitch, and second, to look classy as hell. Who wants ribbing at the top of fingerless gloves, right?
Finishing
Weave in ends and trim. Sew buttons into place as the owls’ eyes—the little square of purled stitches marks where they belong. Now slip them on and never choose between cute and smart again!
Ready to turn your screen off and start knitting? Download Owl Reading Mitts tutorial for a printable version of this post, or download Owl Reading Mitts pattern for a no-nonsense printable pattern.
XOXOXOXO, Meg 🙂
© 2011 Meghan Bosanko
Source: https://t-tees.com
Category: HOW