This post may contain affiliate links. Read my disclosure policy here.
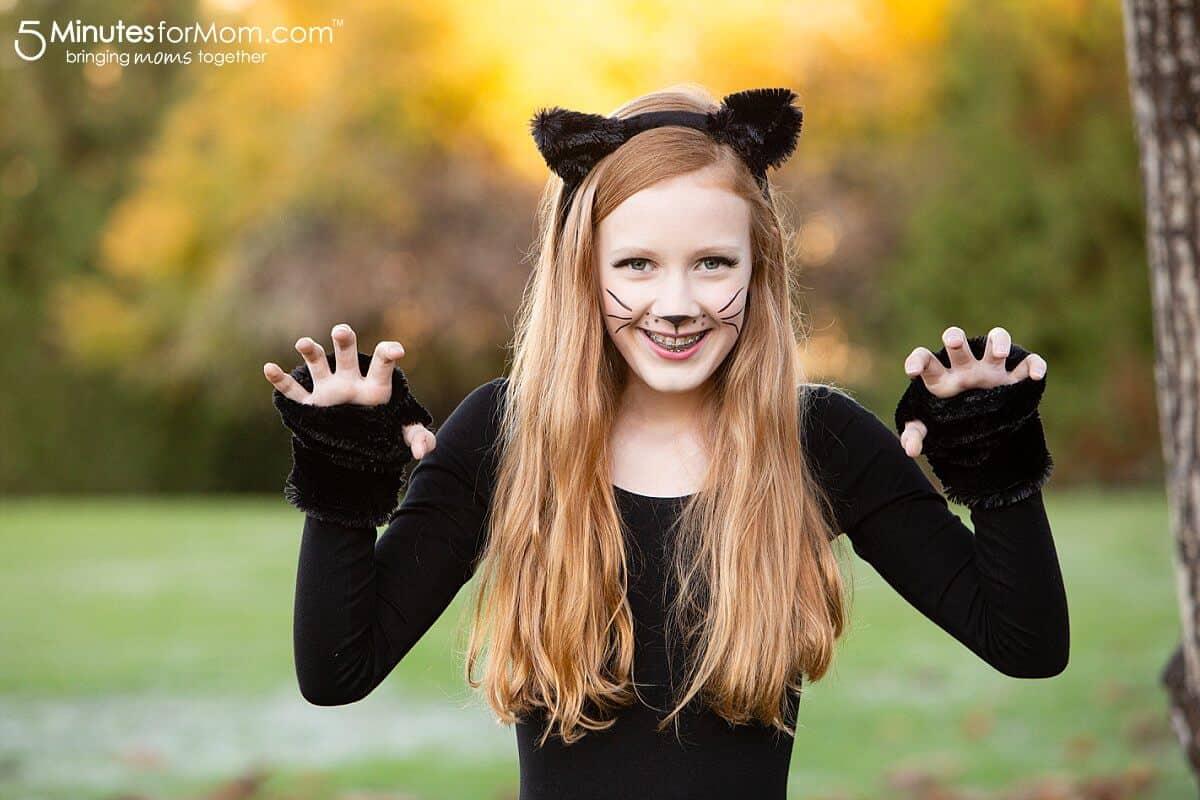
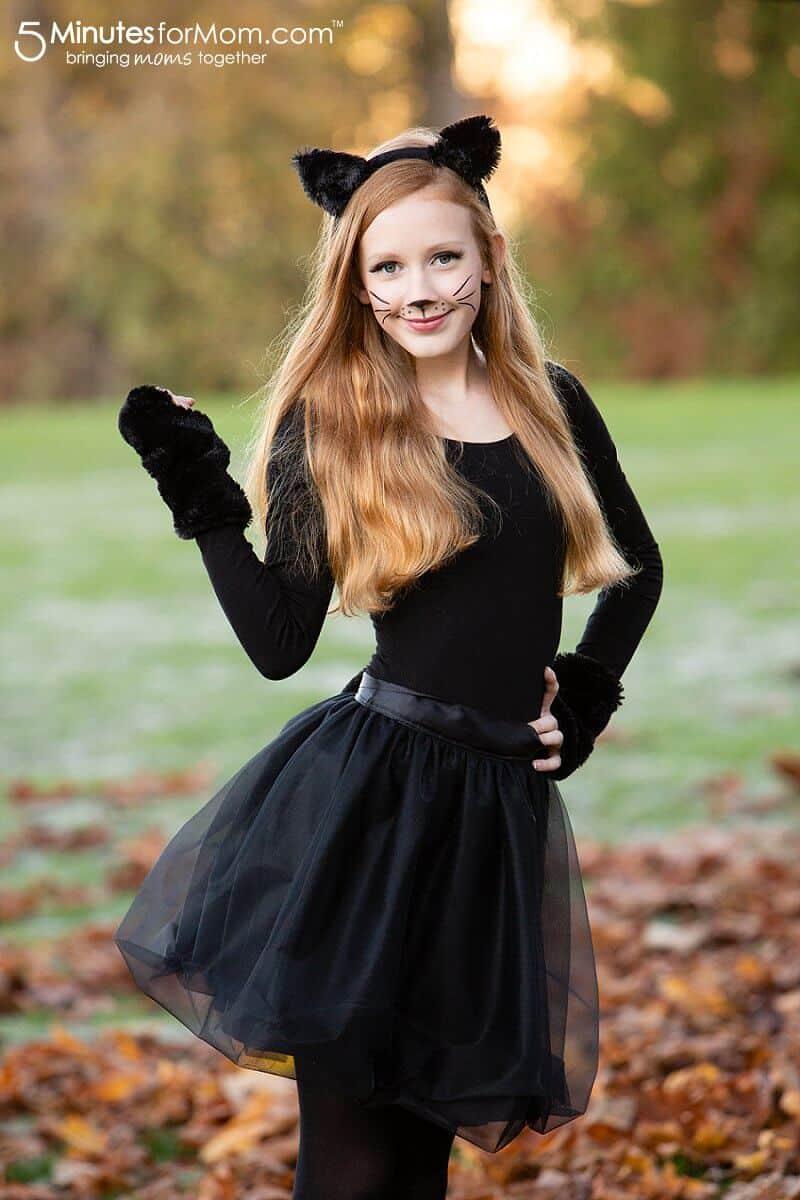
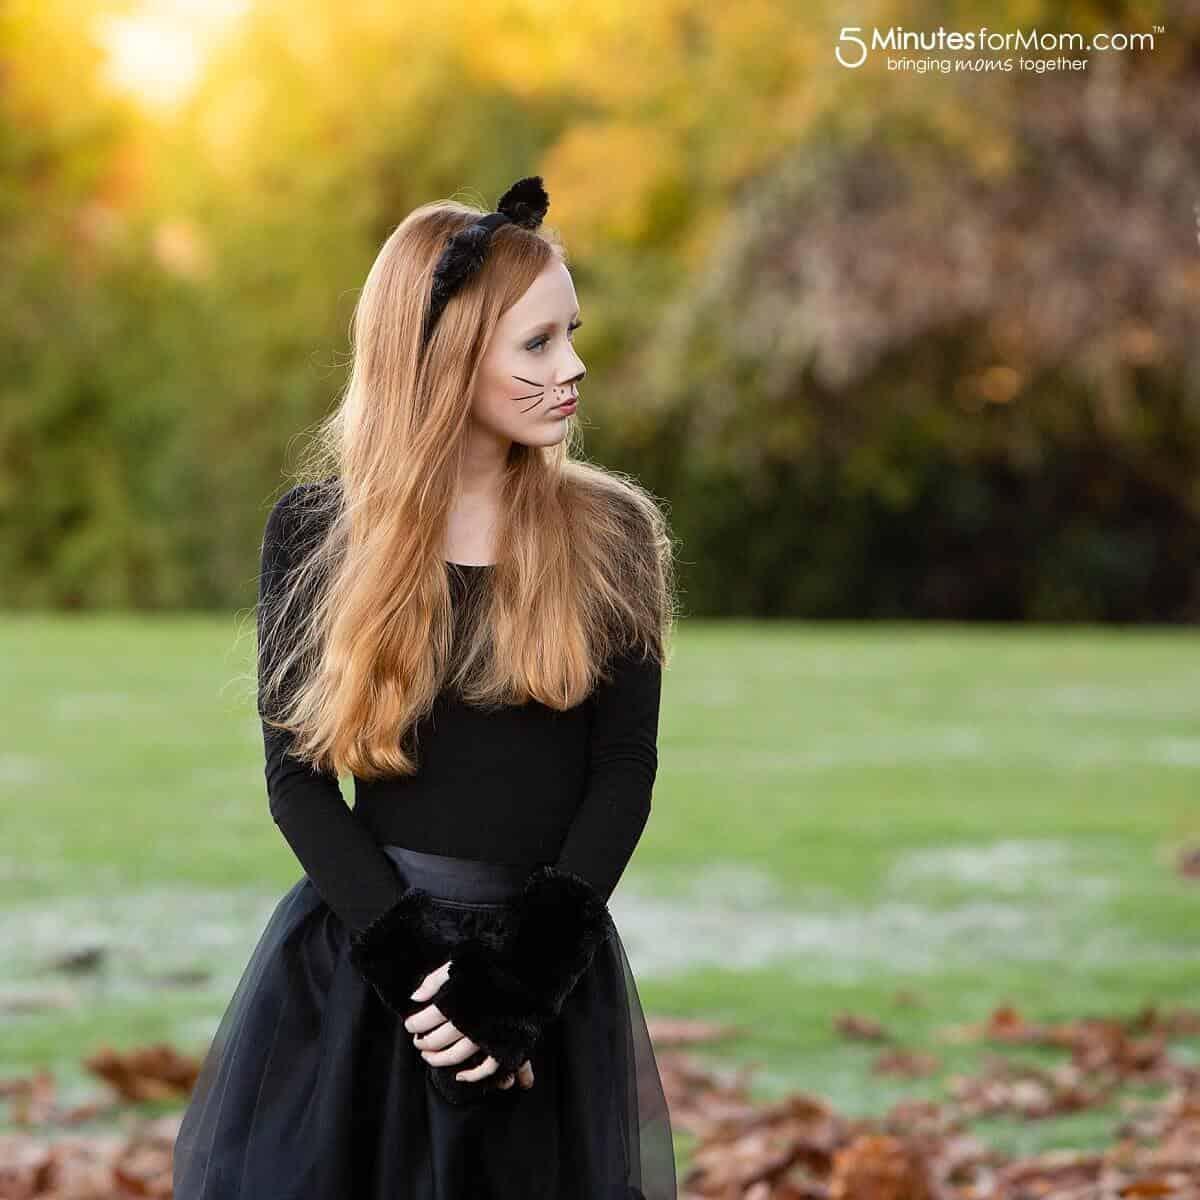
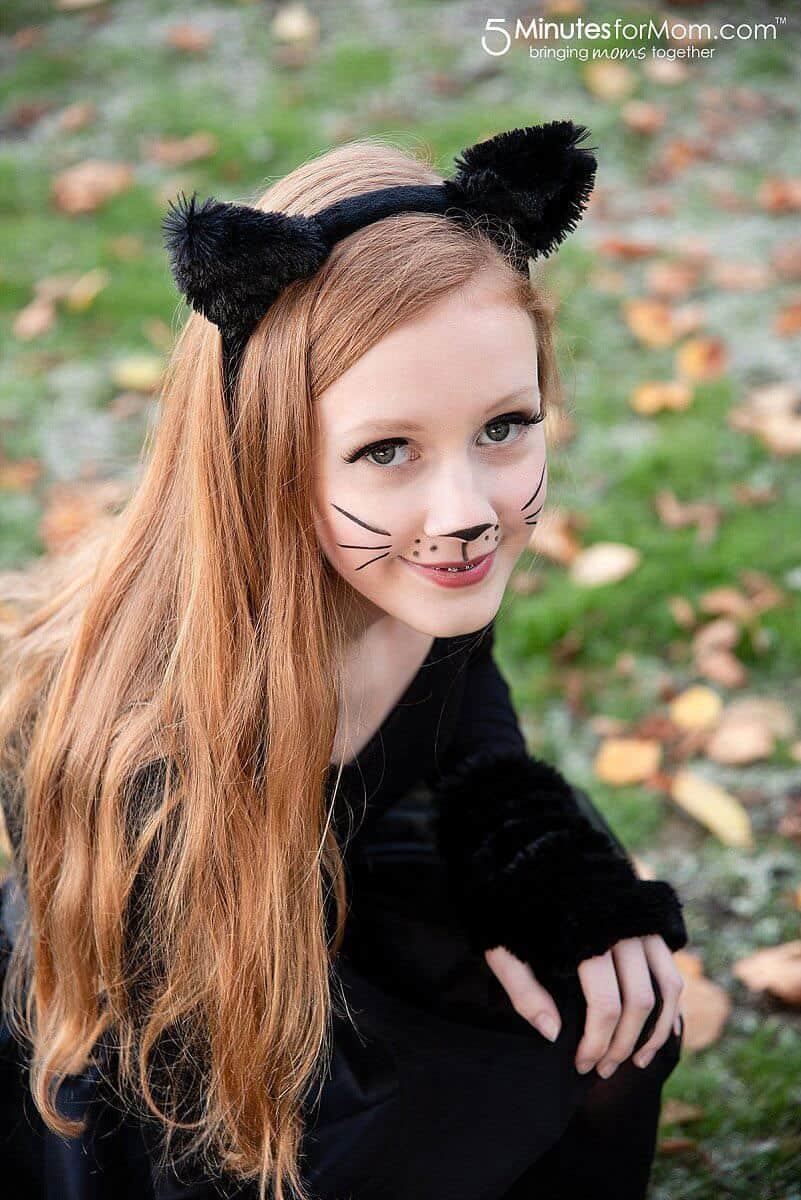
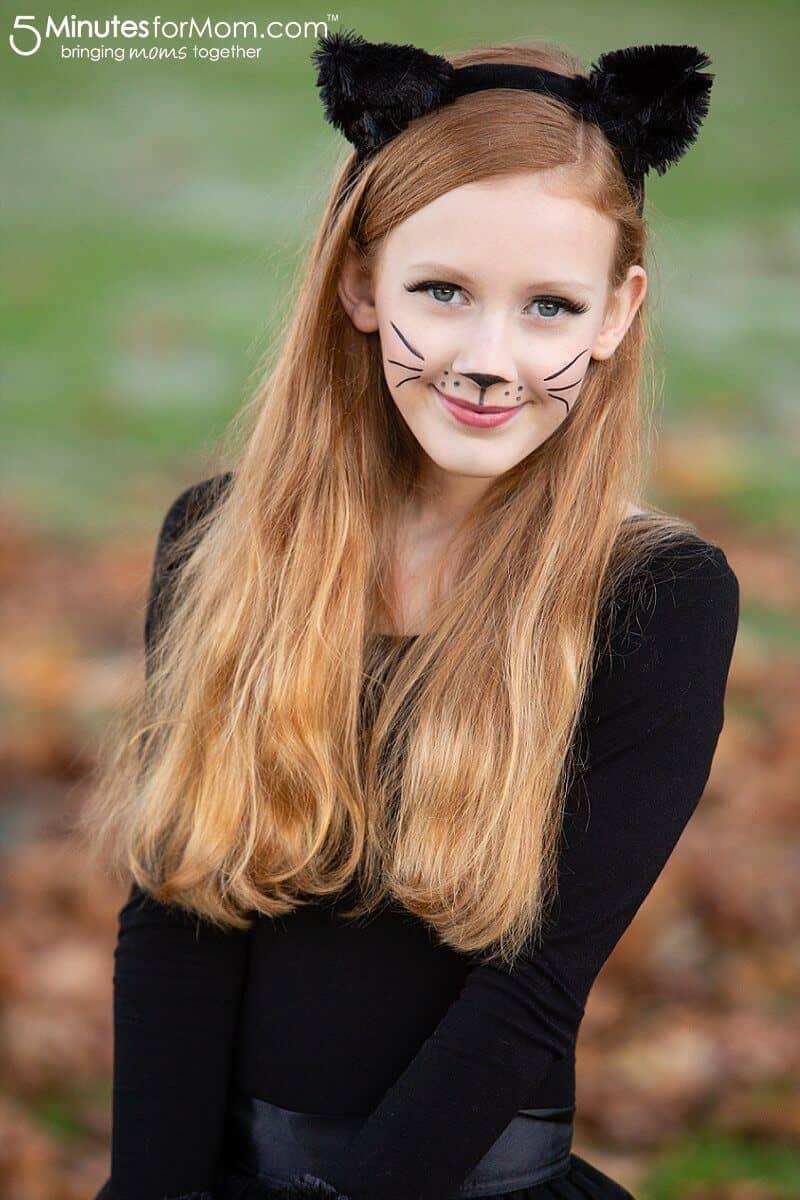
Do you want to make an easy cat costume? This gorgeous black cat costume is super cozy, adorable and easy to make. All you need is some soft black plush fabric or faux fur, a bit of bendable wire, needle and thread, and a headband.
You are viewing: How To Make Black Cat Gloves
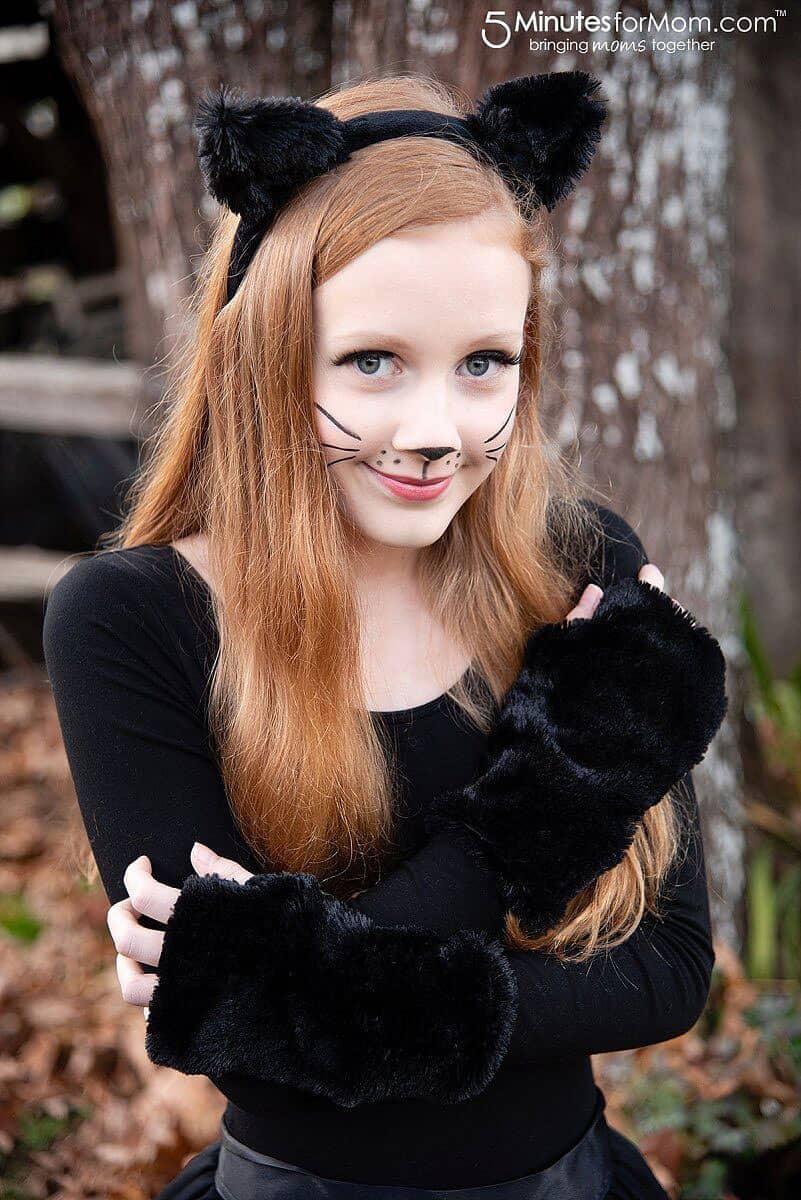
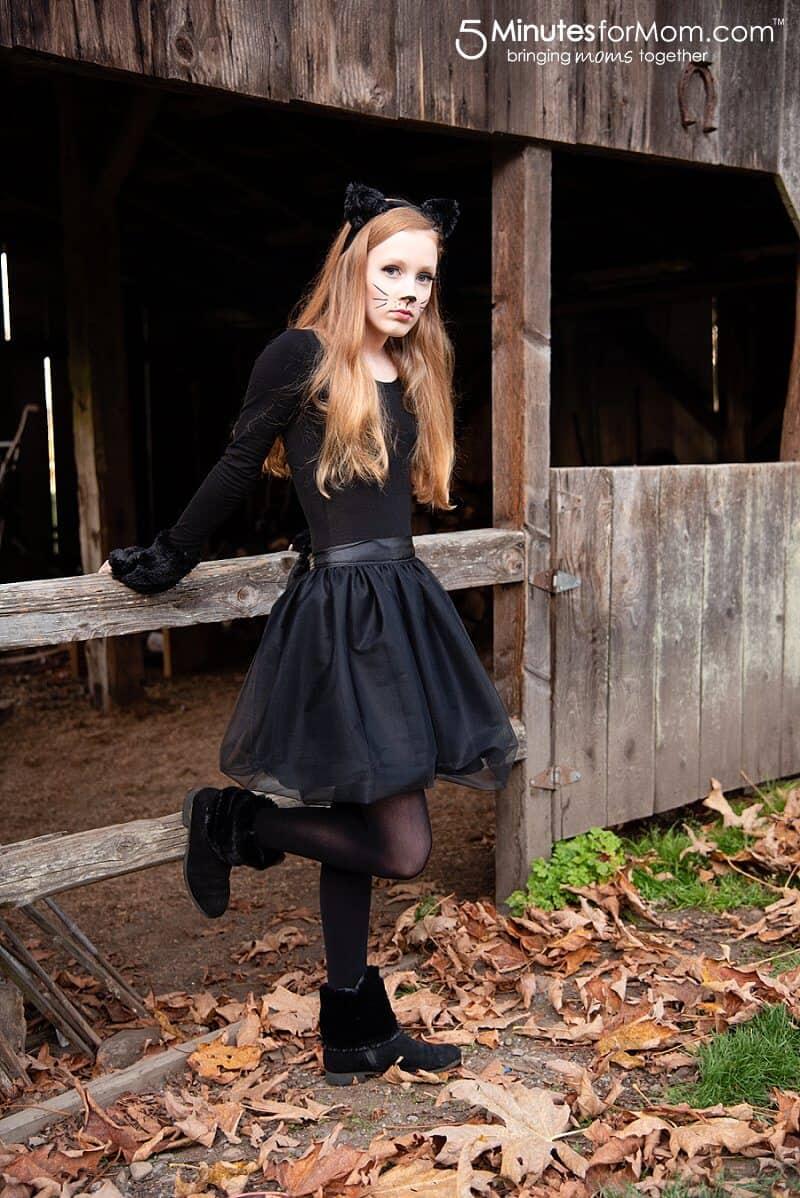
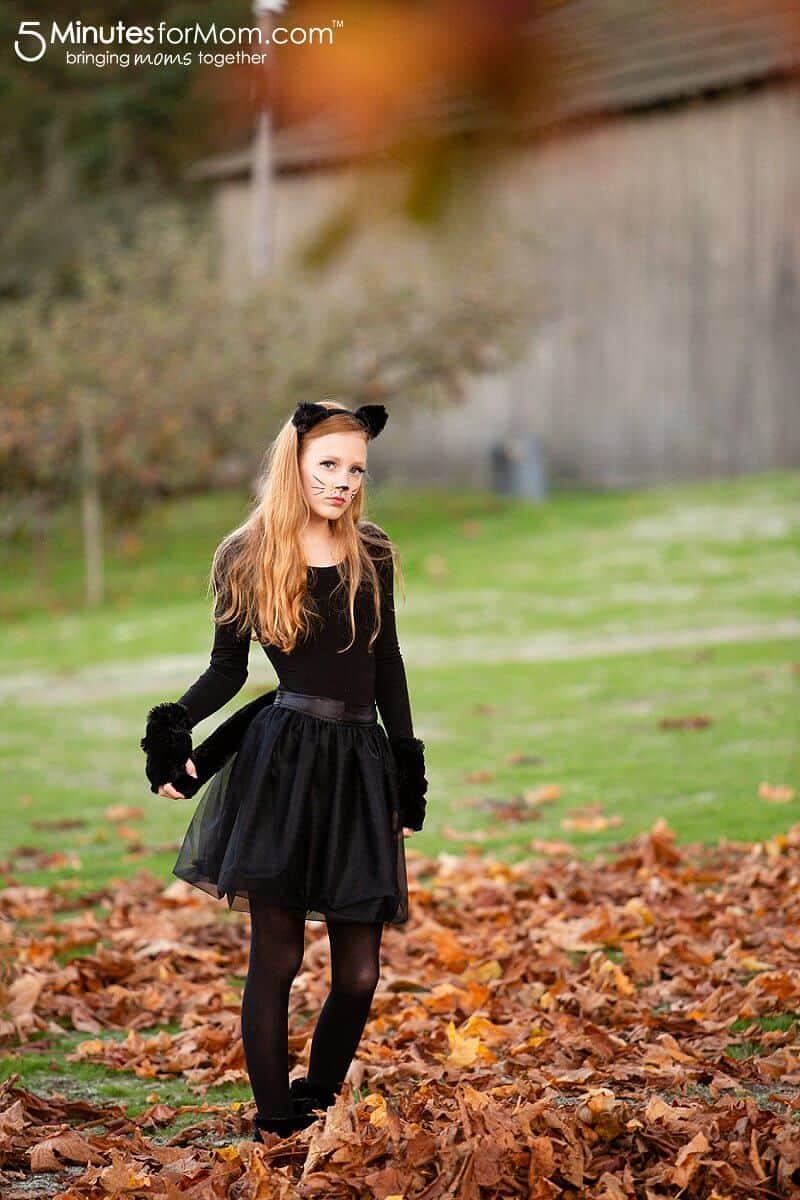
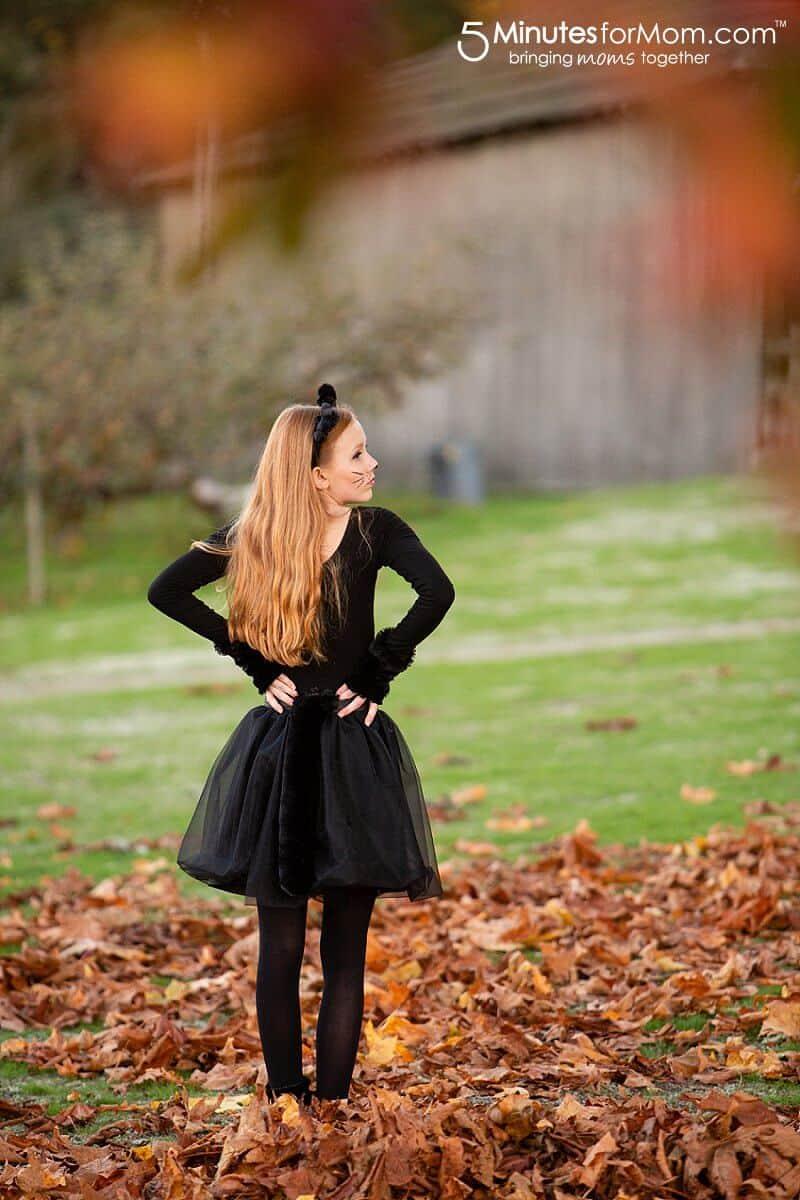
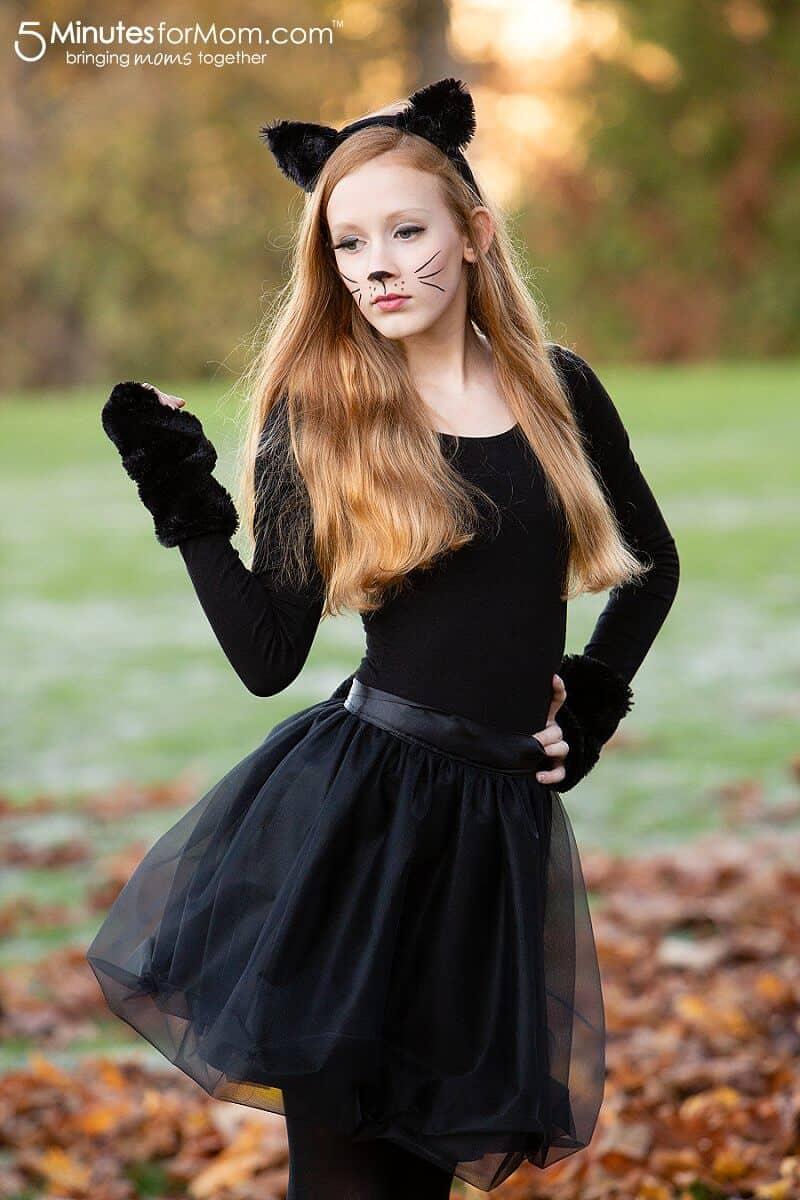
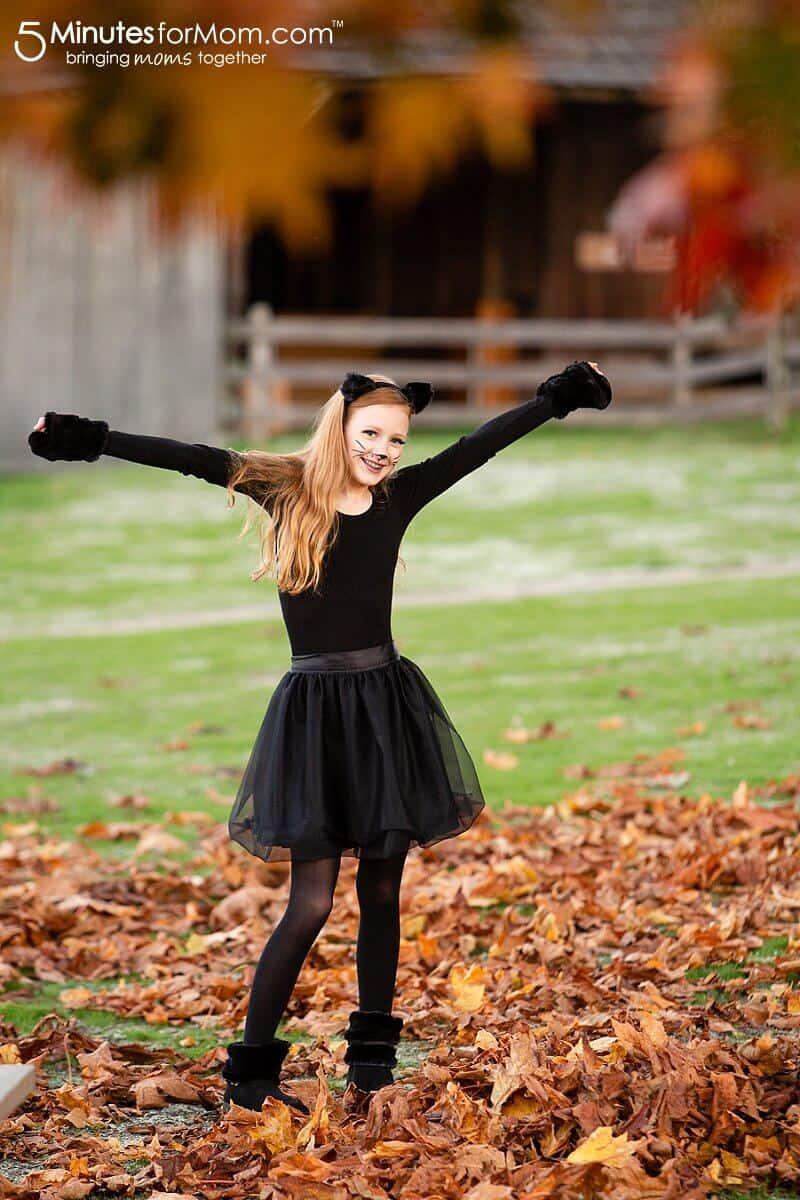
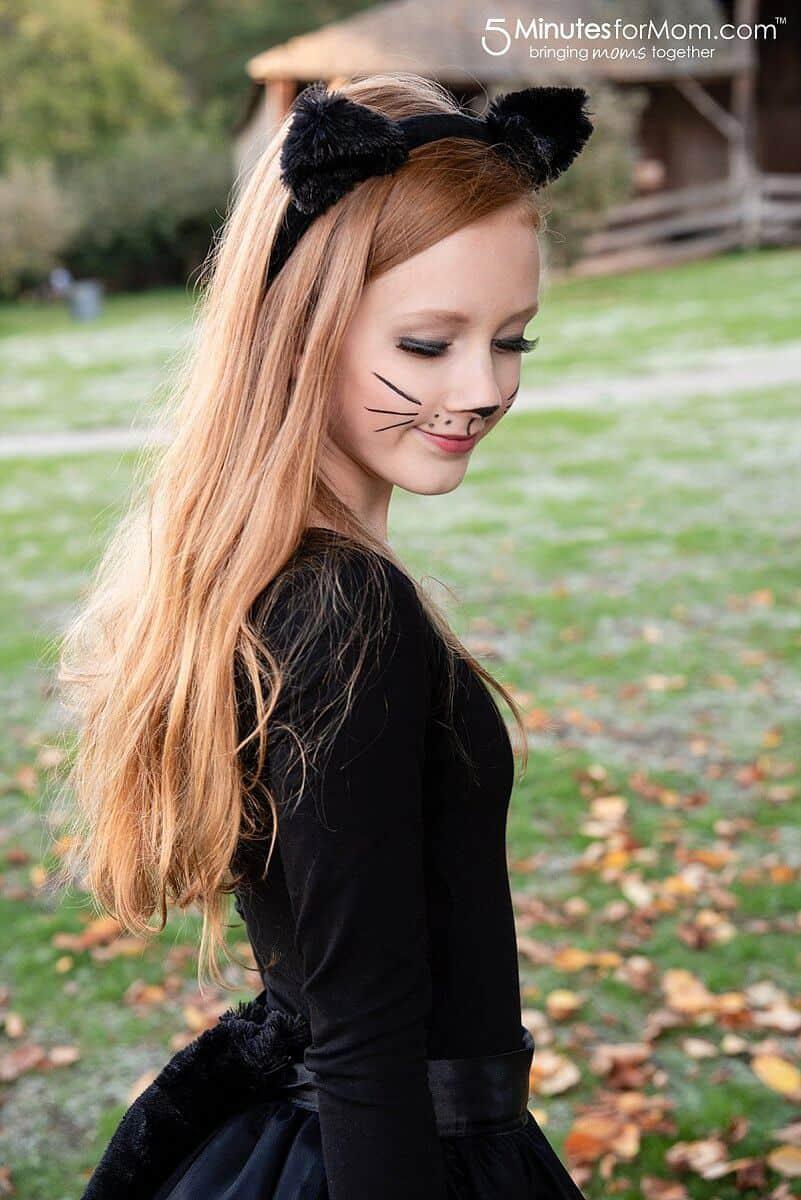
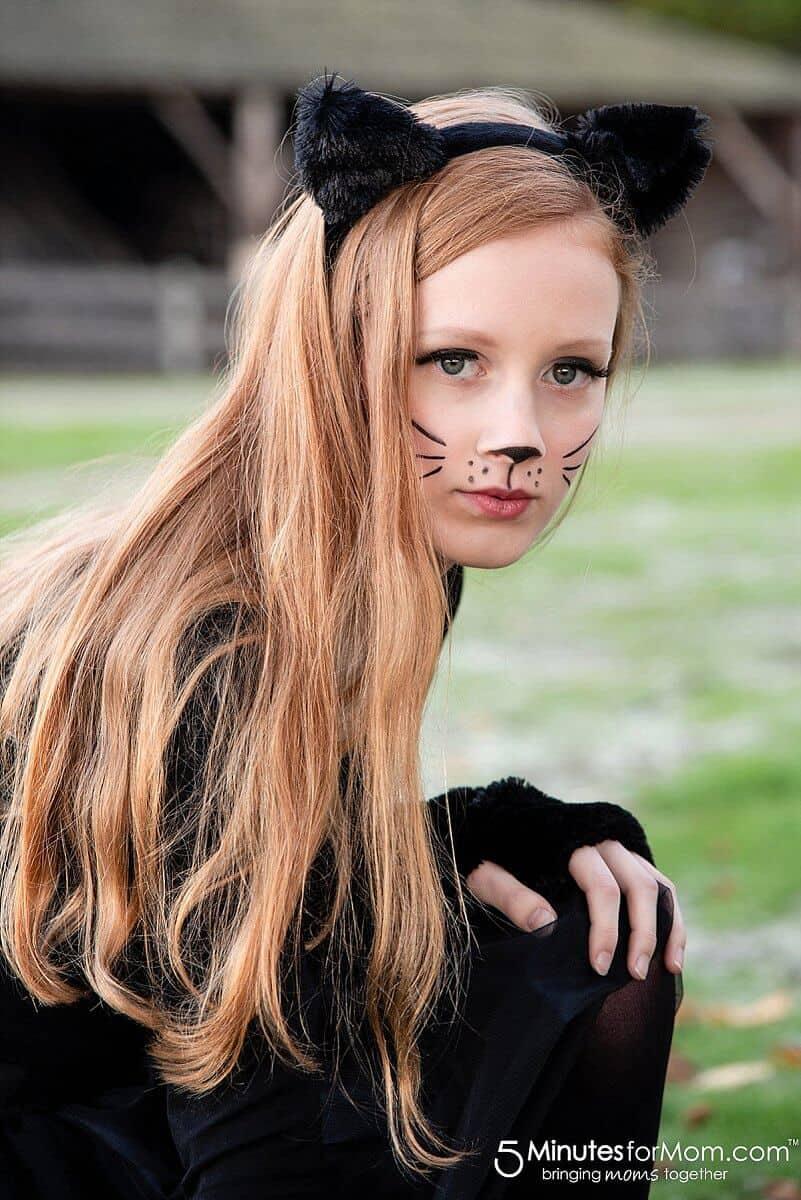
This DIY Halloween costume includes plush cat ears and tail, fingerless gloves and leg warmers. I also made a soft crinoline bubble skirt and paired it with a black bodysuit and applied pretty cat costume makeup.
A black cat probably wins for the most popular Halloween costume. On every sidewalk and at every Halloween party, there are always cat ears and whiskered faces. Dressing up as a black cat can be the simplest solution to the annual question, “What should I be for Halloween?”
But, just because you won’t be the only cat on the street, doesn’t mean your DIY cat costume can’t stand out as one of the best!
With some homemade magic, you can create a stunning black cat costume that is truly one of a kind!
When our girls were younger, we made them these cute black cat costumes that are cozy and perfect for younger kids. In 2018, Julia wanted to dress as a cat again, but as a teenager, she wanted a pretty cat costume that was more suitable for a teen.
How To Make An Easy Cat Costume
While I used my sewing machine when I created this cat costume for my thirteen-year-old niece, Julia, you can sew it by hand if you don’t have a sewing machine. You don’t even need a glue gun!
DIY Cat Ears
First, every cat needs ears. Really, in a pinch, you can just rock the cat ears, black clothes, and some makeup.
Over the years, I have made more animal ears than I can count. I have made various kinds of cat ears, bunny ears, bat ears, fox ears, fawn ears, and unicorn ears.
In these cat costumes I made a few years ago, I show you one method for how to make cat ears.
Easy Animal Ears Video Tutorial
You can see how to make a really easy type of animal ears in this video tutorial…
The Prettiest Cat Ears
For this new cat costume for teens, I made an even prettier style of cat ears. The method I used for these plush cat ears is more refined and simplified. (After making all those ears, I have discovered what works and looks best.)
Here is how I make these pretty cat ears…
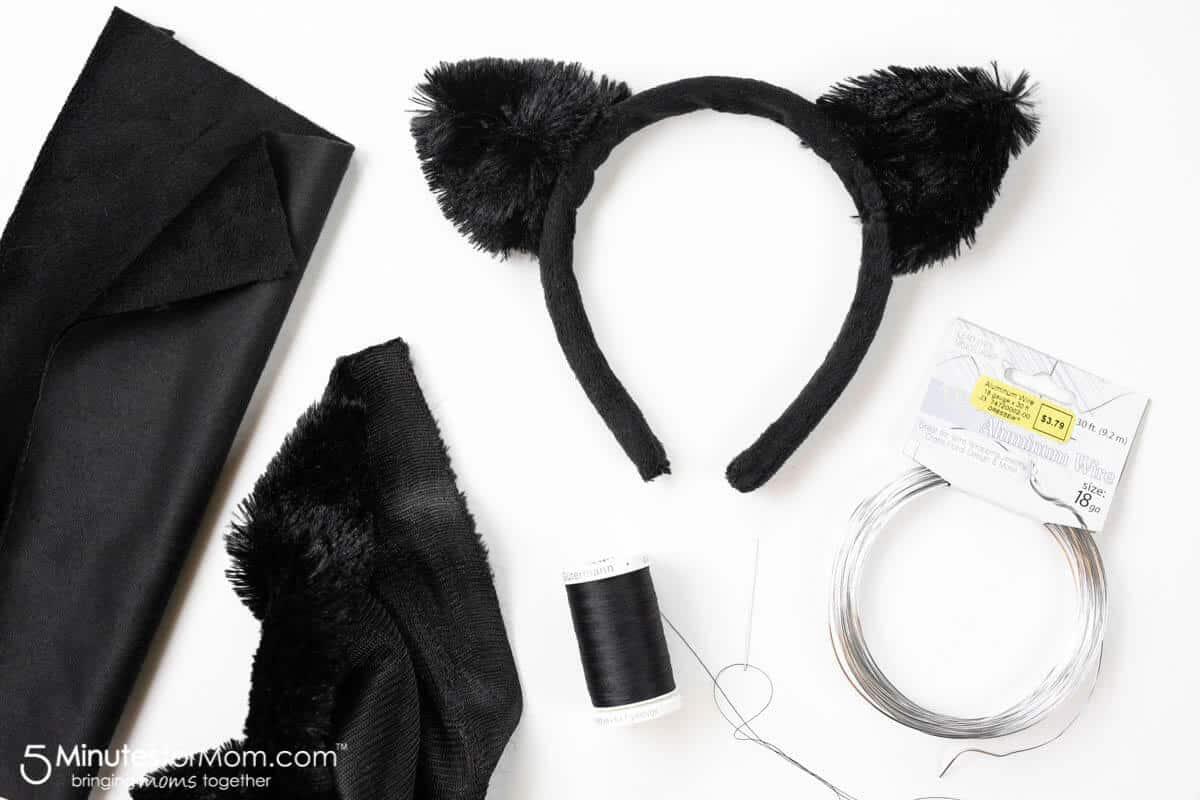
Cat Ears Materials:
- Plush fabric and/or faux fur
- needle
- thread
- scissors
- headband
- bendable wire
Step 1. Cut out cat ears
Draw a simple template for your cat ears on paper. Basically, you just need to draw a triangle that extends down about an inch at the bottom.
Once you have your template, cut your ears out of your fabric — two ears, in sets of two — a front and back piece for each ear.
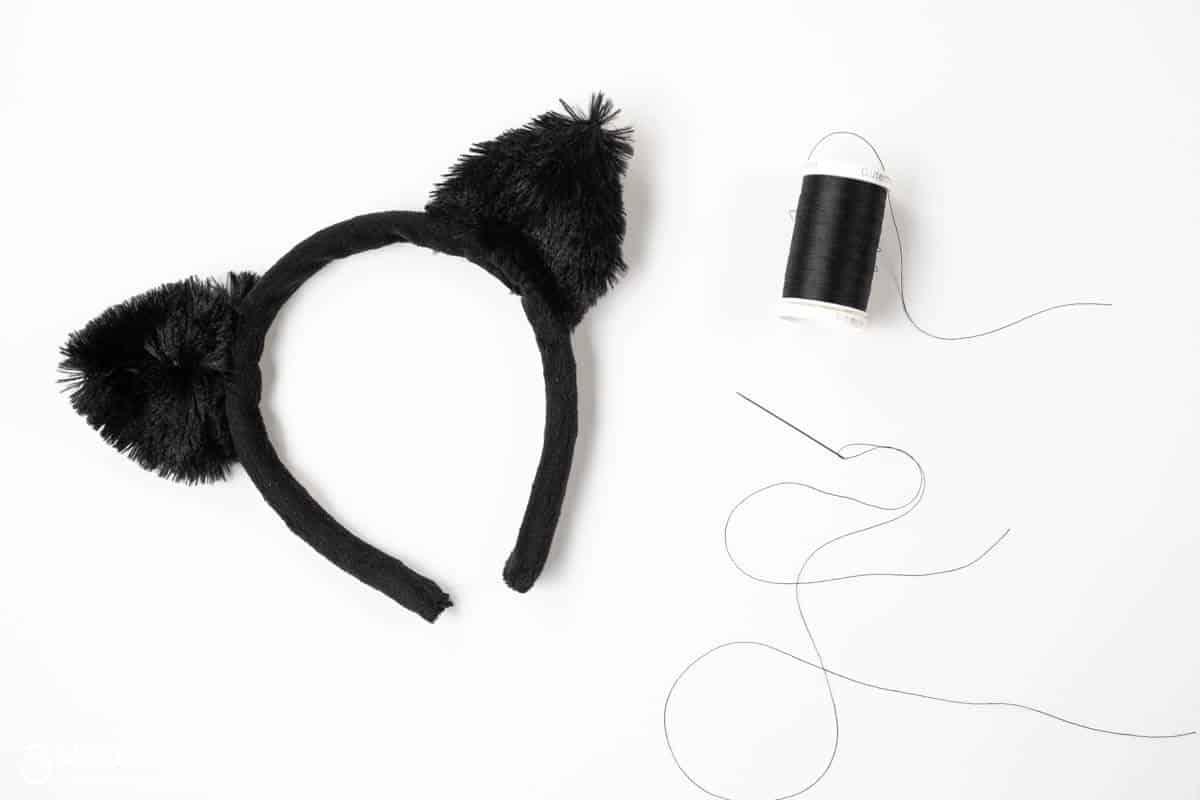
Step 2. Sew cat ears
With right sides together, sew the front and back of ear together, leaving the bottom open. You can use a sewing machine or stitch by hand.
If you have more than a 1/4″ seam allowance, trim. Turn inside out. Repeat for the second ear.
For these cat ears, I actually moved the side seams into the middle of the ears so that the fabric pulled into the center, similarly to how cat fur faces inward at the ear.
But that is optional. You can just turn your ears inside out as usual and have the side seams at the side.
Step 3. Bend wire into cat ear shapes
If your fabric is soft and “floppy,” you will probably need to make some sort of an insert to hold up your ears.
An easy way to hold up fabric ears is to use some bendable wire such as aluminum crafting or beading wire. You can also use pipe cleaners, floral wire, or even the wire from a clothes hanger.
Bend the wire into a triangle shape that you feel resembles the shape you want for your cat ears.
Insert triangle wire shapes into ears and set aside while you make the cover for your headband.
Step 4. Cut out cover for headband
Making a cover for your headband is super simple.
You can make the cover in the same plush you are using for your ears, or you can use another soft fabric that isn’t as fluffy.
(For the bunny ears I made for Sophia last year, I used the same plush for the ears and the cover.)
For these cat ears, I used some black soft, chenille Minky fabric that I had left over from the hoodie I made for Sophia’s panda costume.
If your plush fabric or faux fur is quite fluffy, then I recommend using a thinner fabric for the headband cover.
Measure the length and width of your headband.
Measure and cut out a piece of fabric that is an inch or two longer than your headband and double the width, plus 1″ seam allowance.
Step 5. Sew headband cover
Fold the headband fabric in half, lengthwise. So you will have a folded over piece of fabric that is an inch or two longer than your headband.
Leaving ends open, with right sides together, sew down the long side of the fabric.
You will now have a long fabric tube. Turn it right side out using your favorite tube turning method.
A super effective way to turn a fabric tube inside out is to make a small snip in the fabric at one of the open ends, then slip a hairpin/bobby pin over that little piece of fabric and insert into tube.
Use the hairpin to push/pull through the tube until the entire tube of fabric is right side out.
Read more : How Many Disposable Gloves Do You Use
Turn the ends of one side in and sew shut. Slide the fabric tube onto the headband and sew the other end shut.
Step 6. Attach cat ears to the headband
Once your wire ear frames are inside your plush ears, fold up the bottom of the ears, trimming excess fabric if necessary.
Sew ears shut.
Place cat ears onto the headband, making sure you don’t place the ears too close together.
Ears that are too close together will look like bunny ears. Yes, I have made that mistake a couple of times over the years and I have had to take them apart and reattach.
With hand stitches, begin to sew your ears onto the headband, taking care to put your stitches through the fabric on the top and bottom of the headband cover and also catching the bottom of the wire ear frame.
You will want to stitch your cat ears on very thoroughly. Fortunately, your stitches will not be noticeable in the black plush, so don’t worry about making your stitches neat. You just need a ton of them!
Once you have stitched your ears firmly in place, you are done.
Congratulations — you now own the best cat ears on the block!!!
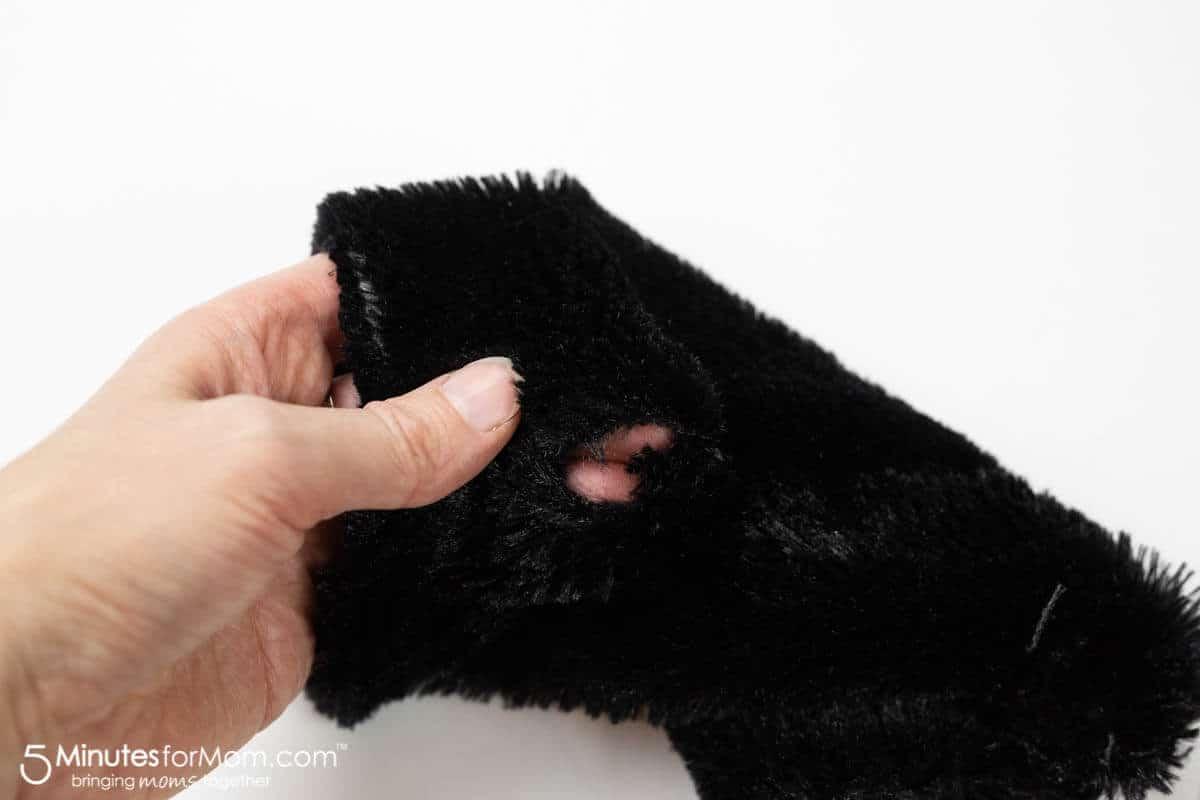
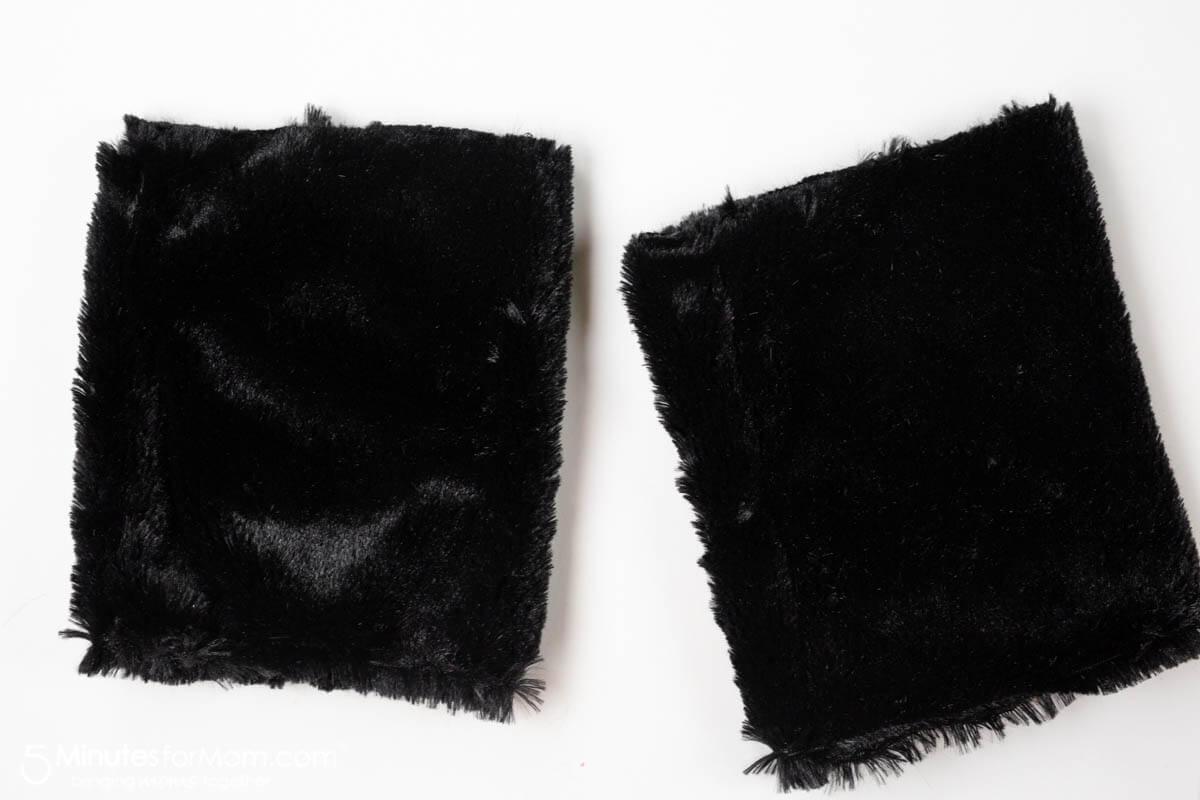
DIY Black Cat Gloves and Leg Warmers or Boot Cuffs
It is fall — let’s get cozy!
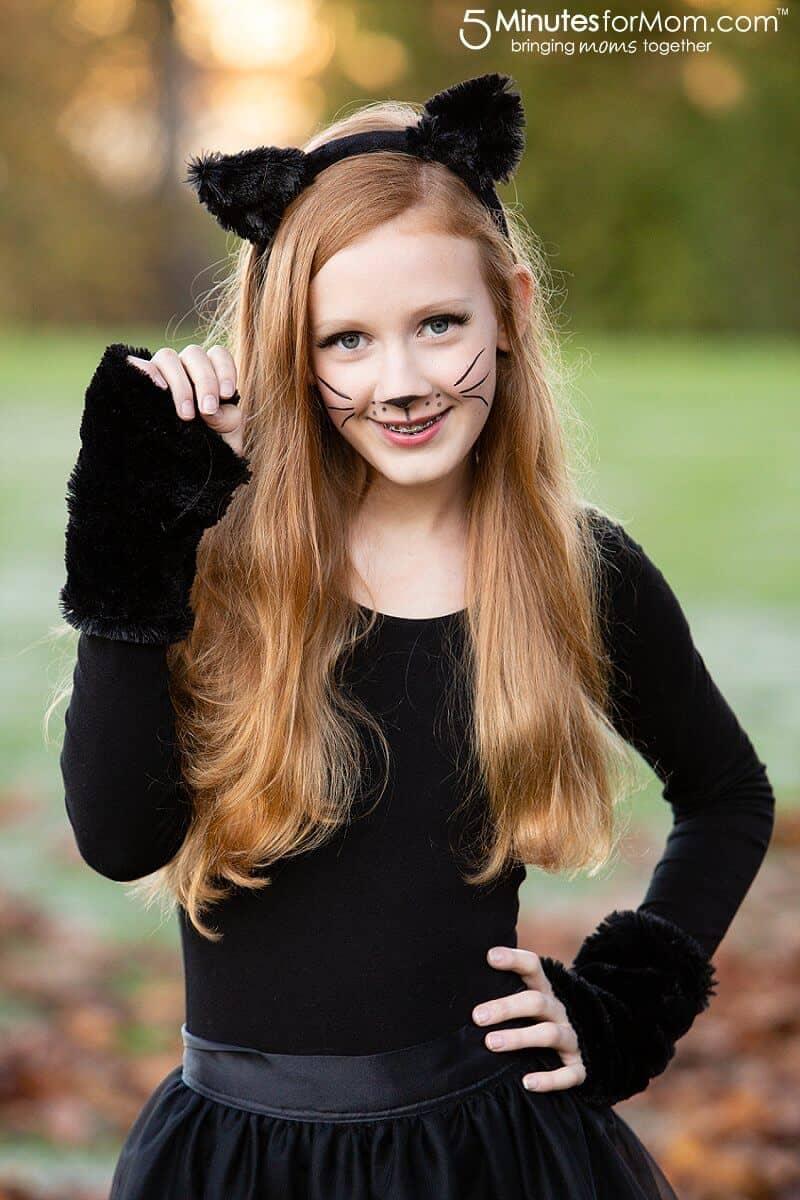
Since this cat costume is designed for a teenage girl who wants to look pretty going to a Halloween party, I made gloves and leg warmers to give the effect of cat fur while not making Julia wear a bulky full-body plush costume.
Honestly, I just want to wear these fingerless gloves and leg warmers/boot cuffs every day. They are super cozy. (I think I might steal the gloves and add them to my camera bag to keep my hands warm while I photograph in the winter.)
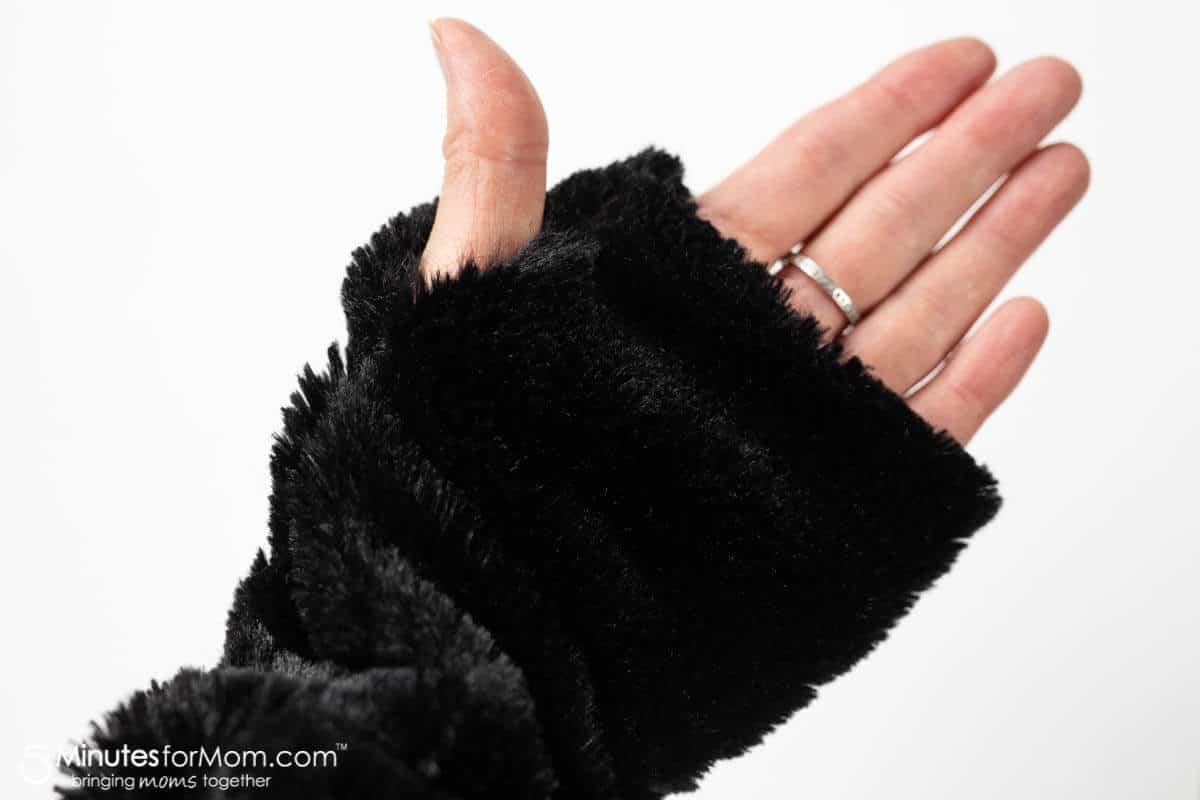
Making fingerless gloves and leg warmers is so simple!
For the gloves, measure the width of your wrist and your hand around your knuckles, including your thumb. Also, measure how long you want your gloves to extend past your wrist.
If your fabric is stretchy, like this plush fabric, then you can make the final width of your gloves a little smaller than the width of your knuckles. If your fabric does not have stretch, make sure you have enough width in your design so that you will be able to get the glove over your knuckles and your thumb.
I cut our fabric 9″x8″. I had extra room because our fabric was so stretchy, so after fitting on Julia’s tiny hands, I restitched them to make them smaller.

Because you want your cat gloves to be “fingerless”, you need to leave an inch or so open in your side seam for the thumb to go through.
Leg warmers are even easier to make.
As you did with the gloves, you need to make sure you have enough width in your design to accommodate getting your piece on and off.
Measure the width of your ankle, but also measure around your heel and ankle. Your leg warmer will need to slip over your ankle.
This will not be too much of a problem with a stretch fabric. But for a faux fur that does not stretch, like the fur I used for Sophia’s Panda Bear costume, I had to make sure she could get them on and off.
Because both Julia and Sophia were wearing black boots with their costumes, we decided to make boot cuffs.
Since we wanted the boot cuffs of the cat costume to go over top of Julia’s boots, I made them much wider than I would have if they were leg warmers.
Making boot cuffs also meant that we didn’t have to worry too much about them slipping down when the girls were running around. They simply rested on the boots.
If you are making leg warmers not boot cuffs, you will need to make sure that they are snug enough to stay up. You may need to hem the top of the leg warmer and insert some elastic to help hold them in place.
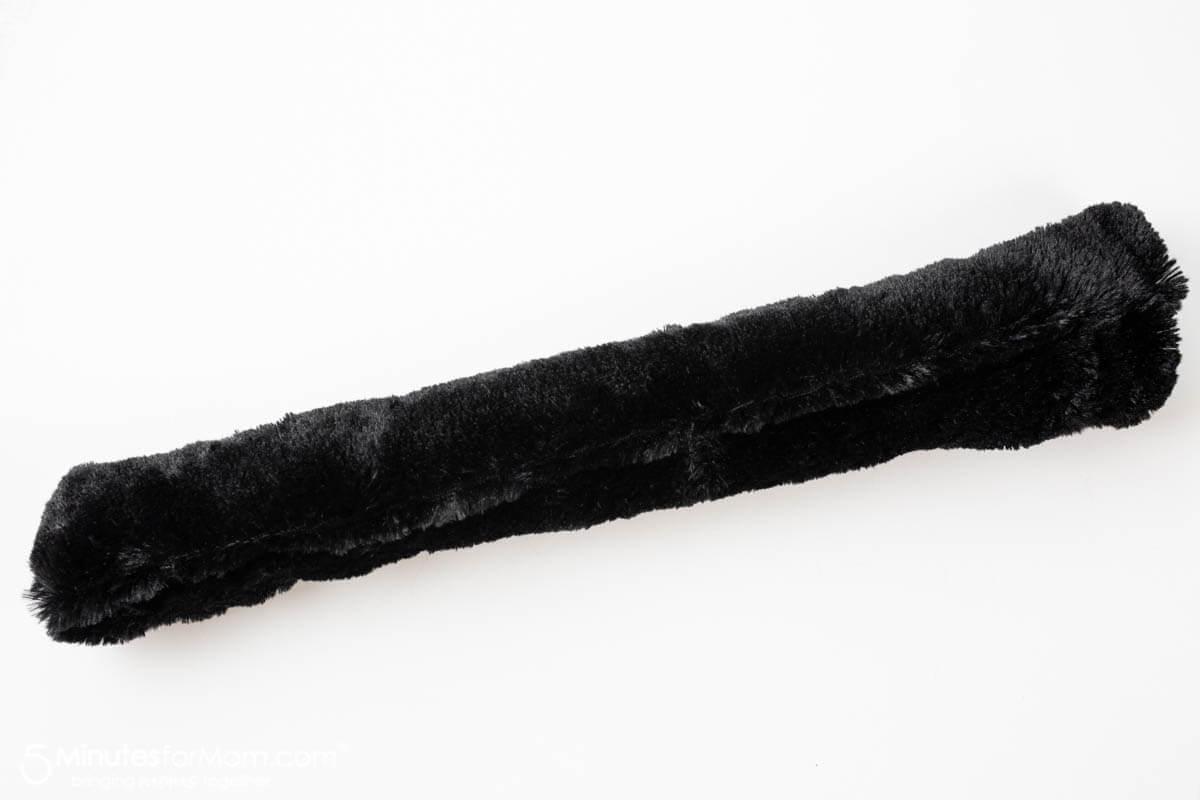
How To Make A Cat Tail
It’s even easier to make the tail.
To make a cat tail, you will be making another fabric tube.
- Simply cut out a piece of fabric the length you want the tail and twice as wide as you want your tail, plus an inch of seam allowance.
- Fold lengthwise with right sides together.
- Starting at one of the short ends, begin sewing and continue along the long side. Leave one end open.
- Stuff the cat tail with polyester stuffing or whatever form of stuffing that works for you.
You can use polyester stuffing (such as quilt batting) or you can just roll up and stuff with something such as light fluffy socks, fabric scraps, etc. (Once you are finished with the tail, you can open it up and take out your stuffing.)
I was out of polyester stuffing when I made this tail and I was about to raid another tail I had made before when I found an old, white “snake” Olivia had made years ago. Instead of opening it up and taking out the stuffing, I just used it as a tail insert and stuck it right inside my black cat tail cover. Recycling!
Once you are finished making your tail, set it aside until you are ready to attach it to your skirt or costume.
Expert Tip: Want to know a secret? I often just SAFETY PIN tails on to costumes once my child is already in it. Easy peasy.
How to Make a Bendable Cat Tail
For this DIY cat costume, Julia wanted to keep her tail simple and not too noticeable. But you can make a long bendable cat tail using a bendable wire or a wire clothes hanger.
Thanks to one of our readers for the following suggestion…
Problem: When you insert a bendable wire or a wire clothes hanger to mold and bend your tail, the wire tends to twist around inside the tail but the tail does not stay put.
Solution: Make your tail inside out and sew A SPOT for the wire.
- Create a fold at the edge of your initial rectangle, with a stopper at the tip so the wire doesn’t explode out later when you insert it.
- Sew your tail, flip it so the seam is on the inside, NOW insert the wire into your fold until it hits the stopper at the tip, and cut your wire.
- Stuff your tail using a wooden stick aka dowel to push in the stuffing.
- Add the stopper at the butt, close up your tail, and safety pin it on. The wire will stay in place and you can easily bend the tail to form.
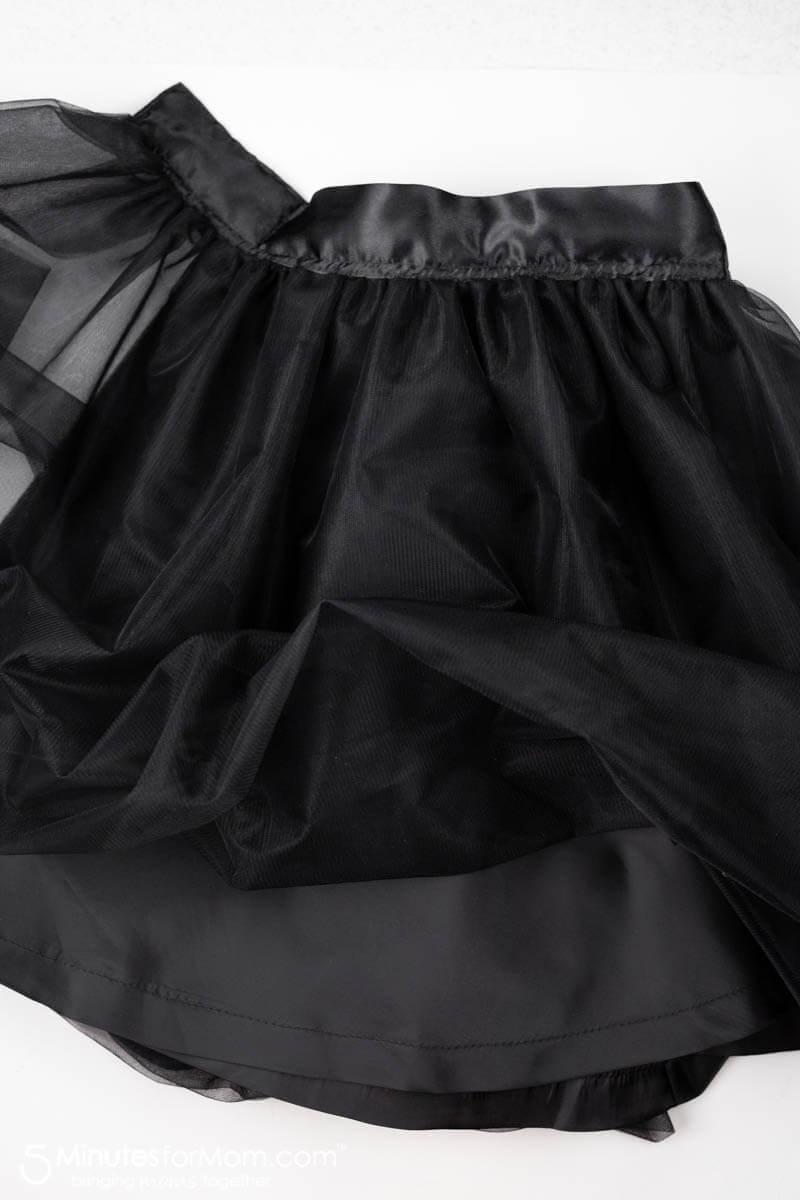
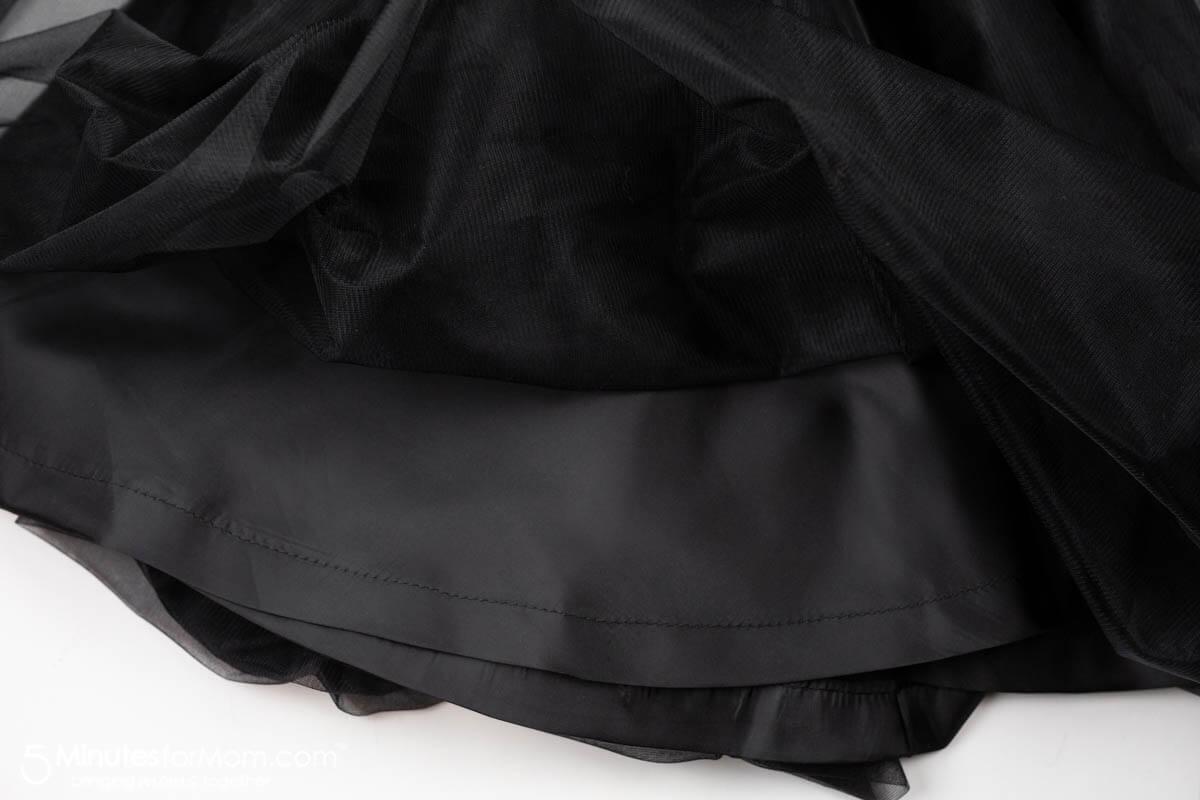
Half Circle Skirt with Bubble Skirt Overlay
I LOVE this skirt.
My mom and I made it in the middle of the night before the photoshoot!
Julia had come over for a final fitting the night before the shoot and she didn’t like the black tutu we had made her. She loved the organza skirt I made her last year for her fox costume and wanted something similar for this cat costume.
So, even though I still had all the ears to make and Sophia’s hoodie to finish, I began cutting out lining fabric for a half circle skirt. Fortunately, I had JUST enough soft crinoline left, (I was using it to make Julia a tutu,) to make a bubble overlay in the same style as her fox skirt and the organza skirt I was making for Olivia’s bear costume.
Mercifully, my mom was helping me, so I was able to hand over the rest of the construction of the skirt to her at about 2am while I moved on to make all the ears and finish sewing Sophia’s panda bear hoodie.
(I went to bed at 8am and got three hours of sleep before getting up to get the girls ready for the shoot. My mom went to bed at 10am for a couple hours and then joined us for the shoot. We sewed everything in less than a week! We had started sewing on Monday and had the photoshoot on Sunday afternoon. Yes, it was wild Project Runway speed sewing!)
But I love this skirt so much and I am so glad we made it. Julia looks gorgeous in it!
How To Make The Skirt For A Black Cat Costume
If you want to make this skirt for your cat costume, it isn’t too hard. But you probably want to have some sewing experience and a sewing machine…
The fabric I used to line the skirt was just a basic lining fabric from the clearance bin. It was a woven — no stretch. So I had to make sure I accommodated for that in my sizing.
I made a half circle skirt for the skirt lining. (You can also see my Fall Flower Fairy dress for more about making circle skirts.)
Here is a handy circle skirt calculator. Remember, if you are making a HALF circle skirt, you need to put that in the calculator too.
This calculator is from Omni Calculator:
- Once I had cut out my half circle skirt, I stay stitched along the top to keep the fabric from pulling out of shape and fraying while I worked. I did NOT sew up the back seam. I left the skirt in one long open piece.
- Next, I cut out my crinoline, (you can use tulle, organza, or whatever fabric suits your style,) to be about 60″ long and twice as wide as my skirt length. I am folding the crinoline lengthwise to create a BUBBLE at the bottom. So there is no bottom hem. The fabric just folds back up to the top.
Then I pinned the folded crinoline to keep it in place and made two rows of gathering stitches at the top.
I gathered by pulling the bobbin threads and spacing out my gathers until they were a few inches longer than the waist of my skirt liner.
Julia’s waist is 25 inches, so my liner, with seam allowance, was around 26 inches. (It was now about 2am so I handed the project over to my mom and I went to work on the ears.)
My mom then pinned the liner to the gathered crinoline and, using the sewing machine, basted it in place. Once she was sure she had the gathers evenly spread out, with no puckers or pleats, she covered the top of the liner/crinoline gathers with a blanket ribbon and VERY carefully stitched the ribbon in place, enclosing the raw edges of the gathered crinoline and the stay stitched liner. After she finished one row of stitching, and everything looked good, she made another row of stitches to help the ribbon laying flat and keep it from turning up.
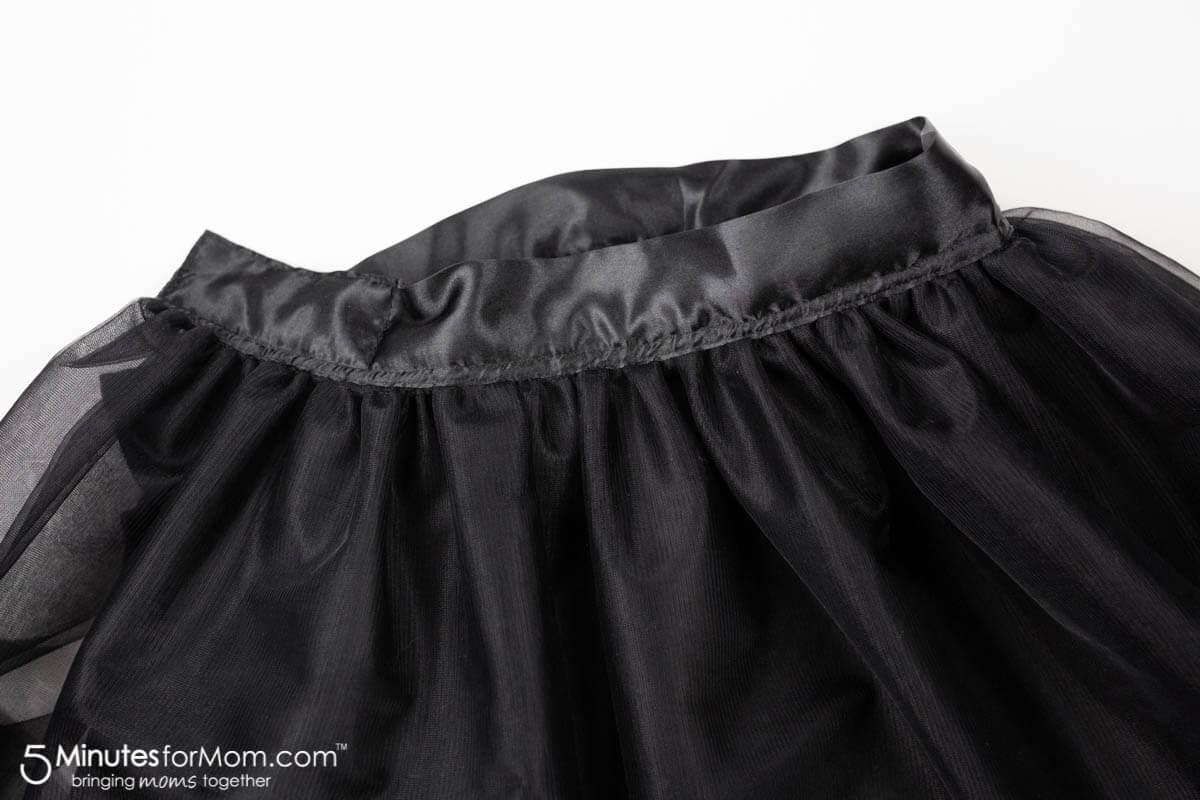
Then, she folded over the edges of the ribbon waistband to make a tidy finish to the back. We made sure to leave extra crinoline sand ribbon waistband extending past the end of the liner so that we could have one end of the waistband layer over the other. That way we don’t have to worry about sewing a back seam in the crinoline bubble skirt.
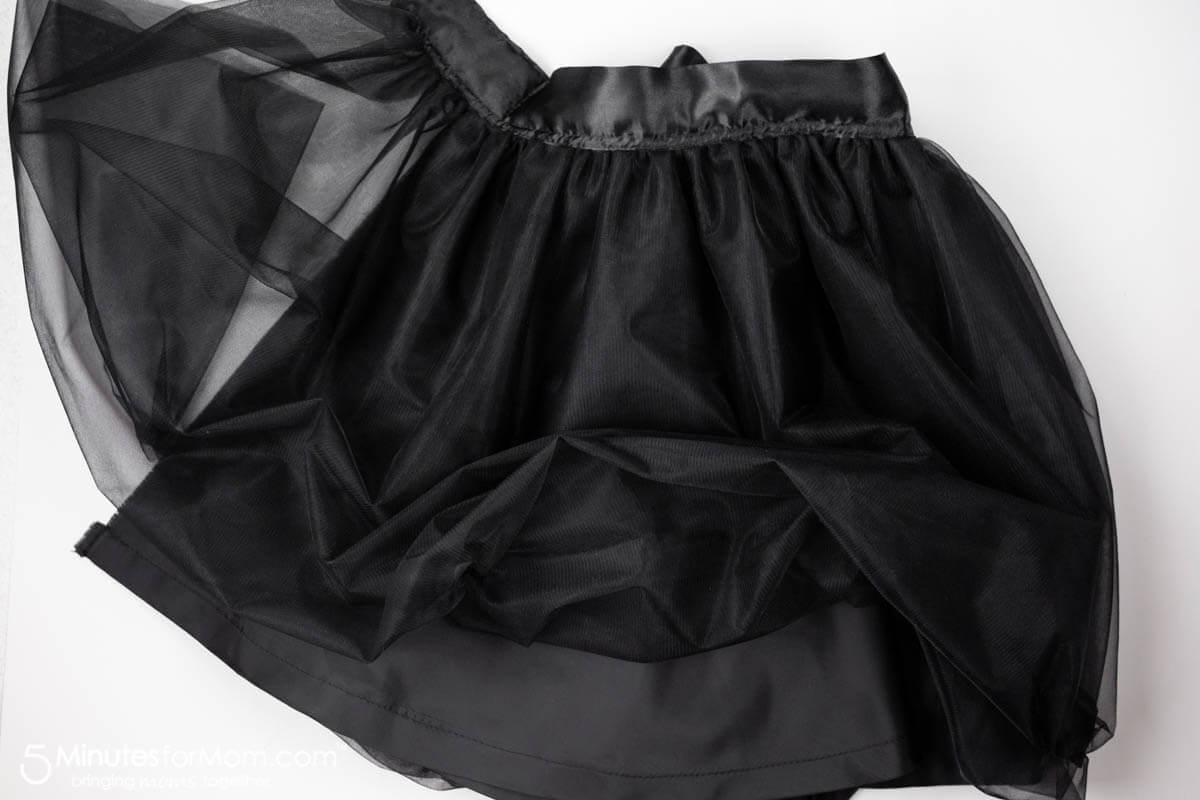
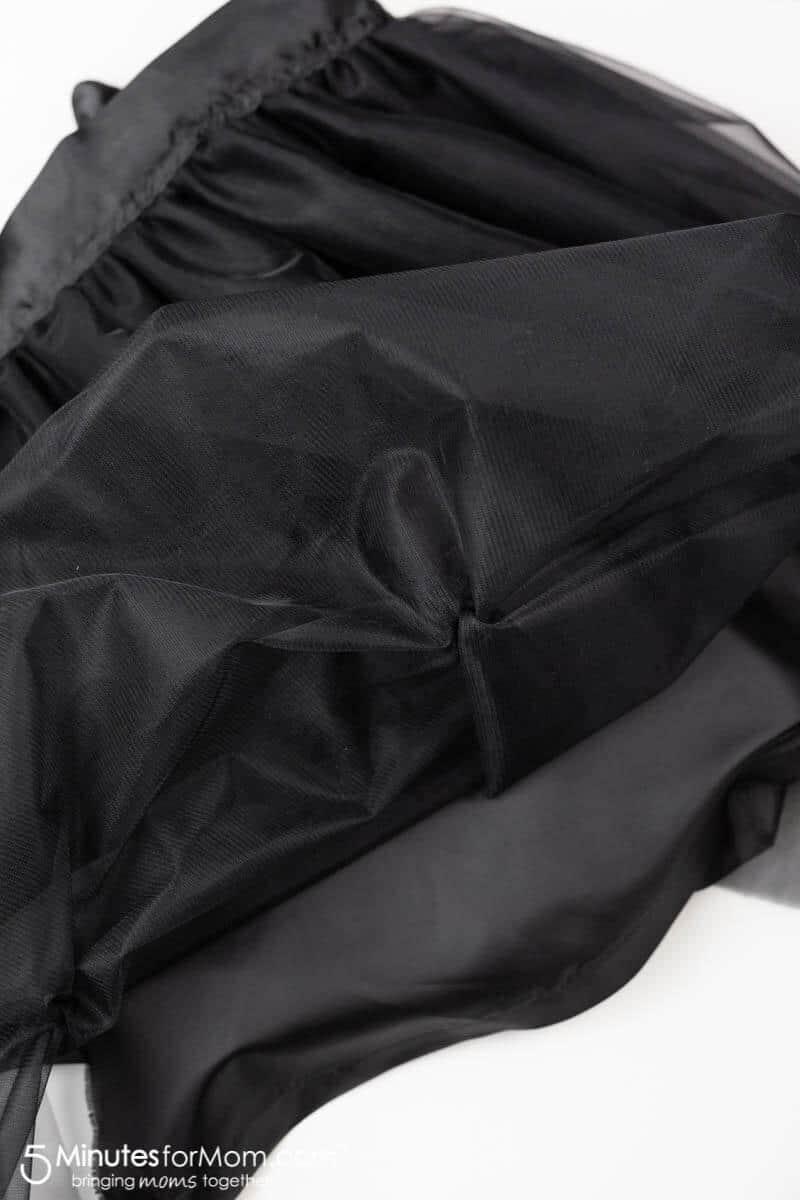
We also add pintucks to the bottom of the skirt to give it extra lift. To make the tucks, I turn the crinoline skirt inside out. (I can do this because I have left the back open, without a back seam in the crinoline. Then I take tiny little bunches of fabric and stitch across them. (I will update this post with pictures of that process. It was the middle of the night, so I didn’t take many photos.)
I make these pintucks about every six inches along the bottom of the bubble hem. After making the tucks, I turn the skirt right side out and the tucks are now inside, “pulling up” the bottom hem, giving the skirt more volume.
After the pintucks, my mom hemmed the liner and then sewed a back seam 3/4 of the way up the back of the skirt liner and left the top part open. We planned to sew hook closures onto the ribbon waistband to hold the skirt shut.
We used the hook closures for the fox and bear organza skirts and we planned to do it for this one too. But we ran out of time!
So, in Project Runway “make it work” style, we actually safety-pinned Julia into the skirt for the photoshoot. We were going to fix it for Halloween, but in the end, we didn’t bother. The safety pins worked fine and we were really tired!
Cat Costume Makeup
Finally, it was show time.
After I had a few hours of sleep, Susan brought the girls over and we did their makeup and got them dressed.
For Julia, we finished off her black cat costume with simple cat costume makeup including false eyelashes, a black cat nose, and of course some whiskers.
My niece Julia is thirteen now and Susan, my mom, and I were a little traumatized by how grown up she looked! Where did our baby Julia go?!?
We hope this post encourages you to skip the costume aisle and make your own cat costume.
You can create your own fabulous black cat costume and be the most stunning cat on the block!
Written and photographed by Janice Croze, co-founder of 5 Minutes for Mom and Janice Croze Photography. Additional photography by Andreas Bernauer Photography. We published the first version of this blog post in 2018.
More DIY Halloween Costumes for Girls
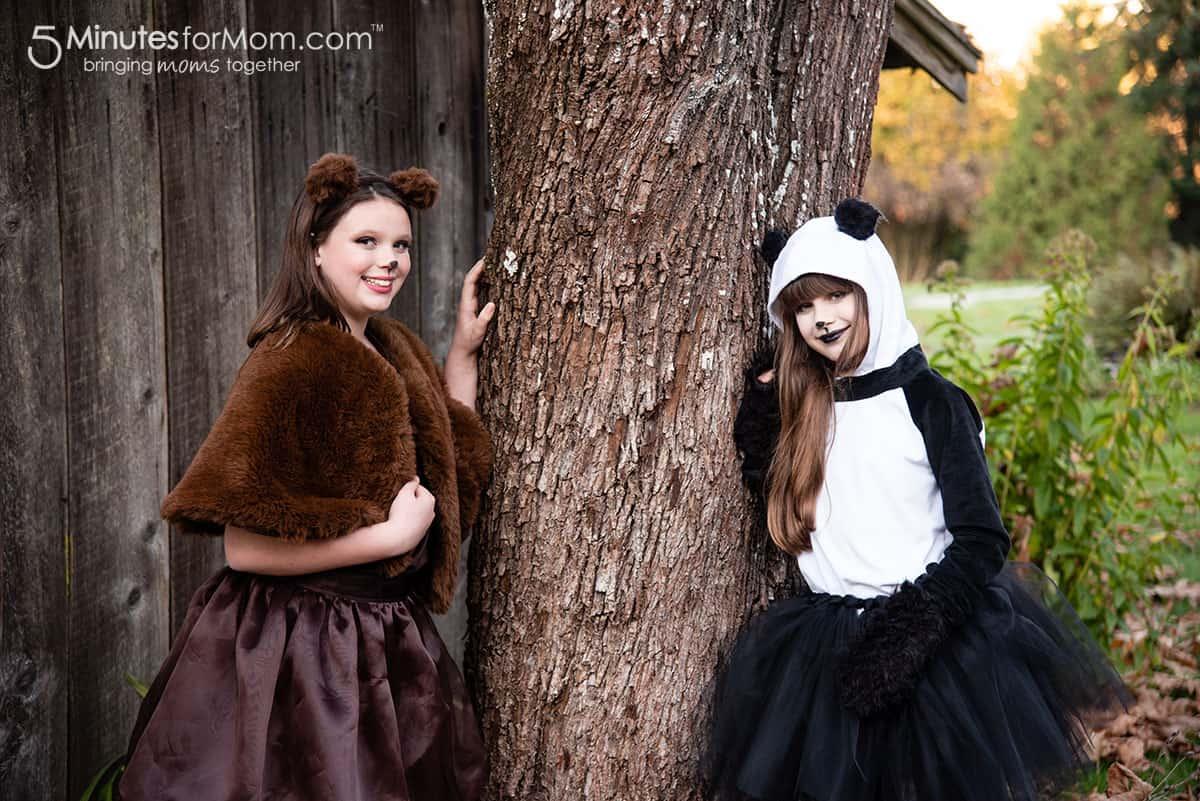
To see photos of Olivia’s Bear Costume and Sophia’s Panda Bear Costume, click over to our post about our DIY Halloween Costumes for Teens and Tweens. I will be posting detailed tutorial posts for each of those costumes shortly.
Also, be sure to check out our girls’ costumes from the year before. You can see how we made these unicorn, fox and bunny costumes. All three of these outfits are great for Halloween costumes for girls of all ages… from little girls to teenagers.

Talk with me: @5minutesformom and Facebook.com/5minutesformom Pin with me at pinterest.com/5minutesformom
Source: https://t-tees.com
Category: HOW