
As part of this year’s Make Nine Challenge I decided to make gloves. It was my first time ever making gloves, so it took me a while to figure out the pattern and the sewing part wasn’t that easy either!
But in the end I managed to get them done and then prepared this tutorial so that you could try glove making, too. Of course, this is just my version and I’m not a glove expert, so I’ve more than likely not done them 100% as you’re supposed to.
You are viewing: How To Make For Gloves
The pattern is based on instructions I found in one of Antonio Donnanno‘s books, and by observing my existing leather gloves. As for the sewing, well, I kind of winged it after first watching a few videos on YouTube! 😀
The Glove Pattern
This was the part that took the most time. I started from Donnanno‘s instructions, but quickly noticed I needed something else, too. You see, the instructions showed how to draft the pattern but without explaining why you draft it the way you do, and the relations of the different sections to each other and your measurements. So I got all my existing gloves and mittens to really figure out what was going on with this pattern.
Donnanno‘s instructions served to give me an idea on how the pattern was supposed to look like, but for the rest I used a pair of gloves that fits me well. It was also useful to see how the pattern pieces would be sewn together. Especially the thumb section seemed really complex!
Here are the measurements that you need to take first:
-Your hand circumference (not too snug, the way you’d like the glove to fit).
-Your hand length from the base, to the tip of your middle finger.
-Your middle finger length at the palm side. You’ll also need to measure the rest of the fingers the same way.
With these measurements you can proceed to draft the pattern as follows.
- Draft a rectangle using your hand circumference + 1cm for the width and hand length + 3mm for the height. This pattern piece is drafted directly with a 3mm seam allowance included. For me the initial rectangle was 19cm+1cm=20cm wide and 18.5cm+0.3cm=18.8cm high.
- To separate the back and palm sections, divide the rectangle width in half and add 4mm for the back side. (In the picture it only says hand circumference, but it refers to the hand circumference + 1cm.) In my case this was 20cm/2 =10cm+0.4cm=10.4cm for the back and therefore the palm is 9.6cm. You’ll also need the middle finger length + 3mm of seam allowance to separate the finger section at the top. Then lower the back side by 5mm.
The Fingers
After this you’ll need to do some calculations, see the picture below, to divide the area between fingers.
The fingers are slightly narrower on the palm side.
Just to give you an example, for me these calculations were as follows:
Middle finger and pinky finger: 10.4cm/4=2.6cm on the back side and 9.6cm/4=2.4cm on the palm side.
Index finger: 2.6cm+0.2cm=2.8cm on the back side and 2.4cm+0.2cm=2.6cm on the palm side.
Ring finger: 2.6cm-0.2cm=2.4cm on the back side and 2.4cm-0.2cm=2.2cm on the palm side.
You might be wondering why the pinky finger would be as large as the middle finger. It’s because there’s a fourchette piece on both sides of the middle finger, adding to its circumference, whereas the pinky (and the index finger) only have it on one side.
Draw the vertical lines for the fingers. Then lower the lines between pinky and ring finger by 7mm. If you observe your hand, you’ll see the reason why.
Then, take the measurements of all your fingers, add 3mm seam allowance and draw the horizontal lines at the top. I used the palm side measurements also for the back; after I had marked the finger lengths for the palm side, I measured the distance from the top of the rectangle and used the same measurements for the back side. This is because the fingers bend towards the palm and so the back side needs some ease.

At this point you can draft the finger shapes and then the aforementioned fourchette pieces. I suppose you could say it’s like a two-piece inset you sew between the fingers. The circles show you where these insets will be sewn.
The instructions said to only draft one pattern using the middle finger length and simply chop off extra fabric when sewing the other fingers. But I preferred to have a separate pattern for each finger.
Read more : How To Get Wood Glue Off Of Work Gloves
The back side is 0.5cm longer. I measured the width for this piece from my gloves and it was 1.5cm at the bottom and 0.5cm at the top. This time the finger length is without seam allowance. You’ll add that all around the piece later. You can curve the back side slightly.

Thumb Pattern for Gloves
I saved the most difficult piece for last! Above you can see how to draft the hole where the thumb piece is going to be sewn. It’s entirely on the palm side. That 3.5cm width is what I got from my gloves, so you might have to modify it.
Here are the measurements you’ll need for the thumb pattern.
The height of thumb “base” (didn’t know what to call it) mentioned above is like the measurement I’m taking in the first picture here (=the thumb’s outer length) but without the thumb’s palm side length I’m taking in the second picture.
The third picture shows where to measure the thumb circumference. Measure it the way you’d like the final glove to fit, so not too snug.
This is the thumb pattern and how to use the measurements you just took. It’s without seam allowance at this point.
Then draw the pattern shape as shown. You should end up with your thumb circumference measurement where the pink arrow is.
In the picture you can also see how the different sections relate to the hole you drew on the glove pattern piece. I recommend you take an existing pair of gloves and see how it’s sewn. This was a real puzzle! Add 3mm seam allowance around the thumb pattern piece and inside the hole.
It’s very likely that you need to make corrections in order to have all the sections match. Here’s what goes where, so check the lengths. Add notches.

Even though I checked the lengths, I had to continue adjusting after having tested the pattern because the pattern pieces just refused to collaborate. I think it’s because the slashed bits throw the measurements off.
The Toile and the Final Glove Pattern
At this point I made a toile to check the fit. I had already decided that my future gloves were not going to be made of leather, so I picked a medium weight knit fabric with a small amount of stretch.
It was also a great opportunity to get an idea about how to make gloves, and practice how to sew the pieces together before cutting the final fabric. There are lots of videos on YouTube if you search for glove making process, or glove sewing. Many of them are about leather gloves, and there’s lot’s of hand sewing.
Anyways, I was happy to see that the gloves were a perfect fit, so I just needed to do some fine tuning, especially on the thumb.
After that I drafted the actual pattern. I wanted to make gloves that are a bit longer to go with coats that have 3/4 sleeves, such as this one.
I added 10.5cm of length and made the hem slightly wider. There’s also a little v-shape in the middle of the back side.
I was originally going to make these lined, but quickly abandoned the idea after having tried to attach the thumb piece. Slippery, lightweight fabric + tiny seam allowance is not an easy combination… So, I just made a facing.
Here’s my final glove pattern. I added notches at the tips of the fingers to have a reference.
The Fabric
Off to the fabric shop I went without a clear idea about what I was looking for. I just knew it needed a small amount of stretch and it had to be something that wouldn’t fray at all due to the tiny seam allowance.
This is what I found. It’s medium weight, very compact wool knit that has a bit of stretch. You can cut it and it doesn’t unravel or fray as you can see here. So it was perfect!
I also bought lightweight boiled wool and synthetic leather in case I wanted to try other materials. After all, you only need 30cm of fabric for these gloves. Maybe later.
Here are the glove pieces that I cut. One YouTube video I watched said it’s best not to slash between the fingers until just before you’re going to sew the fourchette to avoid stretching them. Instead I just marked the points with pins.
Read more : How Many Types Of Medical Gloves
I also paired the fourchette pieces so that they were ready to be united at the base.
Sewing the Gloves
The first thing was to sew the thumb piece in place, starting from the lower, curved section. You can refer to the pattern picture where I indicated which parts will be sewn where.
I sewed the thumb after the difficult section with the slashes was done, and finally decided to top stitch around to flatten the seam allowance.
Then I united the fourchette pieces at the base and proceeded to sew the rest of the fingers going in order from the index finger to the pinky.
Here’s a sequence for the index finger. After having slashed between the index and middle fingers, just pin the fourchette piece, the longer sides towards the back, right sides together. Ensure that you match the correct fingers.
Then sew at a 3mm distance. The base (where the arrows point in pics 3 & 4) is the trickiest part as there’s practically only 1mm of seam allowance, so you might have to sew it a few times. I find it’s easier to sew with the finger side on top.
Complete the index finger by closing the outer edge of the tip. Here’s what you should have now.
Even half of the middle finger is done. So now sew the other half in the same way. Only this time in the end you’ll have a little gap in the center of the finger tip that you need to close after you’ve finished attaching the fourchette.
Sew the rest of the fingers like this and finally, complete the outer edge of the pinky finger and the glove’s side seam.
The resulting glove had some excess volume at the back side that I wanted to get rid of.
So I decided to sew 3 tucks that mimic the points. This is what I learned the lines are called.
I centered the first one with the help of the v-shape at the hemline, and then placed other two symmetrically on both sides of it.
The Facing
Now the glove was still missing its facing, so I sewed the facing’s side seam and then sewed it to the glove’s hemline. Just clip the v-shape and trim the seam allowance slightly at the rounded bits before turning the right side out.
Finally, I pressed the hemline and top stitched to flatten the seam allowance and to keep the facing in place. You can also add a few hand stitches inside the glove.
Decoration
Now the gloves were ready but I wanted to add a little bow decoration near the hemline. I briefly thought about making the bows out of grosgrain ribbon but in the end went with the same fabric the gloves were made of.
The fabric was too heavy weight to finish the edges so I just left raw edges. Here are a few pics. First, the finished bow together with what it was made of.
And then a little sequence.
I added some white stitching to enhance the center of the bow. The stitches are those you use for making buttonholes. I think it’s called the blanket stitch.
And then I hand sewed the bows to the gloves. I stitched them so that I fixed the facing in place at the same time.
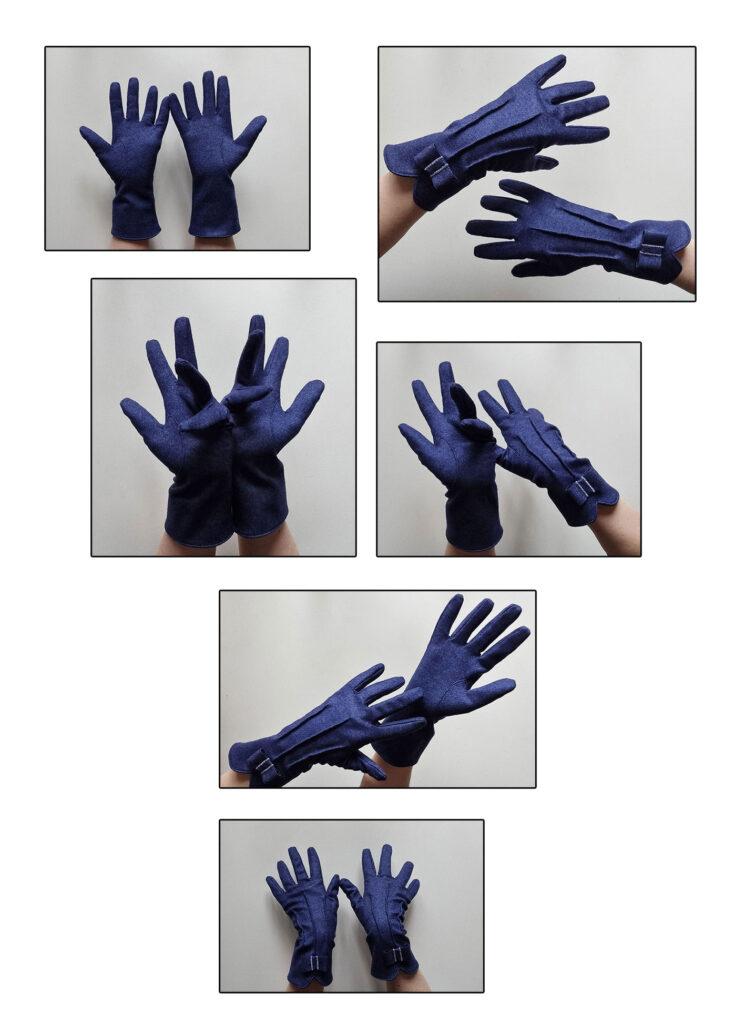
Glove Pictures
Here are my gloves in action! I’m quite happy with the result considering it was the first pair of gloves I’ve done. In the end I’m not too bothered by the fact that they aren’t lined. The seam allowance inside doesn’t disturb me. I might test the boiled wool next and maybe modify the pattern to make a different type of gloves. Not ready for leather yet…
And hey, I can cross off the first square from my #makenine grid. 🙂
How about you? Would you like to make gloves for yourself? Or maybe you already have. How was that?
Source: https://t-tees.com
Category: HOW