
Leg and arm wraps are pretty popular for a wide number of characters, but when translating that into cosplay, it can be a hassle. Wrapping and unwrapping them each time you want to wear the cosplay, plus the worry that they could fall down and slip. It’s a lot of extra work. So why not make them so they never move?
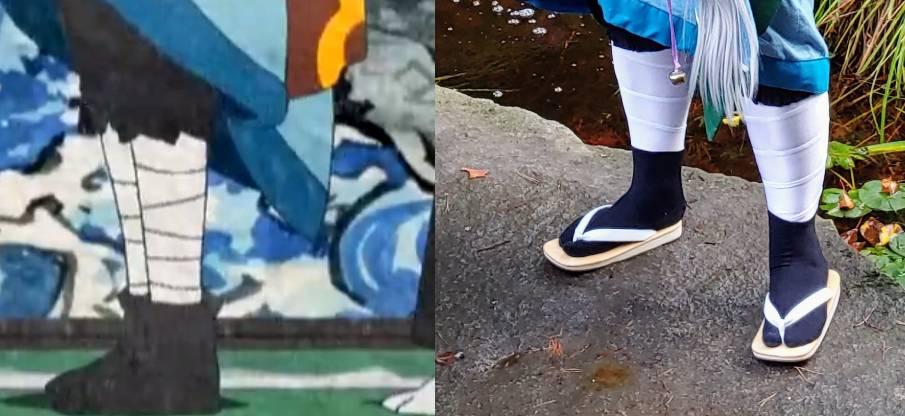
Enter spandex and knit wraps that are immovable. Fabric wound around the legs or arms then stitched with a serge or overlock stitch to keep them from ever separating. The sewn wraps can be attached to other pieces of the cosplay such as socks or pants or reinforced with elastic or no-slip grip elastic to ensure that the wrap stays up all day at a con.
You are viewing: How To Make Hand Wraps Gloves Cosplay
These wraps are custom-made to your own shape and needs. This tutorial covers making leg wraps (because it’s much easier to do on yourself) but the same technique can be applied to arms if you have an assistant or are really good at pinning with one hand. It also assumes you have minimal experience with spandex and stretchy things.
Skill level: intermediate
Cost: moderate
Materials:
- 4-way spandex or knit, at least 1y
- Ruler and scissors
- A box of small pins
- Sewing machine for stay stitching
- Spandex, knit, or ball-point machine needle
- Serger or machine capable of overlocking
- Elastic or no-slip grip rubber elastic (optional)
Making fabric strips
The most difficult part of this whole process is perhaps guestimating how much fabric you need. It will vary vastly depending on how wide the strips are, the width of what you’re wrapping, and how long the wrap needs to be.
For my leg wraps, my strips were 3″ wide at about 1 1/2y length. I needed two of these, one for each leg, and it left a few inches of tail at the end. I sort of guessed when it came to mine, tried a few different widths until I found one that wrapped the way I wanted it.
One method of guestimating is to take an extra-long tape measure and begin to wrap it around your leg or arm and measure the length. These guesstimates will be crude so you’ll want to add a couple extra inches at the end to account for measurement discrepancies as well as a bit for the starting and ending tails. But remember, this is stretchy fabric. There will be a certain amount of give during the wrapping process.
When choosing your width, make sure to add at least 1/2″ seam allowance. When working with a serger or an overlocker, your seams will be relatively small, and starting with a 1/4″ seam allowance on either side of the strip is often enough. If you feel like you need larger seams, add more seam allowance.
Once you’ve decided on a width and a length, it’s time to cut your fabric. Measure the width of your strip with a ruler and lightly draw a line with a pen or chalk pencil then cut along the line. As this fabric is 4-way stretch, you can cut in either direction – along the grain or crossgrain – depending on the length of your strip.
If you have experience in cutting multiple layers, you can make long strips easier to cut. Fold the fabric in on itself and pin it so it doesn’t move while you work. Measure the width and mark it lightly with a pen or chalk pencil on the top layer. Using a rotary cutter or sharp scissors, carefully cut along the line, making sure not to move any layers.
Cut only one strip to start. This will allow you to test the length and make sure it’s long enough and wide enough for the look you want. If you’re satisfied after making the first wrap, repeat the process and cut a second strip. If you only need one wrap, you’re good to go.
Wrapping and pinning
This process will require some amount of flexibility or a second person. You can’t make a wrap without actually wrapping around your body, after all. Grab your strip and the box of pins, and it’s time to mummify you.
Read more : How To Make A Glove That Launches Stuff
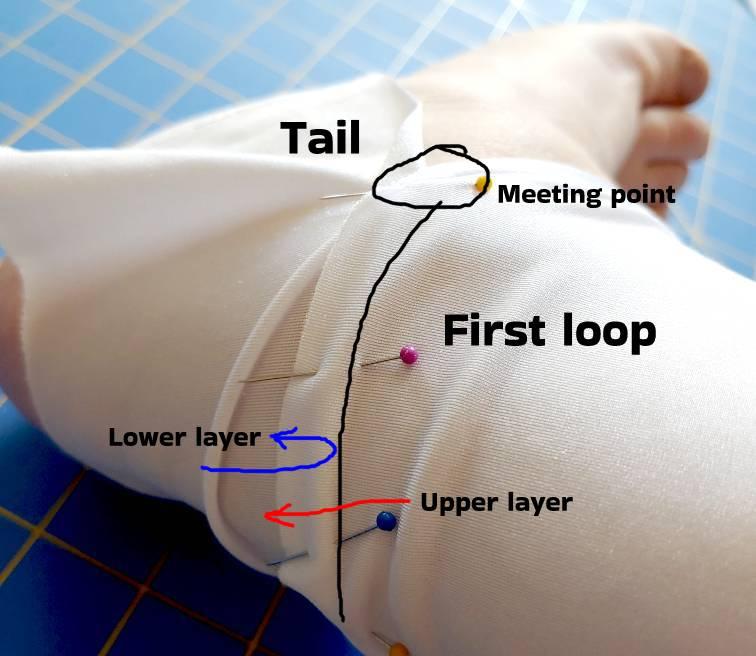
To start, wrap the tail of the wrap around your ankle or wrist once. The tail should be left loose.
Once you’ve made your loop, pinch the edges of the tail and the first loop together to form a seam at the meeting point. It doesn’t matter if your seam is facing up towards your knee or down towards your foot as you’ll make adjustments after you’re done pinning. When pinning, make sure not to stab your own leg or arm. I found it easier to point my pins downward when pinching and pinning.
After the first pin, start angling the strip upward towards your knee or elbow. For the first few pins at this point, you may have to hold the first pin square against yourself as you pull the strip and stretch it over your arm or leg but not so tight you feel like the wrap is squeezing the life out of you. Once you’ve gotten the strip sufficiently tight, pin it.
During this process, make sure to pull the wrap upward as you go. If you notice the wrap slouching, gently tug it upward so you don’t have any puckering in your wraps.
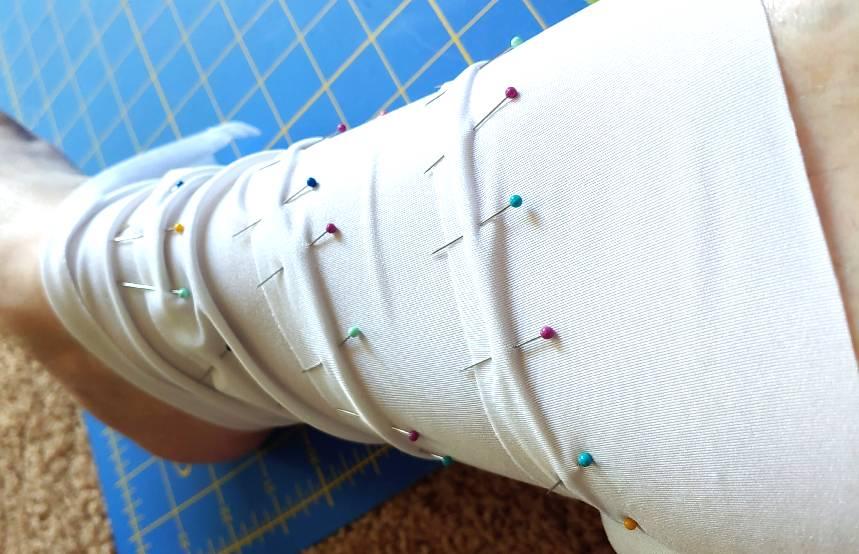
Once you get to the top of the wrap, pin the tail and the loop at the meeting point to keep them from moving.
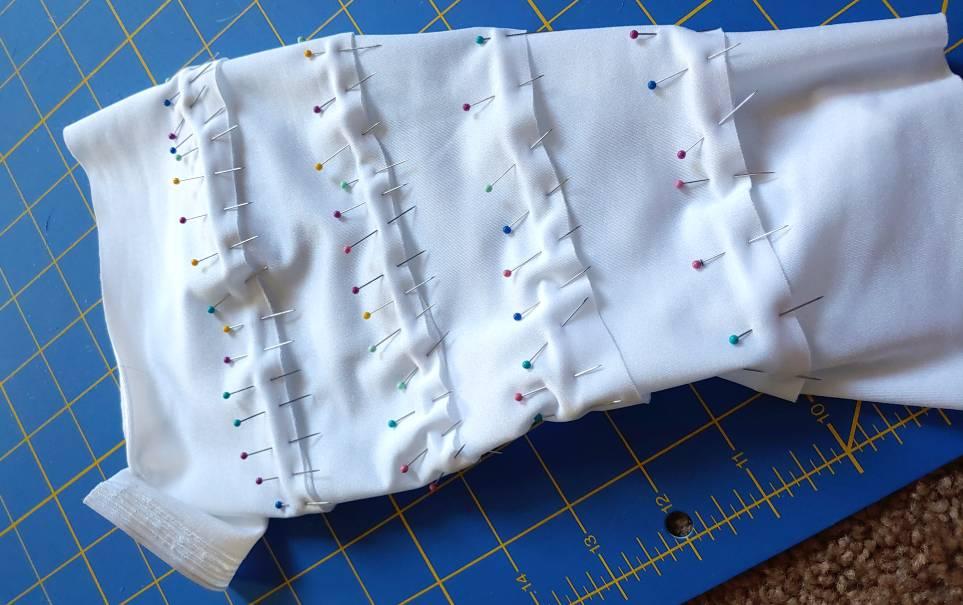
When you’re satisfied with how the wrap looks and feels, carefully slide it off your leg or arm, being mindful not to stab your foot or hand in the process. The heel and the thumb will be the most difficult part to get the wrap over, but if you carefully slide it, you should be able to avoid poking yourself with pins.
Stay stitching
Because you cannot run pins through a serger or an overlock stitch, you’ll need to make sure your wrapped work stays put. And for this, you’ll want to stay stitch your sewing machine. Thread your machine up with general purpose thread and a stretch-friendly needle and let’s get to sewing.
Because the wraps are one big loop, you can stay stitch all in one stitch. Start on either end of the wrap at a meeting point and drop the presser foot down. Stick with a 1/4″ seam allowance (unless you cut more) and sew at a slow-moderate speed as you will need to turn the wrap as you sew. Keep one hand on the wrap and one hand by the seam to stabilize it.
Unfortunately, you cannot use the sleeve arm to sew this wrap so you’ll have to do everything on top. You can sew with the pins facing up or down depending on which direction you’re sewing. I sewed with them down simply because it was easier to not snag my arm with this many pins.
As you move along, carefully remove the pins from the stitched sections to prevent from snagging your hands and arms while you work. Push the fabric away from the seam as you sew. It will tend to try to lean forward and overtake your foot and block your vision because of the wrapped structure.
Once you’ve sewn the whole length of the strap, make sure all the pins are out and it’s time to serge.
Stretchy sewing
With the stay stitching in place, it’s time to make those wraps stretchy. If you stuck with the straight seam, they would pop and snap right as you pulled the wraps on. Instead, you want the wraps to tolerate bending, stretching, and moving. Your body moves after all, right?
If you’re using a serger, make sure the threads either match or aren’t too dark/light and show through the spandex. White and light-colored spandex is notoriously bad at blocking stitch colors, so you’ll definitely not want black stitches on white spandex.
I recommend using a 4-strand stitch. You’ll want the strength from those extra threads as you pull on the wraps to get them on and off.
Read more : How To Measure Hockey Gloves
When serging, you’ll want to stitch much in the same manner as you did with the stay stitching. The added challenge is that a serger foot is much larger than a standard presser foot. It makes it a little harder to see. Modern machines often have a notch to where the needle will land, so you can line that up with your stay stitch to get the exact seam allowance you need.
If you’re using an overlocker, trim the edge of your seam down close to the stay stitch (refer to your machine’s manual to see what that width should be) and equip your machine with the overlocker foot if needed. Much like with stay stitching and serging, start at one tail and sew round and round, making sure to keep the fabric flat and not obstructing your view.
Finishing touches
You can’t finish the wraps with your tails hanging out. You could tuck them in but then you get wrinkles underneath the tight wraps that look unsightly. You’ll need to cut them. Lay the wraps out flat and use a ruler to measure across the bottom and top edges and mark them with a pen. Use a pair of scissors to cut off the tail and make a nice edge.
But that’s not all the finishing things we can do, is it? Absolutely not. There are a number of things you can do with the edges of your wraps.
Elastic
If there are concerns of slipping (and this is a big thing when it comes to leg bands especially), you’ll want to add elastic to the top of the wrap. While there isn’t much room to create a proper channel to thread elastic, this is stretchy material! You can sew the elastic right into the wrap using a serger or a zigzag stitch.
For my wraps, I knew I would be hiding the top edge of the wrap with a pair of pants, but yours might be exposed. If you’re worried about the serged stitch or elastic showing, roll the hem towards the inside and use a zigzag stitch to finish your seam. Wide zigzags are stretchy so they should bend and move with the elastic just fine.
Attaching them to other pieces
Sometimes you just want things to never move. And sewing one spandex piece into another is great to keep things from moving. This could be sewing thigh-highs into a pair of stockings so they never slouch or sewing the bottom of wraps into gloves or socks.
Sewing the wraps into something else is much like when you pinned the wraps in the first place. Pull the wraps on along with whatever you’re connecting them to. Socks, tights, gloves, whatever. There are two ways you can get the wraps to connect to your other thing.
If you can turn things inside out, pinch the two edges together, forming a seam much like you did when making the wraps.
If you cannot turn them inside out, pull everything on and lightly mark with a pen or chalk pencil where you want the two pieces to be joined. Remove everything and give yourself about 1/4″ seam allowance. You likely won’t be able to give more due to how the wraps are made. Then repeat the same sewing process you did for the wraps. Give them a nice stay stitch then serge or overlock the seam to make it stretchy.
A simple hem
Sometimes you just need a nice finished hem. The best hemming stitch for stretchy things is the zigzag stitch. This will allow the hem to stretch over ankles and thumbs – points that often catch non-stretch hems – and not snap. You’ll want a wide zigzag stitch to allow for maximum stretch. Just roll the hem over, pin it, and zigzag stitch it to finish it. Nothing fancy, just a zigzagged stretchy hem!
If you don’t want the zigzag look, see if your machine can support a twin needle. This sort of needle does a straight stitch on top with a zigzag underneath. It’s the sort of stitch you see at the bottom of your t-shirt. A twin needle will allow the hem to stretch and not snap when you pull it over those wide points.
I hope this tutorial helps you to make awesome, immovable wraps for all sorts of cosplays. Everything from ninja wraps to Sheikah warriors and Pokemon leaders with interesting wardrobe decisions. Any time you see a wrap, you can make it easy and immovable.
Let me know what wraps you choose to make! @ me on social media and share with me your creations so I can admire your work!
- Tumblr
- TikTok
Source: https://t-tees.com
Category: HOW