
We have explained the basics of formatting shape outlines in PowerPoint 2016. Now we take you further ahead to explore how you can change line weight to make the outlines thinner and thicker. So, why would you want to alter the weight of an outline? There are many reasons: more often than not, you may want a line that’s almost invisible or very thin, this lets your audience focus on other areas. At other times when you want the attention of your audience to focus on a particular line, then you can do so by thickening its weight. In this tutorial, we will also cover compound lines such as those that encompass double or triple lines.
Weight is the thickness attribute of the shape outline. You can change the weight all the way from a hairline thin line to a chunky thick line. Figure 1 shows you some weight variations in outlines.
You are viewing: Where Can You Change The Thickness Of The Shapes Outline
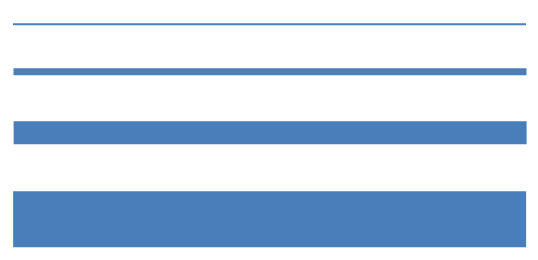 Figure 1: Width (weight) variations in outlines
Follow these steps to change the outline weight of a shape in PowerPoint 2016 for Windows:
- Open your presentation and select the shape that you want to format.
- Alternatively, if you want to start from scratch, launch PowerPoint. You will see the Presentation Gallery. Here, select the Blank Presentation option to open a blank presentation with a new slide. You can change the Slide Layout to Blank by selecting the Home tab | Layout | Blank option. Then, insert a shape and select it.
- We selected a Rectangle shape, as shown in Figure 2. Selecting the shape brings up the Drawing Tools Format tab in the Ribbon, as shown highlighted in red within Figure 2. Activate this Ribbon tab by clicking on it.
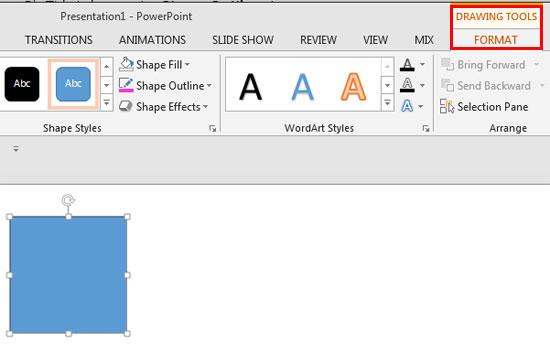 Figure 2: Drawing Tools Format tab of the Ribbon
 - Within the Drawing Tools Format tab, click the right side portion of the Shape Outline button (highlighted in red within Figure 3). This brings up the Shape Outline drop-down gallery, as shown in Figure 3. From the Shape Outline drop-down gallery, choose Weight to bring up the Weight sub-gallery, as shown in Figure 3.
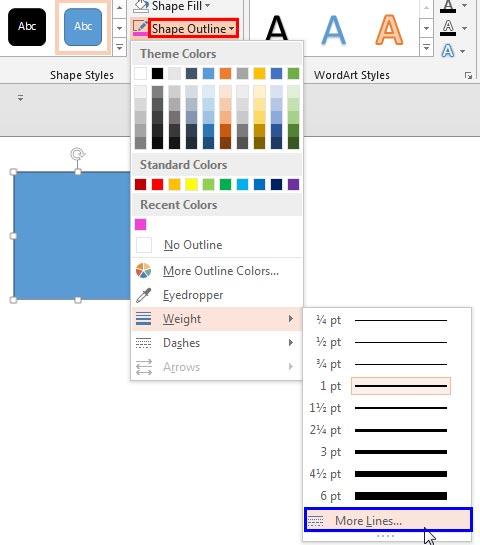 Figure 3: Shape Outline drop-down gallery
 - Within the Weight sub-gallery, choose any weight (thickness) value for the selected shape. Or choose the More Lines option as shown highlighted in blue within Figure 3, above.
- This opens the Format Shape Task Pane that you can see in Figure 4. Make sure that the Fill tab is selected (highlighted in red within Figure 4), then access the Line section. Within this section, select the Solid line radio button (highlighted in blue within Figure 4).
- Figure 4: Format Shape Task Pane with Line options
- The Format Shape Task Pane provides lot of options to format the line, but we will only explore options related to the weight attribute on this page as marked in Figure 4, above:
A. Width
Read more : Where Does Brown Rice Come From
Adds a weight for the selected line in points. You can opt to create a really thick line, even 100 pt or more! However, choose something that works best for you. You can either type in the outline width in the box, or use the up and down arrow buttons in the control to adjust the outline width. You will see an immediate preview within your selected shape on the slide.
B. Compound type
Selecting this option reveals a drop-down from where you can choose any of the compound types available for outlines, as shown in Figure 5. Note that compound lines in PowerPoint are limited to two or three lines compounded to each other. You need to choose the compound line options that PowerPoint provides and cannot create your own custom compound line. Figure 5: Compound types for outlines
C. Dash type
This option allows you to apply dash attribute to the shape outline. Learn more about Formatting Outlines for Shapes in PowerPoint 2016 – Dash tutorial.
D. Cap type
This allows you to choose between a Square, Round, or Flat line end type, as shown in Figure 6. This option only works with outlines within open shapes. Also, if you apply this option to a dashed line, it influences all individual dashes within the line. Figure 6: Cap types
E. Join type
This allows you to choose between Round, Bevel, and Miter joins, as shown in Figure 7. This influences the joins in an outline such as a corner of a triangle or rectangle. Figure 7: Join types
F. Arrow settings
Read more : Where Can I Buy Ammo In Starfield
Arrow settings work only with outlines used as open shapes. We have covered this in our Formatting Arrows (Arrowheads) in PowerPoint 2016 tutorial. After choosing required shape outline attributes you can see the changed shape outline, as shown in Figure 8. Note that the outline weight of the Rectangle shape that was selected earlier has been increased to 6 pts. Figure 8: Shape with outline weight changed Don’t forget to save your presentations often.
See Also:
Shape Lines: Formatting Line Weight and Thickness for Shapes (Glossary Page)
Formatting Line Weight and Thickness for Shapes in PowerPoint 2016 for MacFormatting Line Weight and Thickness for Shapes in PowerPoint 2013 for WindowsFormatting Line Weight and Thickness for Shapes in PowerPoint 2011 for MacFormatting Line Weight and Thickness for Shapes in PowerPoint 2010 for WindowsFormatting Line Weight and Thickness for Shapes in PowerPoint 2007 for Windows
You May Also Like: A Trainers Guide to PowerPoint: Conversation with Mike Parkinson | Tiger PowerPoint Templates
Popular Posts
Source: https://t-tees.com
Category: WHERE