
In today’s technologically driven world, having a reliable built-in microphone on your laptop, such as the MacBook Pro, has become increasingly essential. It is way more comfortable, and the quality of a modern mic is incomparable. Whether you’re a professional on the matter or a casual user, these tiny yet powerful devices play a crucial role in enhancing your digital experiences. From conducting seamless videoconferences for work or studies to immersing yourself in the gaming realm and even unleashing your musical talent, the versatility of MacBook Pro’s microphone knows no bounds. Besides, you want the reimbursement to match your expectations, right?
As technology advances, these microphones have undergone remarkable transformations, becoming smaller and remarkably improving in audio quality and overall performance. However, the quest for compactness has also rendered them inconspicuous, leaving many users needing clarification about their exact location.
You are viewing: Where Is The Microphone On A Macbook Pro
If you’ve ever wondered, “Where is the microphone on my MacBook Pro?” you’re not alone. They are practically invisible. The hidden gems can prove elusive to those unfamiliar with their precise whereabouts. But fear not, as we’ve got you covered. In this article, we’ll walk you through the steps to unveil the mystery and discover the hidden location of the microphone on your trusty MacBook Pro.
Where is the microphone on MacBook Pro?
Traditionally, the mic has always been near the webcam, on the top of your laptop. But this is old-fashioned. Unless you have a primitive computer, the microphone will always be near the keyboard.
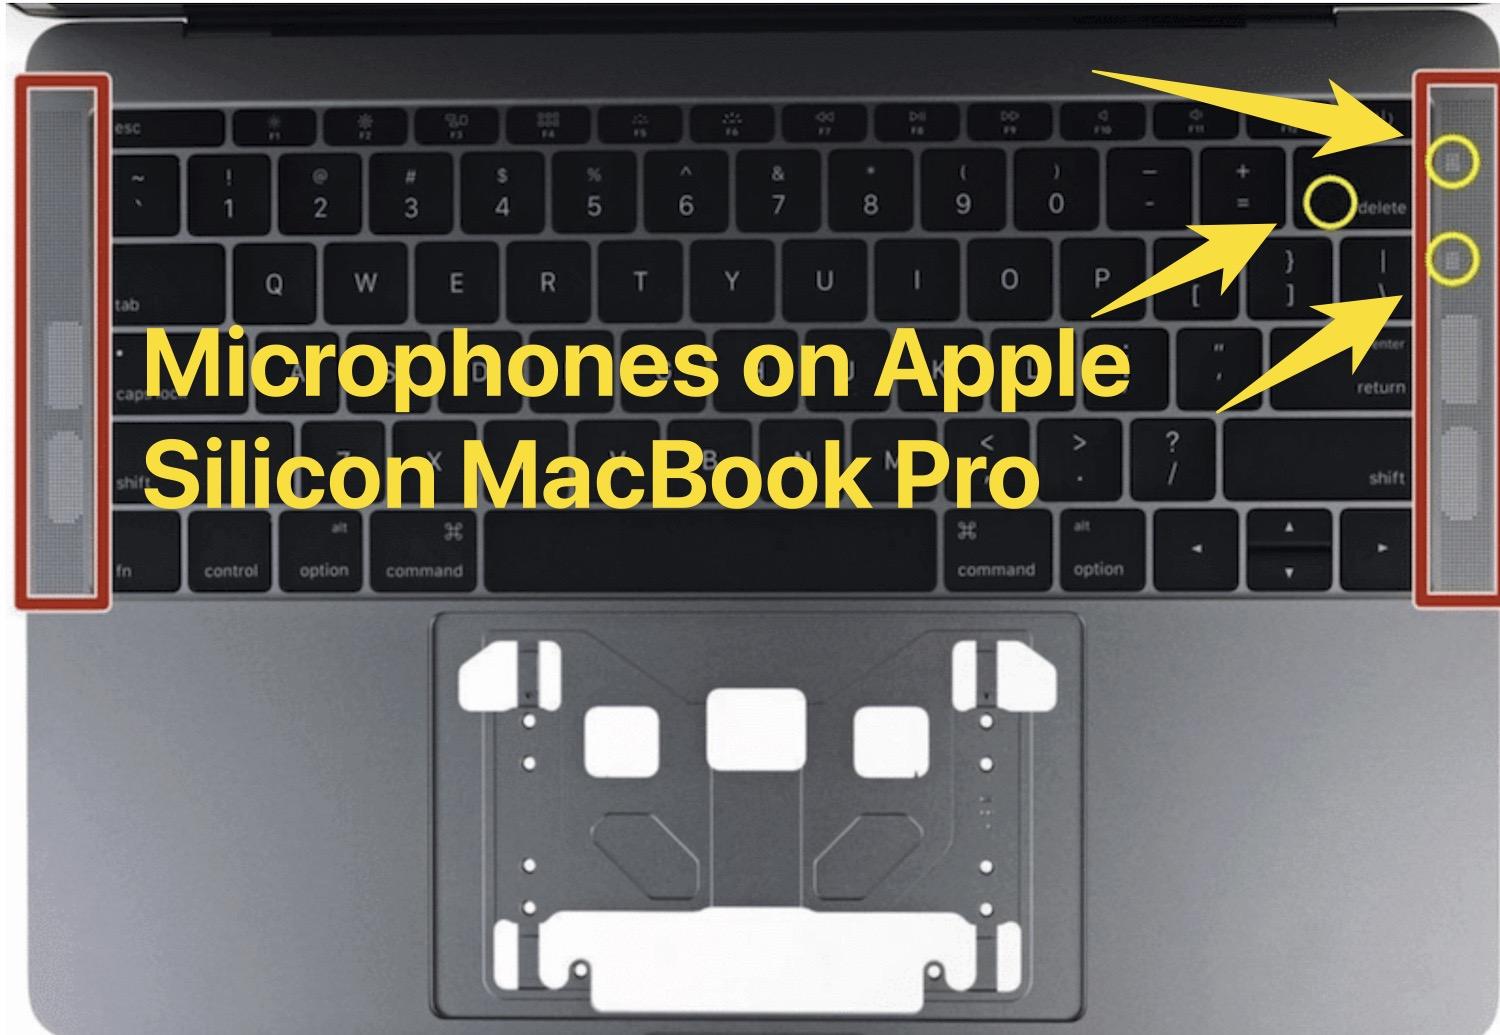
Where is the microphone on MacBook Pro 2018 and later models (including Apple Silicon)?
In the latest iterations of the MacBook Pro, a remarkable enhancement awaits regarding the built-in microphones. Not just one, but three! These sophisticated microphones are ingeniously integrated into the design, so it’s no surprise their location might evade your notice without a helpful guide. Picture the upper right portion of the keyboard and speaker section of your MacBook Pro; within this inconspicuous yet pivotal area, all three microphones are strategically positioned to capture pristine audio with remarkable precision.
For owners of the MacBook Pro 15″, the microphone placement follows a slightly different pattern. Under the right speaker casing, you’ll discover the microphones nestled discreetly, aligned with the diagram mentioned earlier. However, the number of microphones varies depending on the specific year of your computer’s model. Some models boast a single microphone, while others boast two, impeccably tuned to capture your voice with utmost clarity.
Rest assured, regardless of the configuration, these integrated microphones are adept at delivering top-notch audio performance, making your MacBook Pro a powerful tool for all your vocal needs. With such meticulous engineering, Apple continues raising the bar, ensuring your audio experiences remain exceptional. Here’s the guide in case you own a MacBook Air.
Now, armed with this knowledge, you can effortlessly tap into the full potential of these hidden audio gems for crystal-clear recordings, immersive conversations, and seamless multimedia experiences.
Where is the microphone on MacBook Pro 2017 and older models?
In versions of the MacBook Pro 13″ released in 2017 or earlier, the microphone’s location takes a different approach due to the absence of speaker grids and a more compact overall design. Indeed, locating the microphone on these models can be quite a challenge.
Read more : Where Can I Purchase Goat Milk
To reveal its well-concealed position, direct your attention to the bottom left of the casing, just above the ESC key. Upon careful inspection, you’ll notice a series of small holes – and the built-in microphone resides amidst these unassuming apertures, perfectly attuned to capture your audio needs.

Observing how these built-in microphones hide across various MacBook Pro versions in plain sight is fascinating. For those released after 2017, the microphones reside under the right speaker casing providing exceptional audio performance without sacrificing aesthetics. Remarkably, the ones directly beneath the speakers remain virtually invisible, blending seamlessly into the laptop’s design. Without prior knowledge of their precise location, these microphones would remain a secret, underscoring the marvels of modern technology’s miniaturization.
Is the microphone on my Mac secure?
The security of the microphone on your Mac is a top priority, and I’m here to provide a comprehensive answer to your question. Yes, the built-in microphone on your Mac is indeed designed to be secure and cannot be accessed by any external third parties or malicious software.
To ensure the privacy and security of your microphone, there are a few steps you can take. Firstly, it is important to note that the microphone on your Mac is not enabled by default. You have control over when it is activated, which adds an extra layer of protection. So, before you start recording audio, make sure to enable the microphone in the settings menu.
Additionally, Mac systems are equipped with advanced security features that safeguard the microphone’s functionality. These security measures include permissions and access controls, which ensure that only trusted applications can access your microphone. macOS prompts you for permission whenever an application requests access to the microphone, ensuring that you have full control over the applications that utilize it.
Furthermore, Apple constantly updates its operating systems with robust security features and enhancements. Regular updates are crucial in maintaining the security of your microphone, as they address any potential vulnerabilities and protect against emerging threats.
By following these steps, you can have confidence in the security of the microphone on your Mac. With the ability to control its activation and the implementation of stringent security measures, Apple has placed a strong emphasis on protecting your privacy and ensuring that your microphone remains secure from any unauthorized access.
How to reduce background noise on a Mac?
To reduce background noise on your Mac and enhance the clarity of your microphone recordings or conversations, you can utilize the ambient Noise Reduction feature. This built-in feature is designed to minimize unwanted sounds, making it easier for others to hear your voice or any audio you want to capture.
To enable ambient noise reduction on your Mac, simply follow these steps:
1. Start by accessing the Apple Menu, located in the top-left corner of your screen.
Read more : How to Watch the Dallas Cowboys Game Tonight
2. From the Apple Menu, select “System Preferences.”
3. Within the System Preferences window, locate and click on the “Sound” icon.
4. Once you are in the Sound settings, navigate to the “Input” tab. This tab manages the audio settings related to your microphone.
5. Look for the option called “Noise Reduction.” Click on it to select it.
By enabling the Noise Reduction option, you can significantly reduce background noise while using your Mac’s microphone. This feature enhances the quality of your voice by suppressing ambient sounds, allowing your conversations and recordings to be clearer and more easily understood.
It is worth noting that not all Mac models support this feature. If your Mac has an Apple T2 chip or you have selected a four-channel microphone format, the ambient noise reduction feature may not be available.
By following these steps, however, you can effectively reduce background noise on your Mac and improve the overall audio experience during calls, recordings, or any other activities involving your microphone.
How to check the microphone setting on Mac?
To check the microphone settings on your Mac, follow these steps:
1. Start by clicking on the Apple menu located at the top-left corner of your Mac’s screen.2. From the dropdown menu, select “System Preferences” to open a new window with various options.3. In the System Preferences window, locate and click on the “Sound” option. This will open a new window with multiple tabs.4. Within the Sound window, locate and click on the “Input” tab, which will display the list of available microphones connected to your Mac.5. Identify the microphone you wish to check and select it. If you have a built-in microphone, it will be labeled accordingly.6. After selecting the microphone, its settings window will open. Here, you can adjust the input volume according to your preference. Speak in your normal voice and observe the input level to ensure it is appropriate for capturing the sound source accurately.7. Once you have adjusted the input volume and configured the default device, it is essential to test the microphone to verify its functionality.8. To do this, simply speak into the microphone and monitor the sound levels. Ensure that your voice is clear and audible without any static or feedback noise.9. If you encounter any issues or wish to further customize the microphone settings, you can explore additional options within the Sound window and make the necessary adjustments.10. Once you are satisfied with the microphone settings and everything sounds as expected, you can close the Sound window and continue using your Mac with the newly configured microphone settings.
Macbook Pro Mic. Final Words
Whether you’re using a newer MacBook Pro model or one from 2017 or earlier, you can now confidently pinpoint the elusive yet powerful microphones, harnessing their capabilities for many purposes, from virtual meetings and musical endeavors to captivating gaming experiences. The advancement of audio technology in MacBook Pro is undoubtedly a testament to Apple’s dedication to providing users with unparalleled functionality and top-notch performance in every iteration.
Source: https://t-tees.com
Category: WHERE