
As a lifelong potter and clay finder it always surprises me how many potters have never found and processed their own clay. Most people just do not realize that wild clay is everywhere and making usable clay out of it is not hard. That is why I decided to write the definitive guide on how to find clay as a resource for potters who are curious about finding and processing their own clay.
Clay can be found in nature by its unique visual properties, they are;
You are viewing: Where To Find Clay
- Crackled texture when dry
- Hard, angular chunks when dry
- Soft, plastic texture when wet
I have already written an article answering the question “where is clay found” which deals with the best places to look for clay, so this article will not go into too much detail about the kinds of clay or the types of deposits. Instead this article will tell you how to identify clay in the field and how to process it to make natural clay for use in forming pottery. You can use these two articles together as a series to cover the entire subject.
If you are looking for more detailed information about finding and processing native clay with lots of videos showing clay being found and dug in the wild then check out my class Wild Clay 101 which will cover the subject completely and allows you to ask questions and get help along the way.
How to identify clay in nature
Clay is common everywhere on earth but is often overlooked because people do not know what clay looks like in the wild which is why I am often asked how to find clay. When I was growing up in the desert of Arizona I found clay on the banks of a lake, it was obviously clay because it had the same plastic texture as the clay I had used in art class at school. Then when I looked for clay near my home I could not find any because it was not wet like the clay I had found at the lake so I didn’t know how to recognize clay when I saw it.
When you are out in the country driving or hiking around keep your eyes peeled for clay. You will want to bring something to dig with, I like to use a mason’s hammer or a garden trowel. You will also need something to carry it in, a bucket will work but for exploring for new clay sources I like to carry a zipper bag and sharpies to write on them, that way I can collect clay from various places and take it home to test out. Good notes will help you to remember exactly where you collected the clay so you may also want to bring a notepad and pen or perhaps record notes on your mobile phone. Here is the link to the mason’s hammer on Amazon that I use for collecting clay.
Natural characteristics of clay
The easily observable characteristics of clay are described in detail below. The ability to recognize these signs is critical to learning how to find clay in the wild.
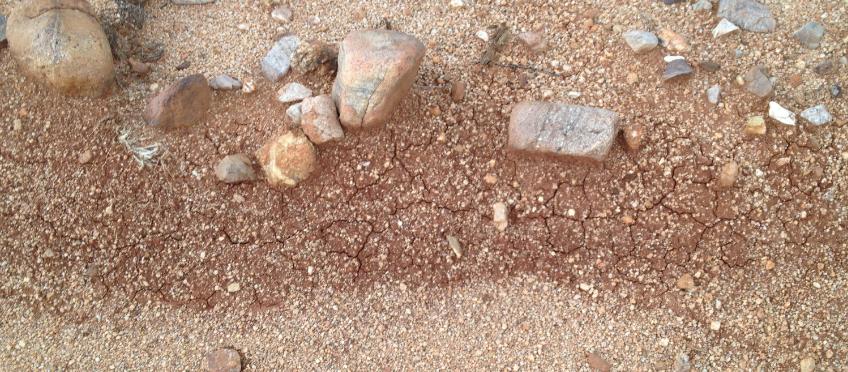
Crackled texture when dry
Read more : Where Is Leander Texas
Think of the crackled up mud at the bottom of a dry mud puddle, this is clay that has settled out in the puddle. All clay is “expansive” which means it expands when it is wet and contracts when it is dry. It is this property that makes clay crackle up when it dries, it shrinks up and breaks apart. Looking for this crackled texture is a great way locate soils with a high clay content that may be suitable for making pottery.
Hard, angular chunks when dry
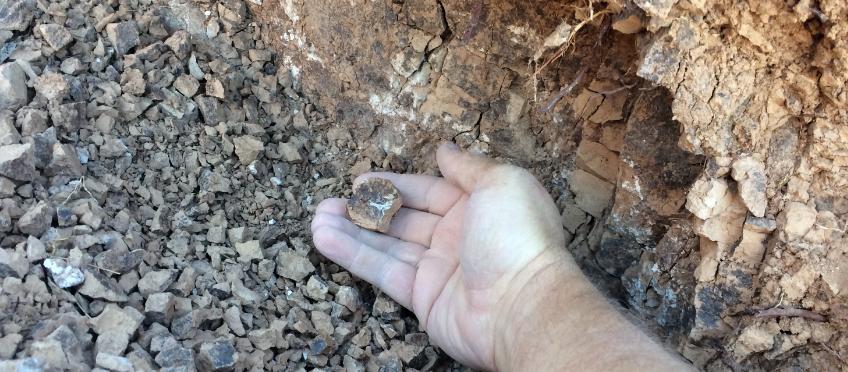
Clay often forms hard angular chunks when dry, not as hard as rocks but almost and with a soft, waxy or soapy texture to the touch. This is most noticeable when an underground clay bed has been exposed by a road cut or a stream cut bank. These angular chunks also sometimes have a dark patina on some facets, the result of thousands of years of wetting and drying leaching minerals into the fractures.
Soft, plastic texture when wet
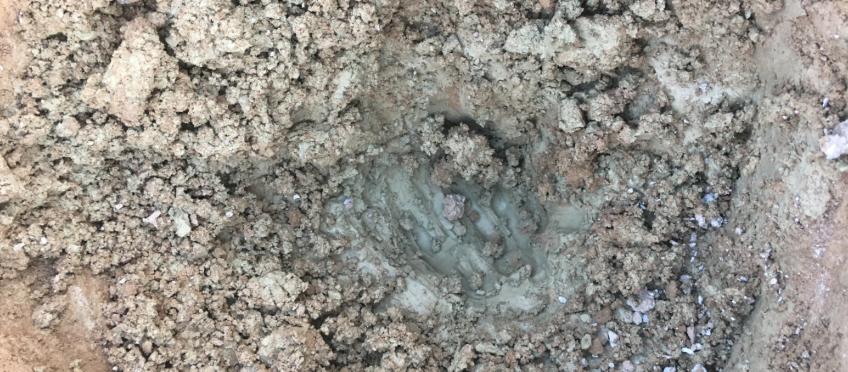
Clay is more easily recognizable when it is wet, then it displays the soft, plastic consistency we associate with clay. Be aware when walking around on damp ground, looking for slick and sticky spots where clay is located. On dry ground that has been wet recently look for deep tire tracks and footprints where people have traveled through clay.
Field Testing Clay
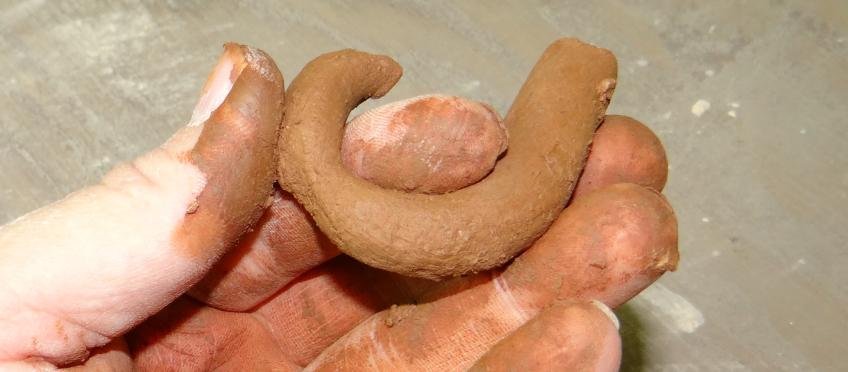
When. you have found something that you think might be clay but you are not sure, the best way to proceed is to test the plasticity. To test plasticity get the clay wet (if it is dry). In most cases it is simple to wet a natural clay that is dry, just pour water over some of it in your hands, then knead it up. You may need to knead it for a few minutes or to wet it more than once to get the correct texture, every clay is different in this regard. Once you get it wet thoroughly try rolling a little coil in your hands then see if you can bend that coil around your finger. If it cracks easily it may be lacking in plasticity, if it bends around your finger easily it would appear to have an abundance of plasticity.
A plastic clay is a good candidate to bring home and try making something out of, grab some for yourself and a little to share with me too.
How to process wild clay
Now you have found some clay you will want to work it into a usable lump and make something out of it. Only by making something from the clay will you know if it will work for your intended purpose. The best way to quickly make this clay usable is to dry process it using the instructions below.
Dry processing natural clay
Make sure the clay is dry, if it is damp, let it sit out in a place where it will not be rained on for a few days to dry. Alternately you could place some on a cookie sheet and put it in your oven on low for a couple of hours to dry it out thoroughly. Don’t worry about accidentally firing your clay, an oven does not get hot enough to transform clay into ceramics.
Read more : Where Do Travis Scott Live
Now that the clay is dry you will need to grind it up. You can do that easily by pounding it on a cement patio or driveway with a hammer or large rock. The clay only needs to be as fine as sand, it does not need to be as fine as baby powder.
Once your clay is ground up, add about 20% sand and mix in thoroughly. Why are we adding sand to your clay? Because it helps make the clay more porous, allowing moisture to escape more easily which will help the pot to dry without cracking. 20% sand can be measured with a 4 to 1 ration, just add four parts clay to one part sand and stir it around. The ratio of clay to sand varies depending on your clay but 20% is a good average for starting out, feel free to experiment to find what works best with your clay.
Now you are ready to wet your clay. Add water a little at a time, knead the clay to mix thoroughly, add water until your clay is a nice plastic consistency. Finding the right consistency can be tricky if you do not have much experience working with clay. Too much water and the clay becomes overly sticky and gloopy, too little and it will crack easily and be overly firm.
Next steps
You will probably want to fire your clay but that is not the focus of this article. If you want to fire your pottery primitively check out the article I wrote on how to fire pottery without a kiln located here.
If you will be firing in an electric kiln you will need to be careful because you don’t know how high you can fire this clay before it starts melting. Start low and take it up a little at a time, keeping your pot (or whatever you made from your wild clay) in a bowl or on a tile or something that you have already fired from clay that can handle the temperature. That way if it melts it won’t make a huge mess in your kiln.
More information for how to find clay
There is much more that can be said about how to find clay, how to process it and use it but an article is not the best way to share that information. Which is why I created a video based online class about this subject that I call Wild Clay 101, you can check it out at this link. You might also be interested in checking out my YouTube channel where I show how to find and process wild clays, here is my YouTube link.
If you have questions or comments about any of this please leave a comment below and I will answer you.
Source: https://t-tees.com
Category: WHERE