
So, It’s Time to Sharpen Your Skates…
There are few things that are as exciting as ice skating for the first time.
When you finally get the hang of it, and you glide along the ice, it feels like you’re flying.
You are viewing: Where To Sharpen Ice Skates
Over time, however, the skates don’t perform quite like they used to.
Is it you, or is it your skates?
As any skating coach will tell you, if you feel that way, then it’s time to sharpen your ice skates.
This could be easier said than done, especially if you want to sharpen ice skates by yourself.
Edge-Friendly Synthetic Ice Panels By PolyGlide Synthetic Ice
Sharpening ice skates is not as simple as passing it along a sharpener like a standard kitchen knife.
There’s a science and an art to making sure you end up with fast, high-performing blades.

What You’ll Learn Here…
In this article, we’ll break down everything you need to know about those pieces of metal attached to your skates.
Then, we’ll explore the two options available to you.
First, you’ll learn how to sharpen ice skates at home.
We’ll walk you through the different tools and techniques to safely and effectively sharpen your skates.
Next, you’ll learn how to sharpen ice skates at a skate shop.
You’ll learn what happens behind the scenes so you can ask the right questions and leave with awesome blades.
We’ll round it out with some tips, tricks, and other important information you need to get the best out of your skating experience.
Why Do You Need to Sharpen Your Ice Skates?
A sharp blade ensures you have enough grip on the ice to perform many of the moves you see in figure skating, ice hockey, or for recreational skaters.
Dull skates cannot create enough friction to melt the ice and generate that thin layer necessary for gliding.
As a result, you’re likely to lose speed, which is necessary for hockey players sprinting on ice or figure skaters trying to land axels.
More importantly, you can lose control over the skates, which can lead to injury or poor skating experience.

A common example is rental skates that do not get the additional care necessary for skating.
If you’re no longer feeling secure, sharpening may help.
or for recreational skaters. also corrects nicks, scratches, and gouges in the blade.
Skaters who walk with blades on different surfaces are likely to see these imperfections over time.
Different surfaces also cause ‘burring,’ which are raised bumps on the vertical edges of the blade (also common after sharpening).
Factors such as blade quality, how you use them (hockey stops!), and type of ice also contribute to sharpening your blades.
The sharper your blades, the better they perform across the ice, creating that thin film of water necessary for movement and stopping.
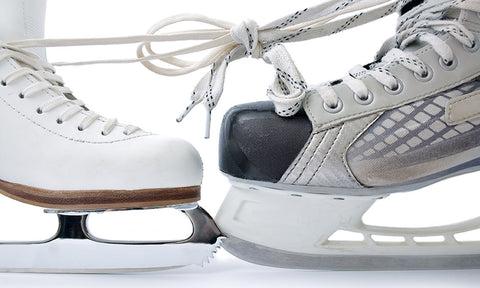
The Anatomy of Ice Skate Blades
There are different types of boots at various price points, which we’ve covered in previous blogs.
All boots have blades attached to them, made up of similar parts:
- Toe and heel plates (Figure and dance skates): These are the two spade-shaped metal plates that attach to the boots with screws.
- Stanchion: The metal part that attaches the blade to the plates.
- Footplate and blade holder (hockey skates): Hockey skates also have two hard plastic plates. The plates are connected to a larger part that serves as the blade holder. When a skater wants to swap the blade, it can be ejected from this compartment.
- Blade, aka Runner: This is the long piece of metal that touches the ice. Figure skating and dance skating runners are slightly longer than hockey skates. The thickness of these runners generally ranges from 3mm to 5mm.
- Toe picks: Figure skates and dance skates have a serrated edge
- Edges: Unlike a knife, ice blades have two sides. Each edge is used in performing stops, spins, turns, and jumps.
- Radius: The curve of the entire blade, starting from the bottom of the pick to the heel. A larger radius means more of the blade will make contact with the ice, which can impact a skater’s performance.
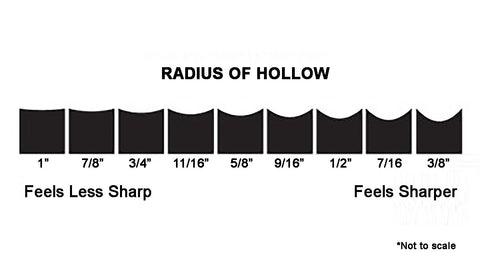
- Radius of Hollow: The concave depth between the two edges. This is one of the parts manipulated by the skate sharpener. Deeper hollows provide more grip at the expense of speed, and vice versa.
The Science Behind Sharpening
The goal of sharpening the blade is not only to get it as sharp as possible.
Yes, this plays a key role in performance.
The sharper the blade, the easier it is to achieve grip on the ice.
However, there are other important parts any new skate sharpener must address.
Blades must have a smooth finish at an angle that’s ideal for you.
A sharper angle allows for more agility, speed, and maneuverability.
A flatter blade angle is ideal for control and stability, which appeals to beginners.
Along with the blade sharpness and angle, the depth of hollow must be to the skater’s specifications.
A deeper hollow provides more grip and control, while a shallow hollow allows for speed.
Finding the right combination of sharpness, angle, and hollow, along with considering factors like the skater’s weight (light skater or heavy skater), skating abilities, and ice conditions, will determine the best result.
Sharpening Ice Skates at Home
So you’re here to learn how to sharpen ice skates, so it’s likely you’ll be doing it at home.
There are pros and cons to home skate sharpening.
Pros
- You control when and how you sharpen your skates
- If there’s no skate shop nearby, it’s the best option
- You avoid poor service from a skate shop
- You learn a new skill and will understand how each hollow performs
Cons:
- Sharpening machines/tools can be very expensive
- It may not be a wise investment if you’re the only one who skates
- You’ll make mistakes at first
When sharpening your skates at home, you must prepare the skates, sharpen them with your desired technique, then reassemble and test the skate.
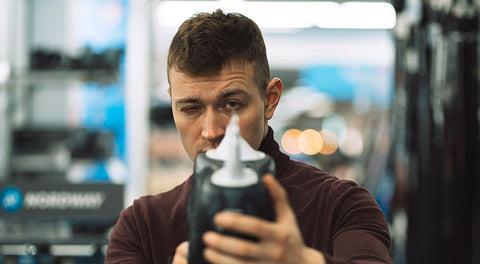
Step 1: Preparing the Skates for Sharpening
Ok, first, start off by gathering all your tools.
Based on the technique, this includes a Torx wrench, flat stone, deburring stone, lubricant, cloth, and grit paper.
You’ll also need to get the tools for your sharpening method of choice, which we will mention below.
You should also invest in safety equipment, like goggles, to protect your eyes.
Step 2: Removing the Blades and Cleaning
Use your Torx wrench to remove the blades from the boot.
Read more : Where To Find Bands On Bands Crossword Clue
This allows you to work with the blade without the boots getting in the way.
Remember to keep the screws in the same order for each boot.
It’s a great opportunity to clean the boots and blade with a microfiber cloth.
For some options, like the Sparx portable machine, removing the blades is unnecessary.
You’ll be mounting the entire boot and blade to the machine.
Step 3: Checking for Damage
Blades are prone to damage, especially if we’re using them to compete in hockey or figure skating.
Check for chips, cracks, rust, or any other issues that may impact the sharpening process.
You can repair any chips or cracks during resharpening.
However, if it fails, you may need a professional to repair the blade.
Are you seeing rust and burring?
Use grit paper to remove any rust, then the honing stone along the profiles to deburr the blade.
Blades can also become misaligned, where one edge is shorter than the other.
Hold the blade up to a light or use a magnifying mirror to look for uneven or misaligned edges.
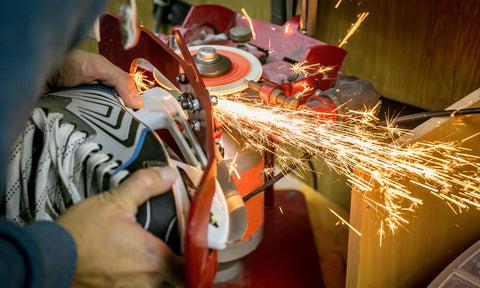
Step 4: Sharpening the Blade
How To Sharpen Ice Skates With A Grinding Machine
A professional grinding machine is the biggest investment a skater can make.
In some cases, it’s the best.
Wissota and Blademaster are two popular grinding machine brands available.
To sharpen with a grinding machine:
- Select your desired radius for the actual sharpening wheel and install it per the machine’s instructions.
- Set the diamond dresser arm to prepare the grinding wheel.
- Turn on the device and pass the arm over the wheel 4-5 times or as needed.
- Adjust the arm to bring the diamond dresser closer to the grinding wheel if necessary.
- Once the wheel is ready, attach one skate on the provided skate mount with the blade facing the grinding wheel.
- Pass the skate against the spin of the wheel about 4-6 times to sharpen the skate.
- Use light pressure, letting the wheel do its job. Make sure the entire length of the blade is sharpened by the wheel.
Turn the machine off, wipe the blade, then inspect it for any imperfections or issues.
You can pass the blades on the grinder 1-2 times or as needed.
Sometimes, you can use a cross-grinding technique to remove imperfections.
The grinding wheel is placed perpendicular to the blades to help finish the job.
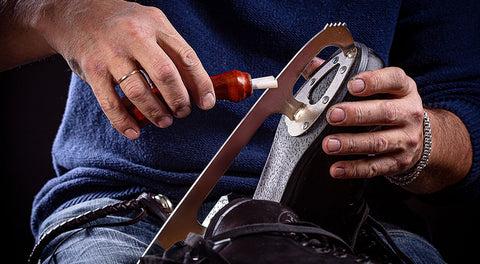
How To Sharpen Ice Skates With A Flat File
Manual sharpening with a flat-file takes more skill and patience than other methods.
However, it’s one of the best ways to truly understand and master the art of sharpening.
For this method, you’ll need a jig to hold the skate in place, a flat sharpening stone, a needle file, and lubricant.
- Load your blades or boots to the sharpening jig. The boot should be loaded upside down with the edges facing you, ready to be sharpened. Add the lubricant to the stone, then pass the stone in one direction – heel to toe – about 15 times. Then do the same in the opposite direction. Keep wiping off residue or bur periodically during the process. As you sharpen the blade, you’ll notice the loud grinding sound slows to a smooth hum, indicating that you’ve sharpened the blades.
- Take a needle file to create your hollow. These files come pre-measured to your desired size. Like with the flat stone, pass the file from heel to toe to create the hollow. This process can take several minutes and often requires trial and error. When you’re done, remove the blades from the jig. Use the cloth and other tools to remove any nicks and blemishes. Using a file requires precision and an eye for detail.
You’ll need several tries before you consistently sharpen your skates to the desired angle and hollow.
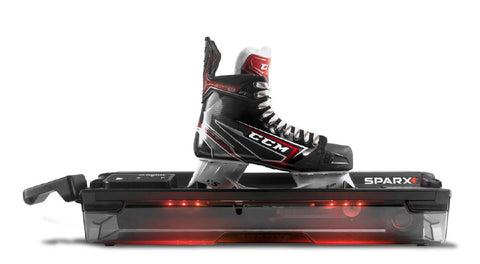
How Sharpen Ice Skates With Automatic Sharpening Machine
Portable or home skate sharpening machines take all the guesswork out of sharpening your blades.
These machines may cost several hundred dollars upfront but are an excellent investment if you have multiple skaters in the home or on your team.
Examples of automatic
- Sparx Skate Sharpener
- Wissota Portable Skate Sharpener
- CAG One Skate Sharpener
Once the skate is prepared, install the desired grinding ring.
These machines often have limited grinding rings, but you can still achieve hollows between 5/8” to 3/8.”
You can also set the height of the grinding ring to sharpen hockey skates, figure skates, and anything in between.
With the ring in place, you can mount your skate in the appropriate jig mechanism.
This holds the skate in place, making It a truly hands-off experience.
From there, you simply turn on the machine, and it will begin to sharpen your skates.
The grinding mechanism will pass over the blade several times, then alert you when it’s complete.
When it’s done, inspect your blade for any issues, including damaged edges.
It’s common to have burns, burrs, and other imperfections even after sharpening.
Use a honing stone along each edge to remove these issues.
Step 5: Reassembling and Testing Your Skates
If you remove the blade using any of these methods, your job is to reattach the blade using the screws, ensuring the blade is properly aligned.
In all techniques, make sure the sharp edges are even along the entire radius of the skate.
Test your skates as soon as possible, looking for any performance issues.
This will allow you to go back to your machine and fine-tune the blade.

Sharpening Ice Skates at a Skate Shop
You’d be surprised to find out that most skaters do not sharpen their skates.
They go to sharpening shops or a professional skate sharpener.
Even with automatic machines, sharpening is a skill that takes several years to master.
As a result, there are pros and cons to sharpening with a skate shop:
Pros:
- You get years of experience on your side
- No large upfront investment
- Professionals can achieve a range of hollow portable machines, or beginner sharpeners cannot
- Takes the hassle out of learning
Cons:
- You must wait your turn.
- Price can add up over time.
- You can encounter new or amateur sharpeners who do not deliver
- Some skate shops may be several miles away
If you’re still convinced, take your clean skates to the nearest skate shop for sharpening.
Speaking With Your Skate Tech
Read more : Where To Stay In Sonoma
The biggest decision you’ll make with your skate sharpener is determining the radius of hollow.
You may already know what hollow you’d like based on your current skill level, history, or preferences.
However, as a new skater, you may need to discuss this with your tech.
As mentioned previously, the depth of the hollow determines speed, control, and bite on the ice. Here’s a diagram to give you an idea of what’s possible.
So your first order of business is to reach out to your rink manager to find a skilled technician and tell them exactly what radius of hollow you’d like on your blades.
If you hand the skate shop your boots without any direction, they will likely stick with a 5/8” to ½” hollow, sometimes called a “House Cut.”
These measurements generally provide equal amounts of glide and bite.
However, for a beginner, these cuts may be too difficult to manage, and an even smaller radius of hollow (for instance, a ¾”) is best.
However, as you improve as a skater, a vanilla sharpen will not cut it.
For instance, you may need more agility or explosive acceleration if you’re changing positions in hockey or if you’re moving up levels in figure skating.
Over time, you’ll know if you want more control or speed and test different hollows until you find what’s the best type of sharpening for you.
You also need to think about body weight.
For instance, heavier skaters need a smaller radius for turning and may struggle on a ½” hollow.
Lighter skaters (think kids) can work with these deeper hollows as it helps them grip the ice more effectively.
Tell the skate technician your skating style, preferred hollow, and radius.
Once you receive the sharpened skate, check for any nicks, burrs, or misalignments.
Test your skates on the ice as soon as possible and provide feedback to the technician on your next visit to avoid any mistakes.
Sharpening for natural vs. synthetic ice
The temperature of the ice and ice quality you’re skating on also influences how you should sharpen your skates.
Ice skating in cold temperatures (an outdoor rink during wintertime) requires deeper hollows and sharper edges to get more grip on the ice.
An indoor refrigerated ice rink can work with a hollow that’s smack-dab in the middle, while warmer conditions and synthetic ice can work well with a smaller radius (figure skate ice and hockey ice).
Synthetic ice is a series of High-Density Polyethylene tiles or panels linked to form a rink.
These are often infused with a slip surface conditioner, reducing the need for you to hold an edge, so you can work with smaller hollows.
FAQs About Skate Sharpening
Now that you know how to sharpen ice skates for maximum performance, I’m sure you have lots more questions.
Keep these questions and answers in mind as you continue to get better at skate sharpening or choose to help others with their skates:
-
How often should you sharpen your ice skates?
Your frequency of skate sharpening depends on how often you skate and the degree of intensity.
Beginner skaters should sharpen ice skates every 15-20 hours of ice time.
This number may drop to 8-10 hours of ice time or even less as you begin to get a feel for the ice and your hockey or figure skating boot.
Additionally, the deeper the radius of hollow grind, the more fragile the blade becomes, requiring more sharpening sessions.
-
Will continuous sharpening shorten the life of my blades?
Not necessarily. Blades are meant to be sharpened, after all.
However, over time, your blades begin to wear away, regardless of your radius of hollow.
How quickly this occurs depends on factors such as weight, ice conditions, quality of the metal, and aftercare.
In many cases, one edge of the skate can wear away before another, giving you an uneven skate.
Sharpening them at home or taking them to the shop can correct this, but it will affect the blade’s performance over time.
On average, your blade should last at least 5 years.
-
Do handheld skate sharpeners work?
There are a few handheld skate-sharpening options.
These include your conventional honing stones, the Y stick, and the Edge Again Skate Sharpener.
These tools can help freshen up a skate’s edge before hitting the ice.
However, they should not be replacements for professional or at-home skate sharpening.
-
What happens if you don’t sharpen ice skates?
Over time, you’ll lose speed and agility as the blade dulls.
It’s more difficult to turn, and you’ll experience more falls and injuries.
Ready to stay sharp?
Sharpening your ice skates takes skill and experience. It can take hundreds of tries to finally master sharpening.
You can also use many of the tried-and-true techniques with sharpening jigs and stones or invest in a larger sharpening machine.
Try an automatic tool like the Sparx Skate Sharpener if you have multiple skaters at home and need quick, yet effective skate sharpening.
You also have the option of working with professionals in a skate shop. Ask the right questions and provide your specifications for the best results.
Also, consider factors like your skill level, skating/playing style, type of ice (natural vs synthetic), and desired performance.
Whatever option you choose, sharpening your skates takes patience for you to get it exactly right.
Follow the steps, and don’t be afraid to make mistakes.
Eventually, as you do on the ice, you’ll move from beginner to pro.
Source: https://t-tees.com
Category: WHERE