
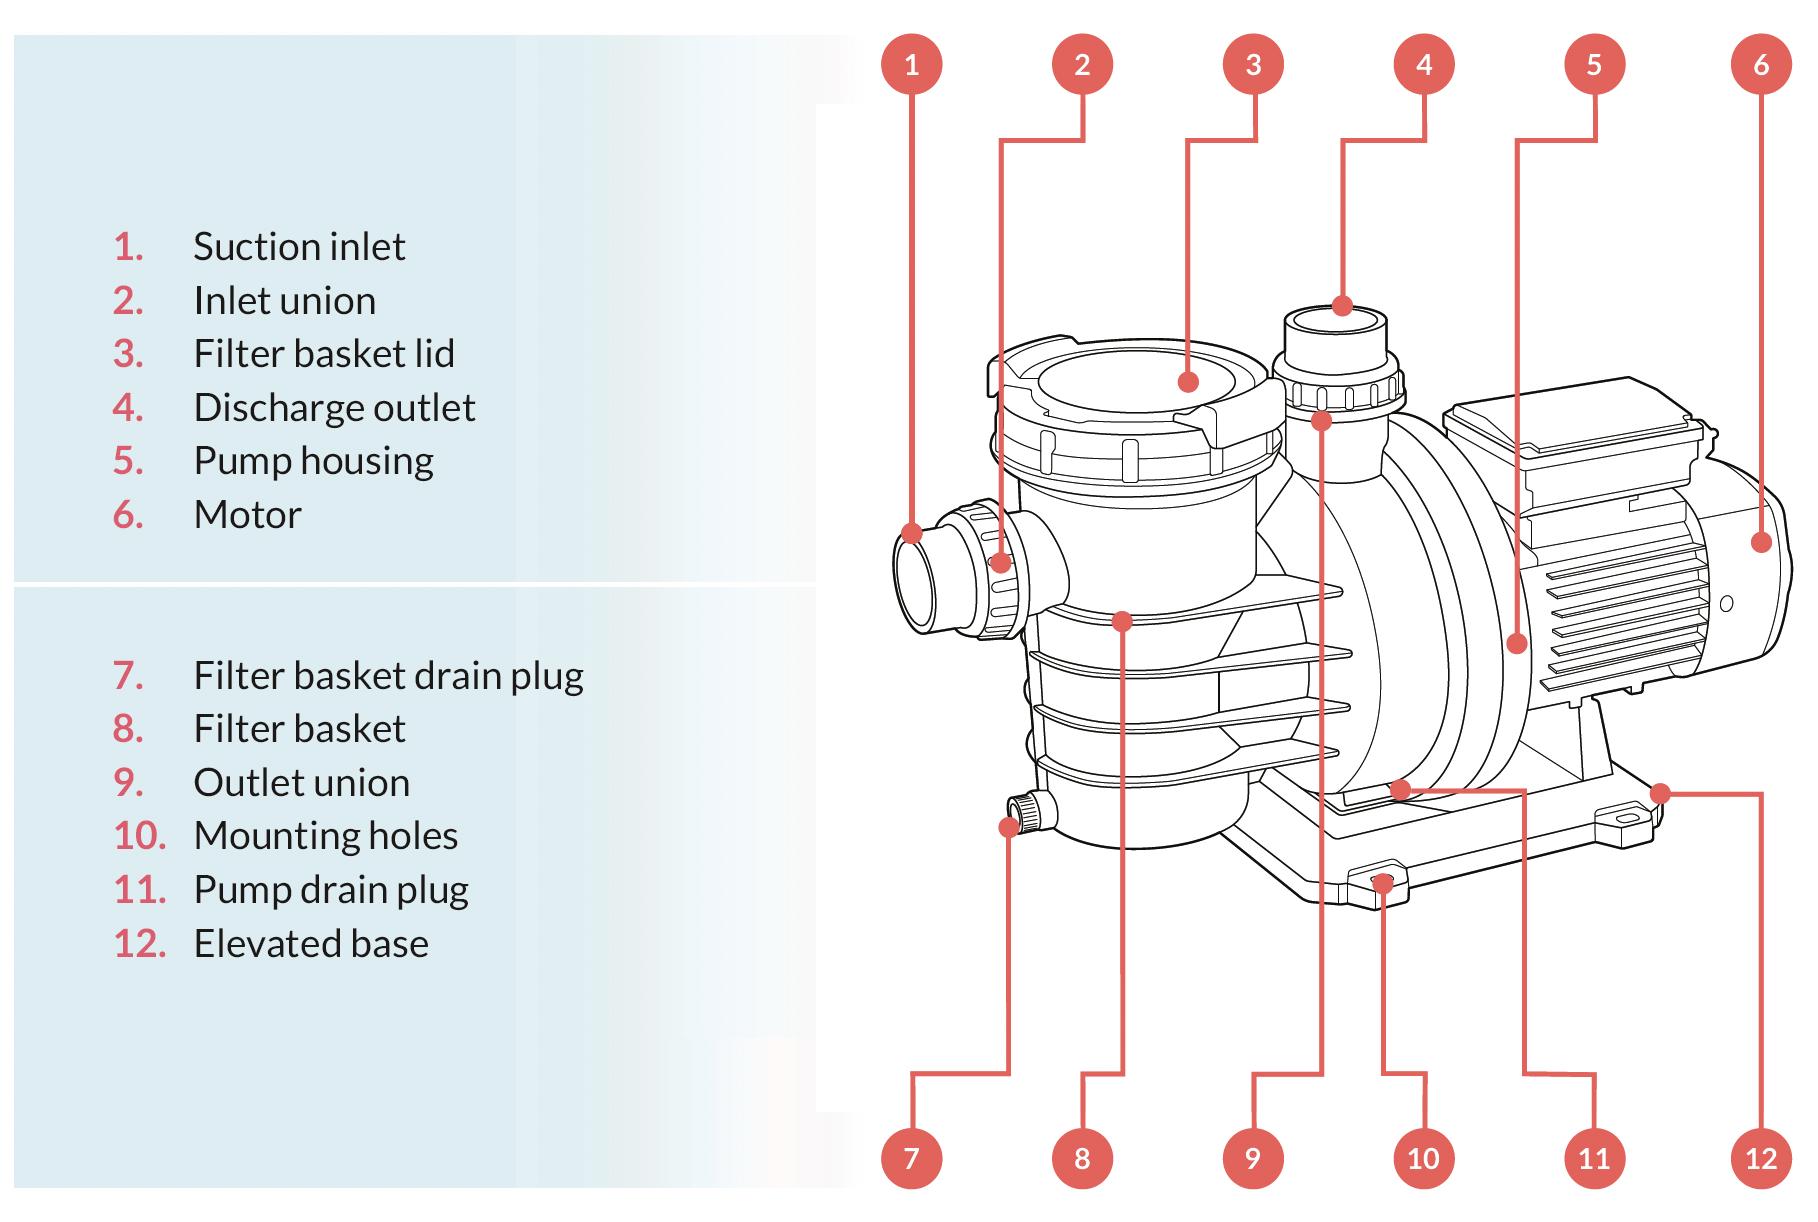
You may be interested
Pool Pump Circulation System
Next, we need to know the circulation system. Below is a diagram showing the basics of the circulation system.
You are viewing: Which Is The Inlet On A Pool Pump

STEP 1: Pool Pump Setup
- It is recommended that the pump is installed not more than 30cm above the water level of the pool. A check valve is recommended on the suction line to the pump from the pool. This is a valve that stops water from returning back down the inlet pipe into the pool. Water running back into the pool makes the pump harder to prime on startup.
- Better self-priming will be achieved if the pump is installed as close as possible to the water level of the pool.
- If the pump is located below the water level, isolation valves must be installed on both the suction and return lines to prevent the backflow of pool water during any routine or required servicing.
- It is recommended that the pump and other circulation equipment be located more than 1.5m from the pool water.
- Choose a location that will minimise turns in the piping.
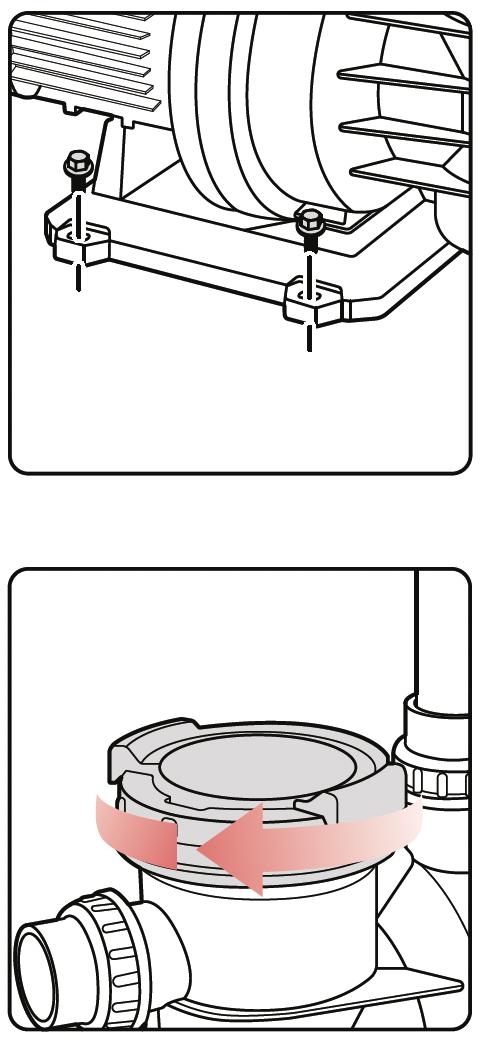
- The pump must be placed on a solid foundation that will not vibrate. To further reduce the possibility of vibration noise, bolt the pump to the foundation, or place it on a rubber mat. It is recommended that the pump is bolted directly to the foundation. All Pool Set pumps have bolt holes ready for bolting onto the foundation.
- The pump foundation must have adequate drainage to prevent the pump from getting wet. Protect the pump from rain and the sun.
- Proper ventilation is required for the pump to operate normally. All motors generate heat that must be removed by providing proper ventilation.
- Provide access for future service by leaving a clear area around the pump. Allow plenty of space above the pump to remove the lid and basket for cleaning.
- If the equipment is under cover, provide adequate lighting.
STEP 2 – Pool Pump Installation
- Fit one of the unions over the discharge outlet by placing the nut over the sleeve and firmly tightening onto the pump housing. This will ensure no leakage at this point.
- Fit one of the unions over the suction inlet by placing the nut over the sleeve and firmly tightening onto the pump housing. This will ensure no leakage at this point.
- It is recommended that you use rigid PVC plumbing pipe to install your pump. The pipes should be manufactured to Australian standard AS/NZA 1477. This standard makes sure the pipe can withstand the pressures it comes under when circulating water through the pool filtration system.
- The piping must be well supported and not forced together in places where constant stress will be experienced.
- Ensure all attachments and valves used in setup are suitable for the pipe size used which will be either 40mm or 50mm.
- Use the least number of fittings possible as every additional fitting has the effect of moving the equipment farther away from the water which reduces water flow.
- To ensure a watertight fit it is recommended to use PVC glue (sometimes referred to as PVC cement) to connect the unions with the PVC pipe.
- Clean both the pipe outside area and the union sleeve inside area with PVC pipe primer. The PVC primer makes sure the glue will have a stronghold and seal.
- Apply PVC glue to the surface of the pipe that contacts the union sleeve and also to the inside of the union sleeve itself.
- Now push them together to create a firm connection.
- Repeat this process for the suction inlet pipe.
- Do not operate the pump for at least 24 hours after glueing to give it time to set.
STEP 3 – Pump Operation
- Never run the pump without water. Running the pump dry for any length of time can cause severe damage and will void the warranty.
- The pump should be pressure tested to check if there are any leaks in the system.
- Pressure testing is a process when you first run the pump to check for leaks at connections and pipes.
- During testing, there is a risk that pressurised trapped air can propel faulty parts or debris which may cause injury or death.
- To avoid this, open the bleed valve on the filter before pressure testing. This will let trapped air escape from the system as it fills up with water. Once filled with water the bleed valve can be closed again.
- The pump motor is usually hard-wired to the power cord which means the pump runs continually once it is plugged in and power is turned on. The use of a timer is recommended.
- To start the operation of the pump it must be firstly primed which means filling it with water. Open and remove the filter basket lid by turning it in an anti-clockwise direction.
- Fill the pump with water up to the lower level of the suction inlet.
- Before closing the lid ensure the o-ring seal is in place. Check that there is no debris around the o-ring and it is a watertight fit. Close the lid by turning it in a clockwise direction but only hand tighten.
- Ensure that the lid is secure. Make sure all valves are open and the unions are tight.
- Open all suction and discharge valves connected to the pool system.
- Plug into power and then turn the power on.
- The pump should prime. The time it takes to prime will depend on the elevation and length of pipe used on the suction supply pipe.
- If the pump does not prime and all the instructions to this point have been followed then check for a suction leak.
Source: https://t-tees.com
Category: WHICH