
The water pressure is low in my Waterpik flosser
If the pressure and strength of the jet of water coming out of your Waterpik is not as strong as you would like or expect there are a number of different solutions to this problem, subject to the model you have.
Adjust the pressure from the flosser itself
Change the pressure by rotating or sliding the wheel/dial/or switch on your flosser. On countertop models you often have the choice of 10 settings. 1 being the lowest and least intense, with 10 being the strongest and highest pressure setting.
You are viewing: Why Is My Waterpik Not Turning On
Cordless models usually have 2 or 3 pressure settings. You can switch between them by moving the sliding switch between positions I, II and III (if available) or by pressing the mode button to change between low, medium and high (if available).
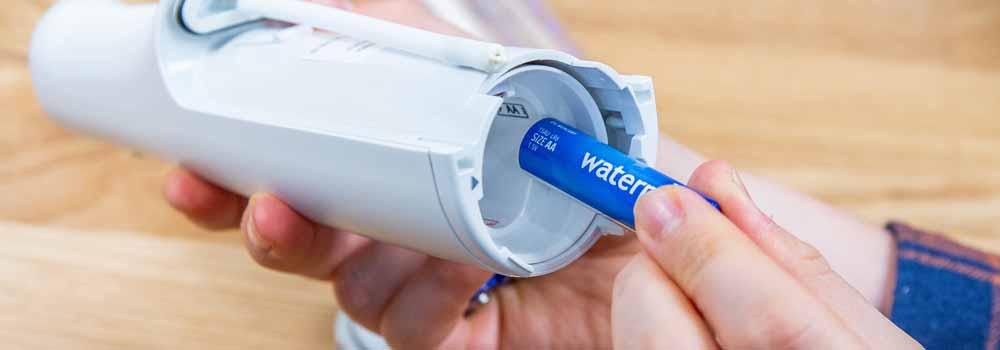
Recharge/replace the batteries
If you own one of Waterpiks cordless flossers that has a rechargeable battery built-in, then place the flosser on charge for the recommended time.
Most units have a charge light indicator to show when the battery is low and fully charged.
For example, with the Waterpik Cordless Advanced takes around 4 hours to be recharged using the supplied magnetic charger.
Read more : Why Aren’t My Snaps Sending
Whilst on charge the indicator on the handle will flash, turning to a solid/continuous light once fully charged.
A fully charged battery in this model is said to offer 1 weeks use.
When there is approximately 30% charge left, the charge indicator light blinks 8 times quickly after use to indicate that you should recharge the unit.
For models with removable and replaceable AA or AAA batteries, consider replacing these as the ones in use may well be low on power or flat.
The type of battery and the quality can affect the performance of your Waterpik.
You should replace all batteries at the same time, being sure to use the same type from the same brand. Mixing types and brands can potentially cause performance issues.
Clean your jet tips
Read more : Why Do I Pay Child Support With 50/50 Custody
Debris and hard water deposits can build up inside the tip(s) used on your water flosser.
Regular cleaning helps ensure water flows freely and the pressure is not negatively impacted.
It is recommended by Waterpik and other water flosser brands to replace tips/nozzles on average every 3 to 6 months. Tips such as the toothbrush and orthodontic tip should be replaced every 3 months, whilst bristle free tips like the jet tip can be replaced every 6 months.
To clean the nozzles:
- Remove the tip from the unit using the eject button.
- Soak the tip in a container of hydrogen peroxide or white vinegar for 5-7 minutes.
- Rinse the tip under warm water.
Clean your Waterpik flosser
- Mix 2-4 tablespoons (1-2 ounces) of white vinegar with 16 ounces of warm water.
- Fill the reservoir with the solution, and then run 1/2 of it through the Water Flosser.
- With the unit off, place the Water Flosser handle in the sink and allow the solution to gradually drain out of the handle.
- Run any remaining solution through the unit and then rinse with a full reservoir of warm water.
For cordless models:
- Add 1 tablespoon of white vinegar to a full reservoir of warm water.
- Point the handle and tip into the sink.
- Turn unit ON and run until the reservoir is empty.
- Rinse by repeating with a full reservoir of clean warm water.
Cleaning your flosser every 1-3 months will ensure optimal performance
Additional steps
If the previously mentioned steps haven’t resolved the issue, some additional things you can try are:
- Replacing the nozzle/flosser tip for a new one.
- On units with a ‘pause’ button, fully depress and release the button.
- If you use mouthwash with your Waterpik, follow Waterpiks guide on how to use mouthwash with a water flosser.
- Remove and clean the valve at the bottom of the reservoir (if applicable)
- If the pressure is still low:
- Remove valve
- Set empty reservoir on the base of the unit
- Fill the reservoir with water without removing it from the base
- Turn unit on and test pressure
- If pressure is restored with the valve removed, replace the reservoir valve with a new one.
- If the pressure is still low:
Source: https://t-tees.com
Category: WHY