
Premiere Pro is one of the best multimedia editors on the market today. Many professionals rely on it to produce their YouTube videos, feature film material, music videos, and more. Unfortunately, playback lag is a well-known issue in Premiere Pro. It can make the workflow for video production more complicated and stressful than it has to be.
Playback lag refers to the slowness or choppiness a user may experience when playing back a fresh or edited video. It can cause audio and video components of a file to desync during playback. And for some users, this lag causes footage to blackout during playback.
You are viewing: Why Is Premiere Pro Lagging
Playback lag in Premiere Pro is a performance issue and is usually a sign that your computer may not have the right specs to handle editing high-resolution videos. It could also mean that Premiere Pro is dropping frames during the playback.
You may also like: Final Cut Pro VS Adobe Premiere: Which Is the Best?
- Part 1: How Do I know If the Video Is Lagging
- Part 2: How to Fix Premiere Pro Playback Lagging Issue
Part 1: How Do I know If the Video Is Lagging
Sometimes, it’s obvious that Premiere Pro has dropped frames during playback because the footage is not smooth and because of how the playhead moves along the timeline. If the playhead makes small jumps or skips instead of gliding smoothly along the timeline, that could be a sign that some frames have been dropped.
Another way to tell if frames have been dropped is to activate the ‘SHOW DROPPED FRAME INDICATOR’ which can be found under program monitor settings (the wrench icon at the bottom right of playback screen). The indicator turns yellow when frames are dropped during playback.
Part 2: How to Fix Premiere Pro Playback Lagging Issue
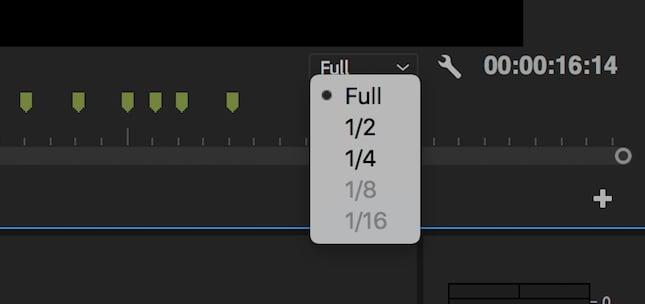
1. Change playback resolution
You can change the playback resolution for your video without altering its export resolution. This can reduce playback lag significantly. To make this change, click the playback resolution dropdown menu (the ‘full’ button) and select any of the 4 options to reduce the playback resolution to a fraction of the native resolution (1/2, 1/4, 1/6, or 1/8).
2. Remember to turn off quality playback
While high-quality playback is desirable as it lets you see your video in a resolution closest to how it will look when exported or uploaded to YouTube. This option can reduce the performance of Premiere Pro. Disabling the high-quality playback option is also another way to quickly resolve playback lag. Simply go to the program monitor settings and deselect the high-quality playback option.
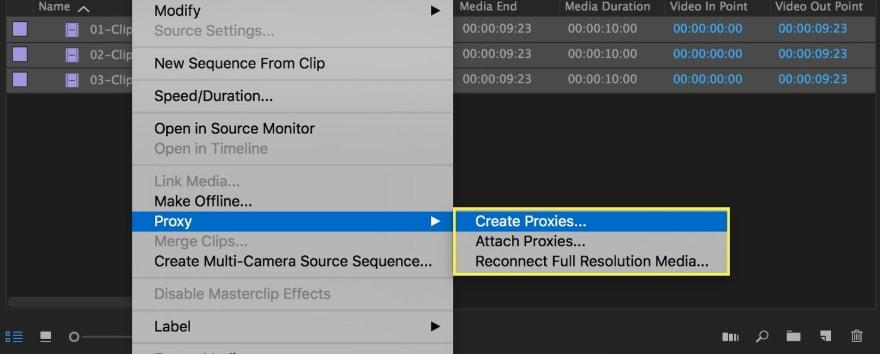
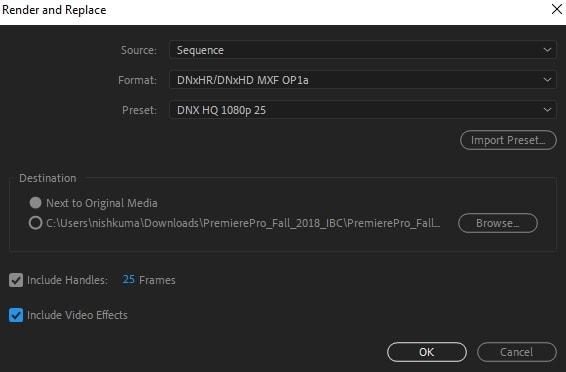
3. Use proxy videos in your workflow
Read more : Why Were The Deuterocanonical Books Removed
Proxy videos are lower-resolution copies of an original video and Premiere Pro supports proxy files. Working with a proxy can ensure you’ll experience no lags during playback. More information on using the proxy.
There are 2 ways to create a proxy video in Premiere Pro. The first is through the new project window. Go to the ‘ingest settings’ tab, tick the ‘ingest’ button and select ‘copy and create proxies’ from the dropdown menu beside the ingest button. The second is through the project menu. Simply highlight and right-click the projects you want to create proxies for and in the context menu, select ‘proxies’ and then ‘create proxies’.
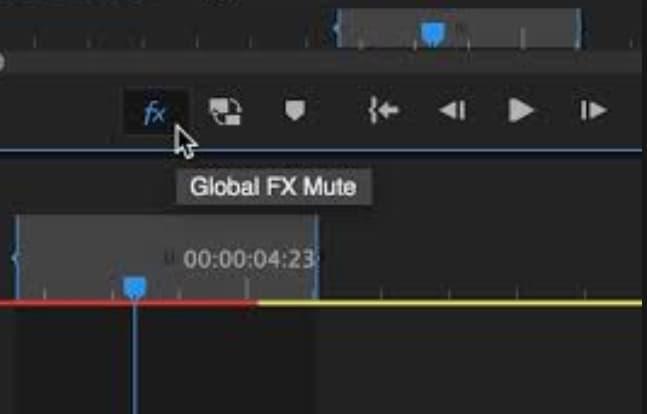
4. Mute FX
Visual and audio effects can increase the working size of a video file significantly. This is why turning off effects can improve playback quality and eliminate lag.
To turn off effects, click the ‘Global FX Mute’ button which should be one of the icons on the play toolbar below the playback screen. If the FX button isn’t in the toolbar, click the ‘+’ button at the lower right side of the screen and drag the FX button to the toolbar.
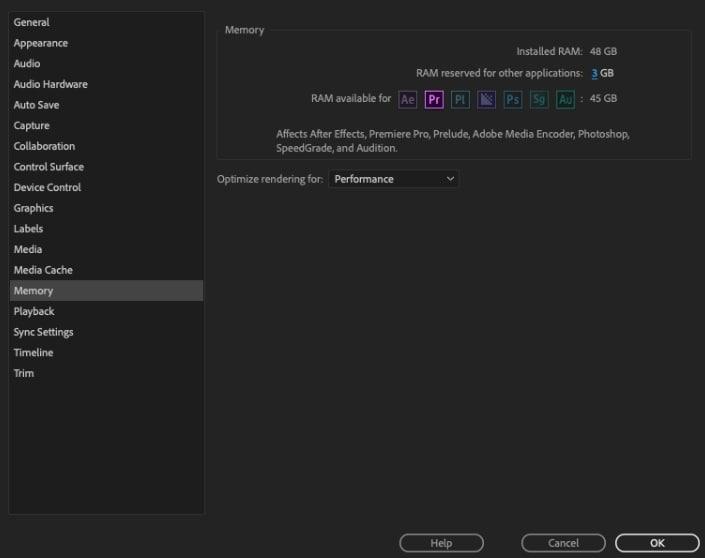
5. Increase memory allowance
Under the memory option within the preferences menu, you’ll find that a certain amount of RAM has been reserved for other applications. Unfortunately, the higher the reserved RAM, the lower the amount of RAM available for Premiere Pro. So, reducing the reserved RAM will increase the memory allowance for Premiere Pro and any other Adobe programs you may have installed. Also, you need to know the maximum memory storage in Premiere Pro.
To increase memory allowance, go to the memory option within the preferences menu and reduce RAM reserved for other apps to the lowest possible level.
6. Render preview videos
Read more : Why Do Female Dogs Cry When Mating
Premiere Pro color codes the video timeline to show when playback is real-time or not. The color green means that playback is real-time while yellow and red show that playback is not real-time. Choppiness and lag increase when playback is not real-time.
By rendering preview videos of all or parts of your footage, you can reduce playback lag. To render previews, start by setting in and out points for the preview video you want to create. Then, go to the sequence menu and select ‘render in to out’. When rendering is complete, the color of the timeline should change to green.
7. Optimize rendering for performance
Premiere Pro lets users optimize rendering for performance or memory. Optimizing for memory can be useful if you are experiencing memory errors. Otherwise, it is best to optimize rendering for performance. To do this, go to memory settings within the preferences menu, and select performance in the dropdown menu beside the ‘optimize rendering for’ option.
8. Close the lumetri scopes panel
The Lumetri Scopes Panel is one of many scopes available in Premiere Pro to support compliance with industry standards. If it is active during playback, the Lumetri panel actually analyses the color and lighting of the footage. This is not always needed and can increase the amount of work Premiere Pro has to do during playback, resulting in performance issues.
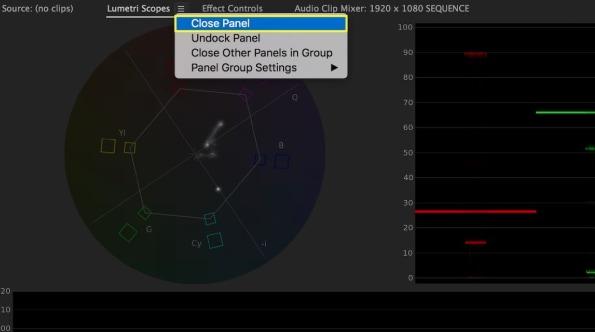
So, by closing the Lumetri panel, you can reduce playback lag. To close the panel, click the menu button beside the panel’s name and select ‘close panel’.
Conclusion
These are some ways to improve the performance of Premiere Pro and speed up your workflow by reducing playback lag. Note that sometimes, it may be more effective to apply a combination of these settings instead of just one.
Other things you can do to improve Premiere Pro’s performance include disabling the ‘automatically refresh growing files’ option under media preferences and applying effects to an empty timeline, so you can disable them easily during playback.
Source: https://t-tees.com
Category: WHY