
If your Keurig descale light won’t turn off, you may need to reset the unit. This process will turn off all of the functions on the machine, and then you can start over by following the steps in the manual.
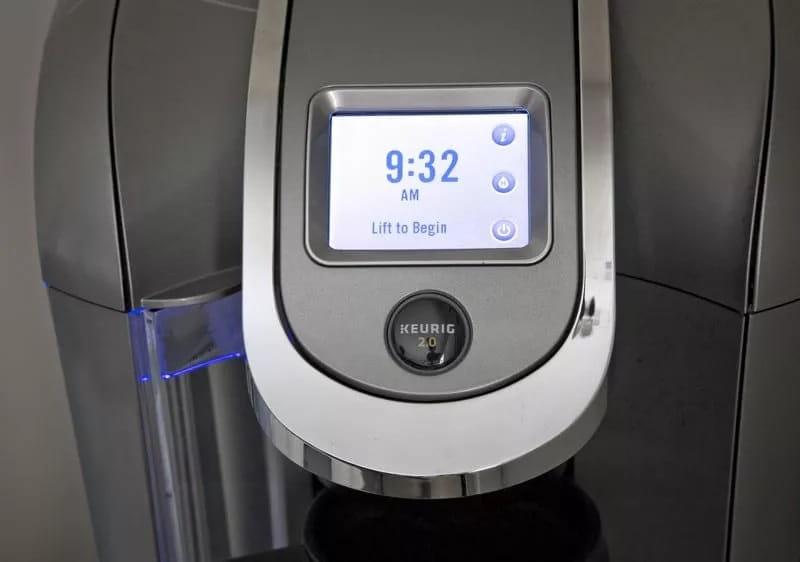
What is the Keurig descale light?
Regarding coffee makers, Keurig is one of the most popular brands. They make high-quality machines that make delicious cups of coffee every time. But with any machine, maintenance is necessary to keep it running at its best. The Keurig descale light is an important part of this maintenance process.
You are viewing: Why Is The Descaling Light Still On After Descaling
So, what is the Keurig descale light? It’s a warning light that indicates when it’s time to descale your coffee maker. Descaling is necessary to clean the machine and remove any mineral deposits and calcium that has built up over time. These deposits can affect the taste of your coffee and reduce the performance of your device.
The Keurig descale light will usually come on every three to six months. Depending on the model of your machine, you might also have regular descale reminders on your display. If you ignore this warning light, your machine may stop working or produce poor-tasting coffee.
Causes of the Keurig Descale Light Stays On
The Descale Light is Stuck On
The most common reason the descale light won’t turn off is that the descaling cycle isn’t complete. To finish the descaling cycle, you must run two full water tanks through the machine. Depending on the model of your Keurig, the descaling cycle can take anywhere from 15 minutes to an hour.
Your Keurig is Overdue for a Descaling
Descaling a Keurig coffee maker is essential for keeping it in good condition. If you haven’t descaled your Keurig in the last six months, then the descale light will likely not turn off until you do so. Over time, minerals and other contaminants can build up and cause your machine to perform less optimally.
The water reservoir is full.
When the Keurig descale light stays on, it is often because the water reservoir is full. This is because the descaling process requires water, and it is the water reservoir that contains the water. If the water reservoir is complete, then the descaling process won’t be able to start, and the light won’t turn off.
Incorrect Descaling Procedure
An incorrect descaling procedure is another common cause for the descale light staying on. Following the manufacturer’s instructions for running a complete brew cycle with a descaling solution is crucial. Failure to properly complete the descaling cycle can result in the descale light remaining on. Double-checking the steps and ensuring all necessary actions are taken will help ensure the descale light turns off as intended.
Malfunctioning Descale Sensor or Circuitry
In some cases, the descale light might not turn off due to a malfunctioning descale sensor or circuitry. This can occur if there is a fault in the internal components of the Keurig coffee maker. If the machine has been properly descaled and the descale light persists, resetting or troubleshooting the device might be necessary.
The descale light won’t turn off on a Keurig coffee maker can be frustrating. The good news is it is usually a simple fix. If you have tried to descale the machine and it still isn’t working, then it’s time to contact customer service.
How to Fix a Keurig Descale Light That Won’t Turn Off
Here’s how to fix a Keurig descale light that won’t turn off:
Basic Troubleshooting Steps
Restarting the Keurig machine
If the descale light on your Keurig machine won’t turn off, a simple solution to try is restarting the machine.
- Turn off the machine, unplug it from the power source, and wait for a few minutes.
- Then plug the Keurig back in, turn it on, and check if the descale light has turned off.
Checking for sensor blockages or malfunctions
Another possible reason for the descale light not turning off is sensor blockages or malfunctions.
- Carefully inspect the area around the sensor to ensure there are no coffee grounds, debris, or any other obstructions.
- If you find any, gently clean the sensor area using a soft cloth or a small brush.
Advanced troubleshooting steps
Solution: Deep cleaning the machine
If restarting the Keurig and checking for sensor blockages does not resolve the issue, deep cleaning of the machine may be necessary. Deep cleaning your Keurig machine is essential for maintaining its efficiency and prolonging its lifespan. Over time, mineral deposits, coffee oils, and other impurities can accumulate inside the machine, affecting the taste and quality of your brewed coffee.
Additionally, a clean machine prevents clogs, blockages, and malfunctions, reducing the chances of encountering issues like the descale light not turning off.
Steps to perform a deep clean:
- Start by disassembling the removable parts of the Keurig, such as the drip tray, K-cup holder, and water reservoir.
- Wash these parts with warm, soapy water, ensuring all the soap is rinsed off thoroughly.
- Use a non-abrasive cloth to clean the water reservoir and lid.
- Pay attention to any hard-to-reach areas or small crevices, and use a brush or cotton swab if needed.
- Once all the parts are clean, reassemble them carefully and ensure they are properly aligned.
- Fill the water reservoir with a vinegar-water solution (equal parts vinegar and water) or a Keurig-approved descaling solution.
- Run a brewing cycle without a K-cup, allowing the solution to pass through the machine.
- Repeat the brewing cycle a few more times with clean water to remove any residual solution.
Resetting the machine
The first step to reset your Keurig coffee machine’s descale is to ensure that the machine is powered up. Once it is powered up, you will need to press and hold both the 8 oz and 10 oz cup buttons simultaneously for a duration of 5 seconds – this will reset the machine. This can help resolve software-related issues and bring the machine back to its default settings.
Read more : Why Did Joel Go To Jail Mrs Maisel
Performing a manual descaling
If the descale light persists, it might indicate a buildup of mineral deposits in the machine. Follow the manufacturer’s instructions for manual descaling, which typically involves using a descaling solution or a mixture of vinegar and water. This process helps to remove any mineral buildup that might be affecting the machine’s performance.
Contacting Customer Support
If all else fails, the author recommends contacting Keurig’s customer support. They can provide additional troubleshooting assistance or guide you through any specific instructions tailored to your model. Their expertise may help you resolve the issue and turn off the descale light.
Descaling your Keurig machine is important to keep it in optimum condition and make delicious coffee. If your Keurig descale light doesn’t turn off, follow these steps to fix it quickly and easily.
How to Descale Keurig Traditional Brewer?
Step 1:
Press the power button to deactivate the brewer.
Pour the bottle of Keurig® Descaling Solution into the water chamber. Then, fill up the bottle with water and add it to the water chamber.
Turn on the brewer again by pressing the power button.
Perform a cleaning cycle: Place a large ceramic cup on the drip tray, raise and lower the handle of the brewer, and choose the largest brewing size. Push the BREW button (if needed). Discard the contents of the mug into the sink.
Step 2:
Repeat the rinsing process until the indicator light turns on. Let the machine stay in place for 30 minutes. Afterward, clean any remaining liquid and rinse the water container completely.
Fill the reservoir with clean water up to the highest line indicated.
Put the big ceramic cup onto the drip tray and execute a rinsing brew with the maximum selection. Do not use a K-Cup® pod. Pour out whatever is in the mug into the sink.
Using the greatest size, do at least 12 cleansing brews. You may need to refill the water tank.
How to descale Keurig K-Duo™ Series?
To descale Keurig K-Duo, please do the following 3 steps:
Step 1:
Switch off the brewer. Insert the bottle containing Keurig® Descaling Solution into the water reservoir and fill it with water. Do not place any K-Cup® Pods or ground coffee in the reservoir. Put a large cup on the tray underneath and press the OZ/POD button to activate the single cup side. Press 12 to initiate a rinse brew cycle and pour the hot liquid into a sink.
Place the carafe on the hot plate and press the CUPS/CARAFE button to activate it. Press the 12 button to initiate a carafe rinse cycle. When done, pour out the hot liquid into the sink. To deactivate the heating plate, press and hold down the CUPS/CARAFE button.
Step 2:
Allow the brewer to rest for a minimum of 30 minutes. Subsequently, empty any remaining solution from the water tank and rinse well after 20 minutes.
Step 3:
Pour water into the reservoir until it reaches the MAX fill line. Place the carafe onto the hot plate. Press and hold the CUPS/CARAFE button to activate the carafe side, then press 12 to start a freshwater brew.
Once the brew is complete, press and hold the CUPS/CARAFE button to shut off the heating plate and discard the liquid into the sink.
Do the 12-cup carafe rinse again 3 times, making four brews.
Read more : Why Do Men Dress In Drag
Top up the reservoir and put a cup on the drip tray. Push OZ/POD to switch on the single-serve side, then press 12 for a solitary cup of water brew.
Do this 12oz brewing procedure three more times for four brews.
How to Descale Keurig K-Slim® Series
Step 1:
To start Descaling Mode, press and hold down the 8oz and 12oz buttons simultaneously for 3 seconds until the DESCALE indicator illuminates steadily. Empty the bottle of Keurig® Descale Solution into the water tank. Refill the bottle with water and pour it into the reservoir. Don’t insert a K-Cup® capsule. Put a large cup on the drip tray.
Press the brew button to initiate a purifying rinse once the brew button starts to flash. Keep repeating the cleansing rinse until the ADD WATER light is lit up. Discard the hot liquid into the basin.
Step 2:
Empty the water tank and clean it thoroughly. Fill up to the maximum line with new water. Push the brew button when it starts blinking. Keep repeating until you see the “ADD WATER” indicator light up. The brewer will then leave Descale Mode and be ready for use.
How To Descale Keurig 2.0?
Step 1:
To start, the user can fill the water reservoir with either 16 ounces of white vinegar or Keurig Descaling Solution, followed by an equal amount of water. Then, the user can press the “brew” button once to start the cleaning cycle.
Step 2:
After the cycle is complete, the user should run several cycles of clean water through the machine to ensure all the vinegar or solution is flushed out. Keurig recommends descaling your brewer at least every 3 to 6 months, depending on your water source. And if you have run out of Keurig descaling solution, simply use distilled white vinegar or bicarbonate.
See more:
- How To Descale Keurig Supreme
- How To Use Reusable K Cup
- Do K cups expire
Hacks for Getting your Keurig to Descale Light to Turn Off
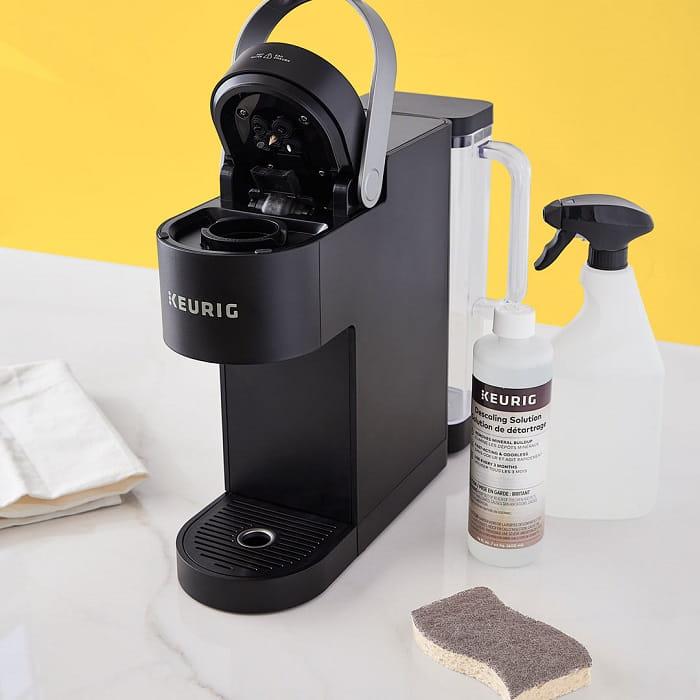
Keurig Descaling Solution
If you have a Keurig descaling solution on hand, follow these steps:
- Empty the water reservoir of the Keurig machine.
- Pour the entire bottle of Keurig descaling solution into the reservoir.
- Fill the empty bottle with water and pour it into the reservoir as well.
- Place a large mug or container on the drip tray to catch the liquid.
- Start the brewing cycle without inserting a K-Cup® pod.
- Allow the machine to brew the solution until the reservoir is empty, discarding the liquid in the mug or container.
- Repeat the process if necessary, especially if your machine is heavily scaled.
- Rinse the reservoir thoroughly with clean water.
- Fill the reservoir with clean water and run a brew cycle without a K-Cup® pod to rinse any remaining descaling solution from the machine.
- Repeat the rinse cycle at least one more time.
- Finally, wipe the exterior of the machine with a clean, damp cloth.
Note: Depending on how dirty your Keurig machine is, you may need to run this cycle multiple times until the water comes through clear.
White Vinegar as an Alternative
If you don’t have Keurig descaling solution, white vinegar can also be used effectively:
- Empty the water reservoir of the Keurig machine.
- Fill the reservoir halfway with white vinegar.
- Add water until the reservoir is almost full. Avoid filling it to the top to prevent a vinegar taste in your coffee.
- Place a large mug or container on the drip tray.
- Start the brewing cycle without inserting a K-Cup® pod.
- Allow the machine to brew until the reservoir is almost empty, discarding the liquid in the mug or container.
- Repeat the process as necessary, depending on the level of scaling.
- Rinse the reservoir thoroughly with clean water.
- Fill the reservoir with clean water and run a brew cycle without a K-Cup® pod to rinse any remaining vinegar from the machine.
- Repeat the rinse cycle at least one more time.
- Finally, wipe the exterior of the Keurig machine with a clean, damp cloth.
Note: Using vinegar to descale a Keurig is effective due to its acidic properties, which help cut through calcium build-up and eliminate bacteria lingering inside the pipes.
Other Common Keurig Issues and Resolutions
In this section, we will discuss a few other common issues that Keurig users may encounter and provide possible solutions to resolve them.
Keurig Won’t Brew or Dispense Water
If your Keurig machine is not brewing or dispensing water, try the following steps:
- Ensure the brewer is powered off but still plugged in.
- Lower the Cold Water Reservoir Lid to make sure it is properly closed.
- Press and hold down the BREW Button for a few seconds and then release. Occasionally, this can reset the machine and solve the issue.
- If the problem persists, you can try a thorough cleaning of the Keurig. Use a descaling solution or vinegar to remove any mineral buildup that might be causing the blockage. Refer to the manufacturer’s manual for detailed cleaning instructions.
- If none of the above steps work, the machine might have a more serious issue, such as a failing heating element or control board. In such cases, seeking professional assistance or contacting Keurig customer support is recommended.
Keurig Brewing Weak or Partial Cups
If your Keurig is brewing weak or partial cups of coffee, consider the following solutions:
- Check the water level in the Cold Water Reservoir. If it’s too low, the brewing process may not be able to extract enough flavor from the coffee pod. Fill the reservoir with fresh water and try brewing again.
- Check the puncture needle. Over time, coffee grounds can accumulate and clog the needle, reducing the flow of water. Clean the needle using a paper clip or a needle-cleaning tool provided by Keurig.
- Ensure you are using the correct brew size. Some Keurig models allow you to adjust the brewing size. Check the settings and make sure it is set to your desired cup size.
- If the issue persists, try using a different coffee pod. Sometimes, certain pods may be defective or not compatible with your machine. Experiment with different brands or varieties to see if it make a difference.
Preventing the Issue From Occurring
Regular Maintenance Tips
- How often to descale: It is important to descale your Keurig machine regularly to ensure its proper functioning and prevent issues like the Descale Light from sticking. Your maintenance routine should include descaling approximately once a month if you live in a hard water area, while those in soft water areas may be able to perform a full descale 4 times a year at a minimum. This frequency helps keep clean water flowing through your machine and avoids the accumulation of mineral deposits.
- Cleaning and maintenance routines: Along with descaling, performing regular cleaning and maintenance routines for your Keurig machine is essential. This includes emptying and rinsing the water reservoir, cleaning the brewer’s internal components, and wiping down the exterior to prevent any build-up of residue or dust.
Importance of Using Filtered Water
In the context of preventing the Descale Light issue, using filtered water becomes crucial. Filtered water is considered the purest water available, especially through a reliable system like reverse osmosis (RO). Using filtered water reduces the chances of mineral deposits and scaling occurring in your Keurig machine.
This helps prevent the Descale Light from staying on and ensures your equipment’s overall health and longevity. Additionally, filtered water improves the taste of your brewed beverages, removing impurities and enhancing the flavor profile.
Conclusion
Descaling the machine is an important part of the maintenance process, so it’s important to ensure you follow the manual’s instructions. The process typically involves running a cleaning solution through the machine and flushing it out. This helps remove any mineral deposits clogging up the water line and causing the machine to malfunction.
If the descale light is still on after descaling the machine, you may need to check for more serious issues. It’s possible that the descaling process wasn’t done the first time correctly or that there is a more serious issue with the machine. If this is the case, it’s best to contact a professional.
We hope this blog helped you understand why the Keurig descale light won’t turn off and what to do if it happens. If you’re still having trouble with your Keurig machine, contacting a professional is always best.
Source: https://t-tees.com
Category: WHY